Petty Cash Format in Excel

Excel from Microsoft is a really strong program. With the help of Excel's features and tools, we can perform a wide range of functions on our datasets. To develop formulas, we can utilise a variety of Excel's built-in default functions. Excel files are widely used by businesses and educational institutions to hold important data. Almost all commercial organisations use Excel worksheets to store their financial transaction records. However, producing the template with the necessary formats can be challenging for someone unfamiliar with Excel.

This tutorial will take you through creating an Excel Petty Cash Book Format step-by-step.

How Do Petty Cash Books Work?

Little in value is referred to as petty. Large organisations use cash books to track their receipts and outlays. Cheques are used for most large transactions. All cash payments are required for certain incidentals, though. Cheques should not be used to pay for small sums. Cash book tracking is another requirement for those transactions. It takes time and work to register them into the main cash book. In this situation, the book of petty cash proves useful. This petty cash book is a useful tool for keeping track of tiny, regular payments.

The Simplest Ways to Create an Excel the Petty Cash Book Format

We will develop an Excel worksheet with an analytic petty cash book structure in this tutorial. We'll generate an Excel template for this purpose. If we want to keep track of the amounts received and paid, we can make a basic petty cash book. We can also construct an analytical cash book to further detail the expenses. For this reason, carefully follow the procedures listed below to complete the procedure.

Step 1: Develop the Petty Cash Book

  • For our cash book, we must first input the necessary headings.
  • The petty cashier will be given a starting amount to spend on little expenses, which will be entered into the Received Amount column .
  • Next, we have the Date and Type .
  • The TypeType concerns the three payment types: miscellaneous, postal, and Cartage. Moreover, they are column headings.
  • The Total Payment for the specified date is the next header.
  • You can make additional required headers in this manner.
Petty Cash Format in Excel

Step 2: Enter the Received Amount and Date

  • We will now enter the received money and the corresponding date.
  • View the image below for a clear understanding.
Petty Cash Format in Excel

Note: Observe that the Excel spreadsheet displays the Date format and the Accounting number format in the Received Amount column.

Step 3: Fill Up Type

These expenses come in three different forms. To avoid you having to type, we'll provide a drop-down list in the Group area from where you can select. To complete the work, adhere to the steps listed below.

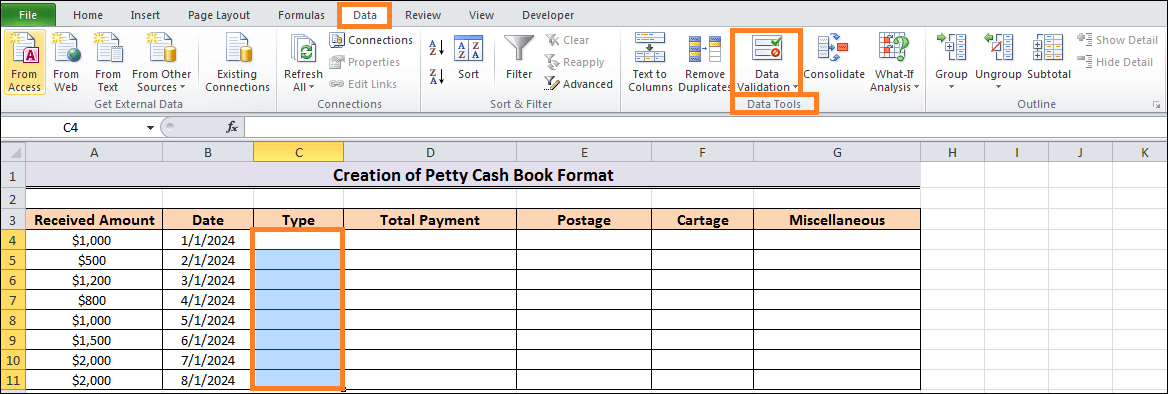
  • Choose the range C4:C11 first .
  • Next, select Data > Data Validation under Data Tools
    Petty Cash Format in Excel
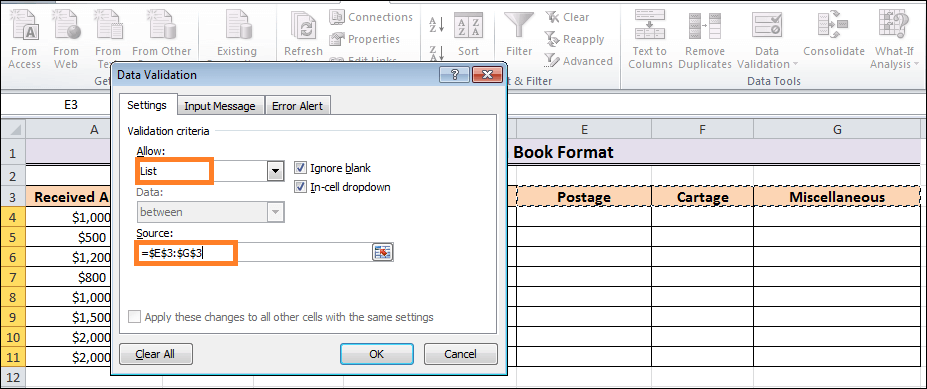
  • The Data Validation dialogue box will then appear.
  • Select Allow > List there .
  • Next, choose the range E3:G3 in Source.
  • Click "OK."
    Petty Cash Format in Excel
  • Data validation list of the book of petty cash
  • Therefore, every cell within the entire Type column will have a drop-down icon next to it.
  • You can select your preferred TypeType by clicking on it.
  • For a better understanding, take a look at the accompanying figure.
    Petty Cash Format in Excel

Step 4: Enter the Total Payment

  • We will need to manually enter the entire payment amount in this step.
  • Please look at the dataset below, for example, where our payments are.
    Petty Cash Format in Excel

Step 5: Formula Creation for Postage

  • Click on cell E4 first .
  • Type the following formula after that:
=IF(C4=$E$3,D4,"-")
  • After that, click Enter to activate AutoFill .
  • The E3 and C4 cell values are compared using the IF function to see if they are the same.
  • In this manner, this column will automatically contain the entire payment amount of D4 for the postal group.
  • If not, the cell will remain empty.
    Petty Cash Format in Excel

Step 6: Use the Formula to Determine Cartage

  • First, select cell F4 .
  • Enter this formula in:
=IF(C4=$F$3,D4,"-")
  • Press Enter after that.
  • Consequently, finish the series using AutoFill .
  • Consequently, it will return the cartage payment amounts.
    Petty Cash Format in Excel

Step 7: Create the Miscellaneous Formula

  • To insert the formula, enter the following one in cell G4 .
=IF(C4=$G$3,D4,"-")
  • To obtain different results, hit Enter and activate AutoFill .
  • You will, therefore, receive expenses for others.
    Petty Cash Format in Excel

Step8: Calculate Total

  • Using the Ctrl key, simultaneously select cell A12 & the range D12:G12 .
  • Then, add up the received amounts, total payments, postal, carton, and miscellaneous costs using Excel's AutoSum tool .
  • Look at the image below to view the outcome.
    Petty Cash Format in Excel

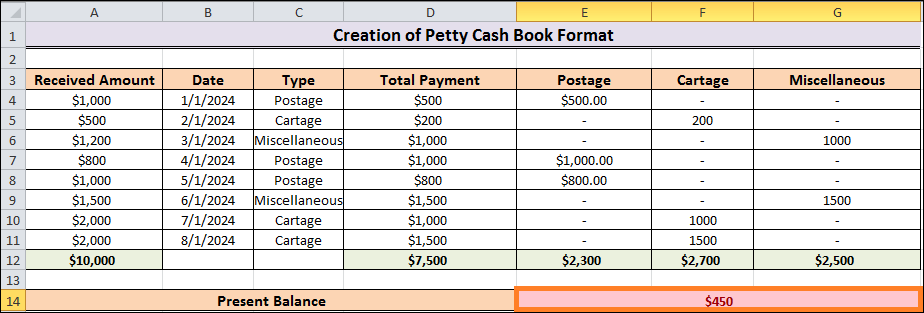
Step 9: Calculate Current Balance

  • We must, therefore, ascertain the balance.
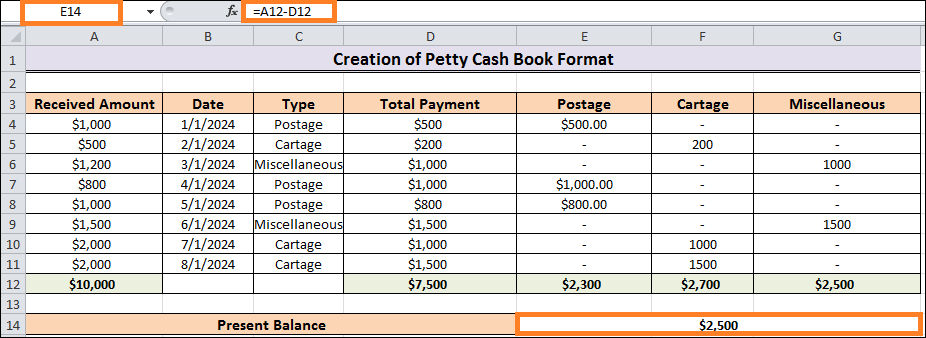
  • To do that, choose cell E14 .
  • Put this formula in:
=A12-D12
  • Press Enter .
  • You will thus receive the present balance.
    Petty Cash Format in Excel

Step 10: Use Conditional Formatting

Additionally, drawing attention to the net balance makes sense if we're about to run low. It will notify us so we can take the appropriate action. In this step, if the net balance is less than $500, we will fill it in red. Take note of the subsequent procedure.

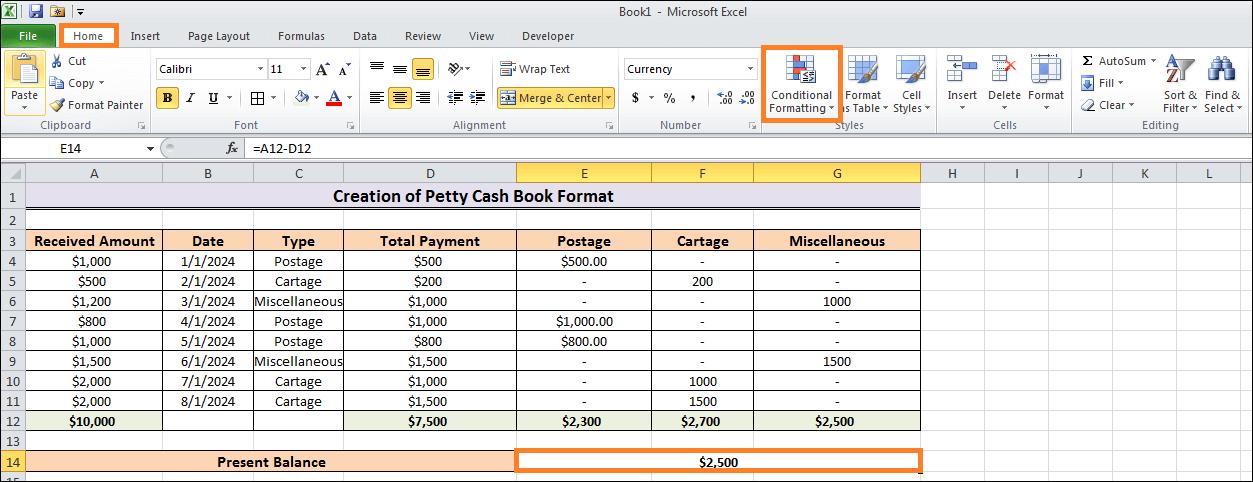
  • Choose cell E14 first .
  • Next, select Home > Conditional Formatting > Highlight Cells Rules > Less than.
    Petty Cash Format in Excel
  • Enter 500 and select Light Red. Fill it with dark red text or an alternative option from the pop-out dialogue box that suits your taste.
  • Thus, click OK .
    Petty Cash Format in Excel
  • As a result, as seen below, the balance will be filled with red whenever it drops below $500.
  • The Excel demonstration of the petty cash book format has become complete.
    Petty Cash Format in Excel


Latest Courses