Spell Check in Excel

MS Excel is one of the most powerful programs that help us record data within the rows and columns in spreadsheets. It allows us to store vast amounts amount of data and perform different data-centric operations on it.

Since we typically enter the data with the help of a keyboard, there are chances that we mistype some spellings. For this, Excel provides us a built-in tool to find and correct the wrong or mistyped spellings with ease. The tool is usually known as the 'Spell Check' and 'Spell Checker'. However, the Spell Check tool in Excel is not as powerful as Word Spell Check as it does not check grammatical errors or check spellings as soon as we start typing. In excel, we must check and correct spellings manually.
Spell Check in Excel

In this article, we are discussing the detailed introduction of Spell Check in Excel. The article also discusses the steps to help us understand how we can spell check within the Excel worksheet and increase the overall productivity, making our work effective.

What is a Spell Check?

Spell check is a software tool that helps us find the wrong spelling of words and correct them. The tool is typically helpful for various word processing programs, emails, data entries, cell phone messaging, blog posting, and more. A good spell-check tool automatically finds the misspelled words within the entire document and gives us relevant suggestions to correct them. Some tools even automatically correct the misspelled words.

The spell-check tools can be built-in with the specific programs as well as come in as standalone software. However, the most common thing is that they all usually underline the errors with red color. Furthermore, a menu with correctly spelled suggestions is also displayed, enabling us to choose the correct spelling or ignore it.

Where do we find Spell Check in Excel?

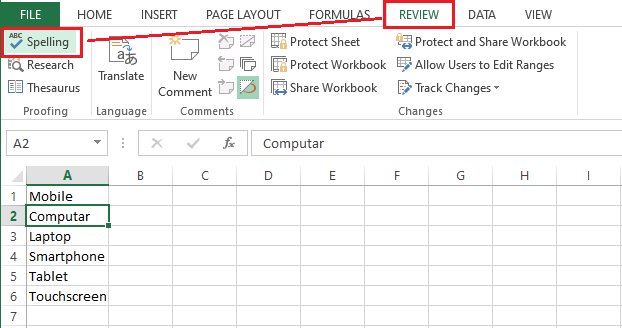
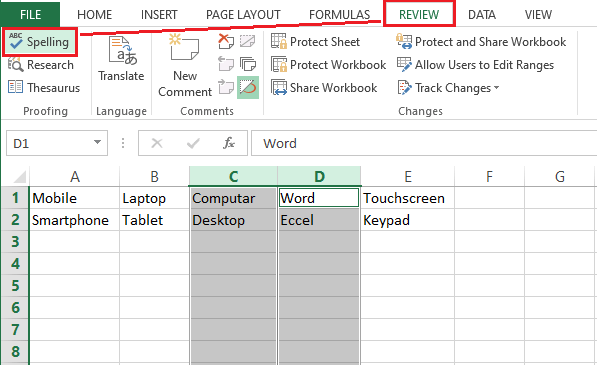
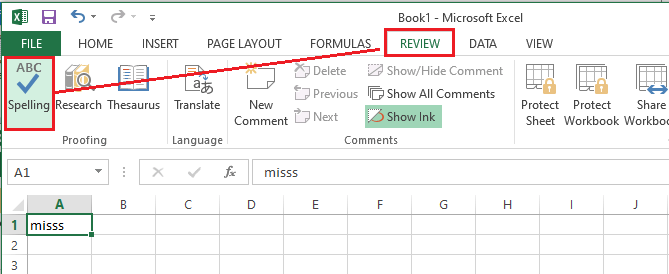
In Excel, the spell-check tool is located under the 'Review' tab in the ribbon. It is identified by the text 'Spelling' associated with the tile that has 'ABC' written on it. It looks like the following image:
Spell Check in Excel

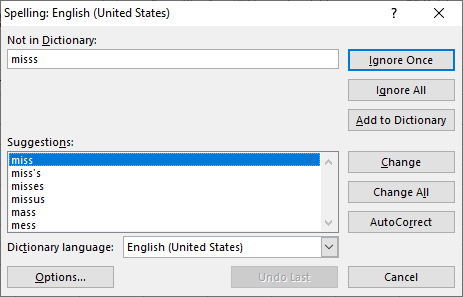
Every time we click on the spell-check tool from under the Review tab, it launches the 'Spell Check Dialogue Box', as shown below:
Spell Check in Excel

Note: Although we can perform a spell check in Excel in different ways, the easiest one is to use a shortcut key. Excel allows to immediately perform spell check within the entire sheet by pressing the function key 'F7' on the keyboard. However, it must be noted that we may first need to activate the function keys by pressing the 'Fn' button on the keyboard.

How does Spell Check work?

We must understand the process of how the spell-check tool works in Excel. Suppose we select cell A1 and run the spell check within the entire sheet. The tool will analyze cell A1 and then the others cells in the first row. After that, it will move onto the second row and check all the cells from left to right, then the third row, and so on. If the tool finds any spelling error in any of the cells, it displays the Spell Check dialogue box with various options.

Apart from this, if we select the cell somewhere else within the sheet and run the spell-check tool, the tool starts checking for errors from that particular point. For example, if we select cell B2 and run spell check, it will go through all the cells in the second row from the B2 cell and then the other rows. Every time we start from a cell somewhere else in the sheet, it asks us whether we want to continue checking for spelling mistakes at the beginning of the sheet after checking the rest of the cells after selection.

Understanding the Spell Check Dialogue Box Interface

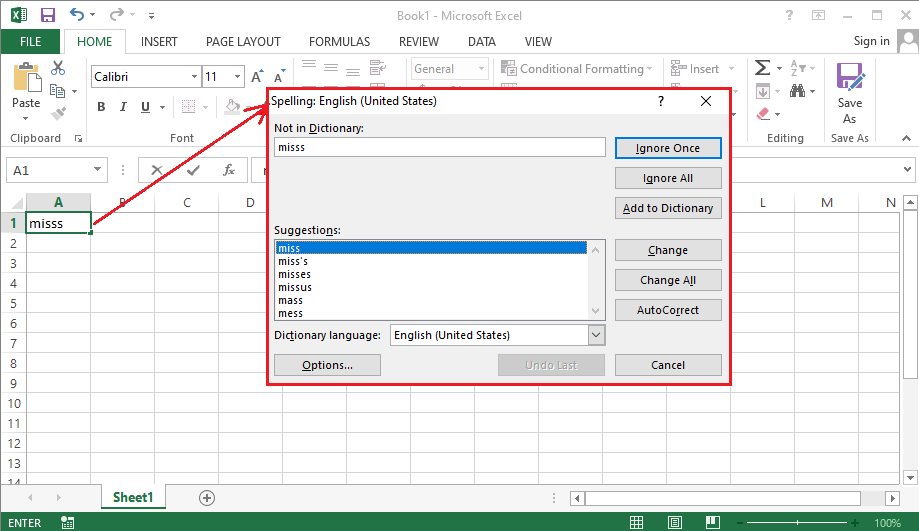
When we run spell check in Excel, it displays a Spell Check dialogue window with some options. The spell check dialogue window typically looks like this:
Spell Check in Excel

In the above image, we have the following options:

  • Ignore Once: Suppose Excel finds and flags a particular word as an error, and the word is repeated multiple times within the sheet. However, we want to keep it as it is for the selected cell and move the cursor to the next cell of the corresponding word; we must click the 'Ignore Once' button. This way, we can go through all the occurrences of the mistyped word and decide to change it or not using the suggestions.
  • Ignore All: If Excel finds and flags a particular word as an error and the word is repeated multiple times within the sheet, but we want to keep all these occurrences the same (as they are), we must click on the 'Ignore All' button.
  • Add to Dictionary: When Excel displays some words as errors and flags them under incorrect words even though they seem correct to us, we can use the 'Add to Dictionary' button to save that particular word as a correct one. That way, Excel does not flag those words again and accepts them like other correct words. Generally, we use the 'Add to Dictionary' button for certain names or abbreviations that we create and use on our own.
  • Suggestions: Whenever Excel finds incorrect or wrong spellings, it lists some relevant words as alternatives under the suggestions. We can pick any of desired words from the list.
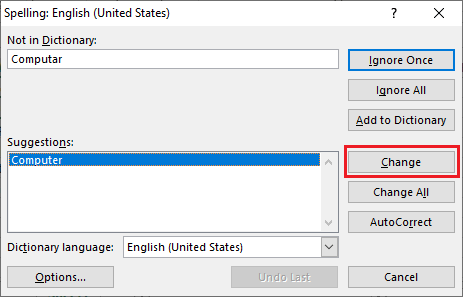
  • Change: When we pick up any suggestion from the list, we need to decide if we want to change it only for the selected cell or within the entire sheet. If we want to use the suggestion only for the selected or highlighted cell, we must click the 'Change' button.
  • Change All: When we have occurrences of any wrong/ misspelled word within the sheet, and we want to change all of them at once, we must click the 'Change All' button after selecting the correct word from under the suggestions. This will apply the corresponding suggestion within the entire worksheet.
  • AutoCorrect: Excel AutoCorrect option helps correct the spellings automatically after we save a specific word once. If we pick up the appropriate suggestion from the suggestions list and then click the 'AutoCorrect' button, Excel will add the corresponding word in the AutoCorrect list. That means, whenever we mistype the same word again, Excel will automatically correct it with the suggestion we selected earlier.
  • Dictionary Language: We can select the dictionary language from the drop-down list next to the dictionary language.

Adjusting Spell Check Settings

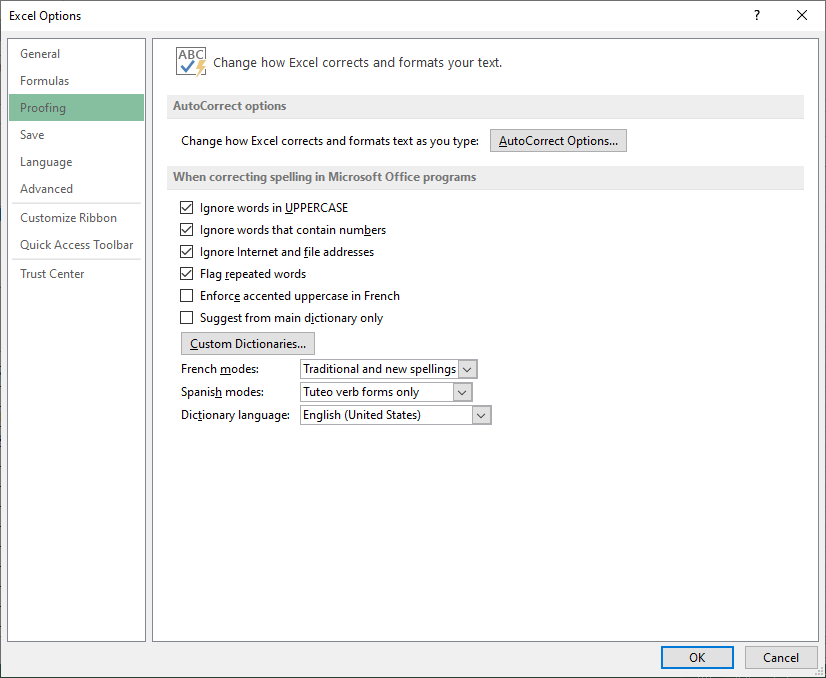
Excel spell-check tool has some default configurations or options that help control how Excel connects and formats our data. We can change these default settings by clicking on the 'Options' button in the Spell Check Dialogue box. It will open the Options dialogue box to help us make the necessary changes in spell check by navigating to the Proofing menu.
Spell Check in Excel

The following are some default presents for spell check in Excel:

  • Excel spell check ignores all such words that are written in upper case. That means, if we have misspelled the word in upper case, it will not be checked. For example, the word 'HELLOOO' will not be flagged as a misspelled word.
  • Excel spell check ignores checking words that include numbers. For example, if we type the word 'Helloo123', it will not be flagged as a misspelled word.
  • Excel spell check ignores internet URLs and file addresses.
  • Excel spell check does not ignore repeated words. For example- Hello Hello, how are you? Since the word 'Hello' is repeated here, so it (the extra word) will be flagged as an error.

Steps to Spell Check Individual Cells and Ranges in Excel

Sometimes, we may have some names or acronyms within the cells that may not be needed to check for spelling errors. However, we may need to spell check for the remaining individual cell or the multiple cells in a range.

For Individual Cells

If we have doubts regarding spelling mistakes in a single cell, we can perform a spell check only for a corresponding cell.

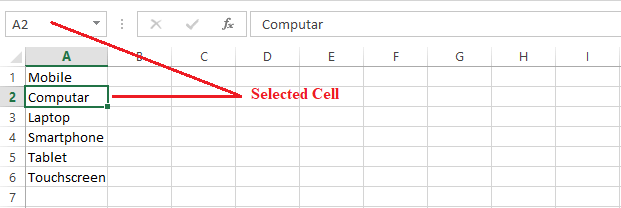
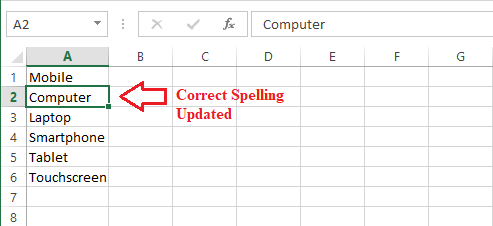
Suppose we have the following data set where we have some doubts regarding the spelling written in cell A2.

Spell Check in Excel

We need to follow the steps discussed below to spell check in any cell within the sheet:

  • First, we need to select cell
    Spell Check in Excel
  • After that, we must navigate to the Review tab and select the Spelling
    Spell Check in Excel
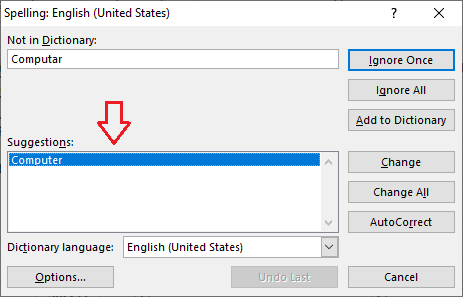
  • Since we have the misspelled spelling in cell A2, Excel will display some relevant suggestions within the Spell Check dialogue box.
    Spell Check in Excel
    Besides, if Excel does not find spelling mistakes, it will not launch the dialogue box. Instead, it will only inform that there are no spelling errors.
  • We need to choose an appropriate word from the list of suggestions and then click on the Change However, we can also use the other options from the dialogue box accordingly.
    Spell Check in Excel
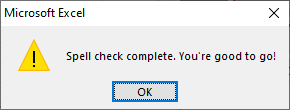
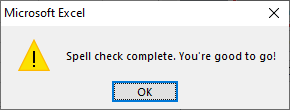
  • After completing the previous step, Excel will update the respective word and display a pop-up window with a message saying the 'Spell Check Complete'.
    Spell Check in Excel
    We will get the following result after we are done with the spell check process:
    Spell Check in Excel

For Ranges

If we have doubts regarding spelling mistakes in multiple cells, we can perform a spell check for multiple cells.

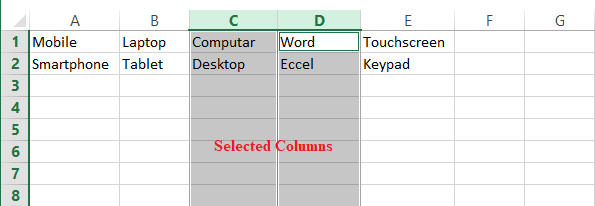
Suppose we have the following data set where we have some doubts regarding the spellings in columns C and D.

Spell Check in Excel

We need to follow the steps discussed below to spell check multiple cells in a range within the sheet:

  • First, we need to select the desired cells. We can select two or more cells, rows, columns, custom range, or the entire sheet. In our case, we select the entre columns C and D.
    Spell Check in Excel
  • After selecting the desired cells, we need to go to the Review tab and then select Spellings.
    Spell Check in Excel
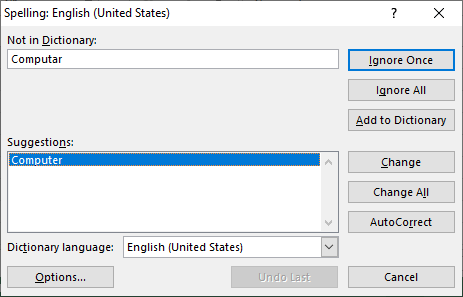
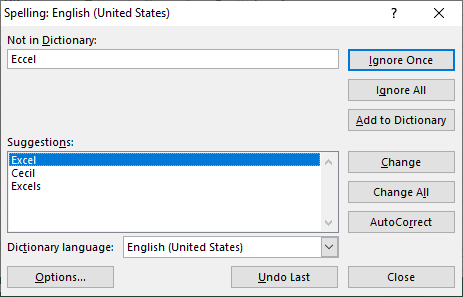
  • After that, Excel will display all the misspelled words within the selected range. Furthermore, it will launch a spell check dialogue box for each misspelled word with the relevant suggestions.
    Since we have two wrong spellings, we get the following two windows:
    Spell Check in Excel
    Spell Check in Excel
    We must select the right suggestion for each misspelled word and click on the Change button until the Excel displays the 'Spell Check Complete' pop-up.
    Spell Check in Excel
    We will get the following result after we are done with the spell check process:
    Spell Check in Excel

Steps to Spell Check Selected Sheets in Excel

If we have data in multiple sheets within the workbook and we want to perform a spell check in some individual sheets only, we need to follow the below steps:

  • First, we need to navigate the sheet tab and select the sheets we want to perform spell check. To select the sheets, we must press & hold the Ctrl button and click the desired sheets using the mouse button.
    Spell Check in Excel
  • After the desired sheets are selected, we need to either go to the Review > Spellings or press the shortcut key F7. This way, Excel will spell check in all the selected worksheets and display us misspelled words with suggestions.
    Once the spell check is completed, we need to right-click on the sheet tab and select the 'Ungroup Sheets' option to ungroup the sheets.

Steps to Spell Check Entire Workbook in Excel

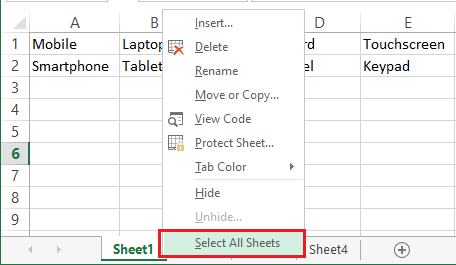
Excel also allows us to check spelling mistakes within the entire workbook/ spreadsheet at once. This will cover all the sheets of the active workbook. For this, we need to follow the below steps:

  • First, we need to navigate the current workbook's sheet tab and right-click using the mouse. Next, we must click the option 'Select All Sheets'. This way, we select all the sheets of an active workbook.
    Spell Check in Excel
  • After all the sheets are selected, we must either navigate to the Review > Spellings or press the shortcut key F7 on the keyboard. By doing this, Excel will spell check in an entire workbook and display us misspelled words with suggestions.
    We can perform the desired action using the options given in the spell check dialogue box.

That is how we can use the spell-check tool in Excel.


Latest Courses