How to delete blank rows in Excel?Often, you have seen unnecessary blank rows between the data in Excel file. Due to which data is scattered and unmanaged. These blank rows can be annoying and might break the concentration of the users while analyzing the data. These blank rows can be in the beginning, last, or between the other data row. There are a lot of ways in Excel to delete these blank rows from your data. In this chapter, you will learn how to delete blank rows or the rows that contain blank cells. See the different methods for deleting the blank rows. What we are going to discuss?In this chapter, we will discuss various methods for deleting the blank rows in an Excel sheet, such as -
The following topics will cover different techniques to delete the blank rows. Delete a single blank row manuallyWe will first show you how one can delete a single blank row or any row. It is an easier method to delete any row in an Excel worksheet. But it is not good when you want to delete multiple blank rows in a large dataset of a worksheet. "Using this method, you can delete blank rows as well as rows with data." For now, follow the steps below for single row deletion - Select a row by clicking on the targeted row number on the left side of the Excel screen. For example, row number 5. 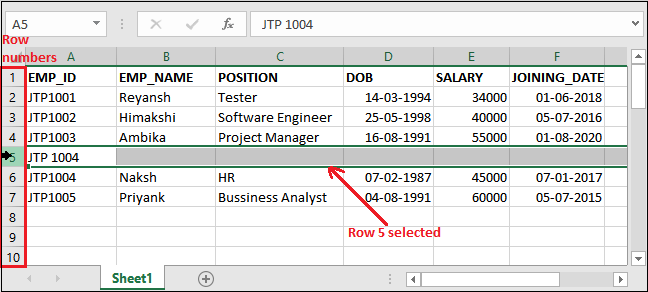
Right-click on the selected row and then choose Delete from the list. 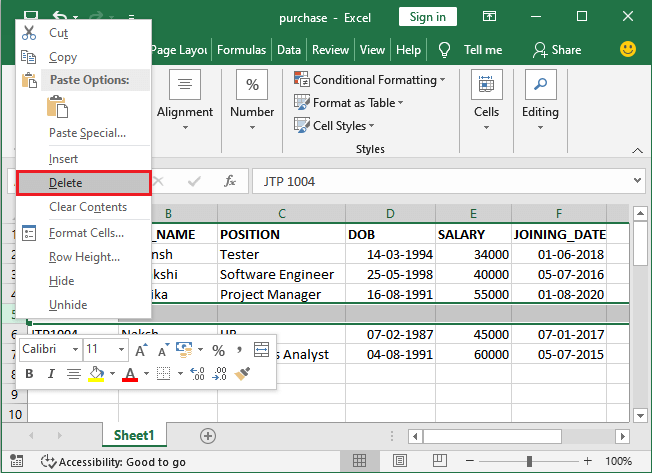
Your selected row has been disappeared and the 6th row has been shifted to there. It means that the 5th row has been deleted successfully. 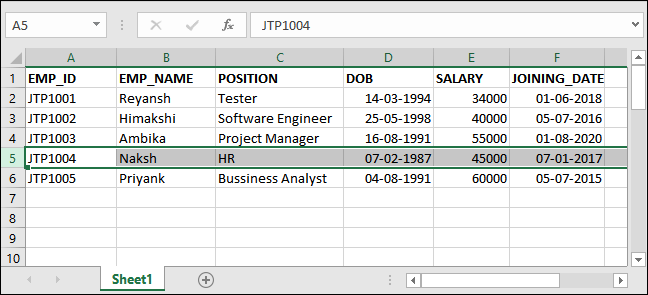
Remember that - this method more helpful when you want to delete a particular row, not multiple rows. Delete blank rows using Go To Special methodUsing this method, you can delete all the blank rows between the data as well as the rows that even contain blank cells. This method deletes the entire row if it finds only a single blank cell. Hence, use this method only for simple Excel tables whose dozens of rows fit within a single screen. See the following steps below: Step 1: Open the Excel sheet. We have the following dataset, which has some blank rows and cells. 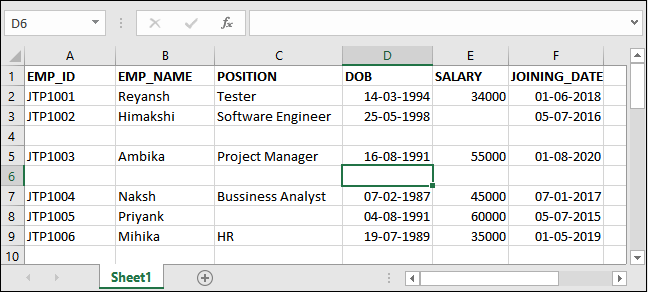
Step 2: Press the Ctrl+G shortcut command to open the Go To dialogue box. 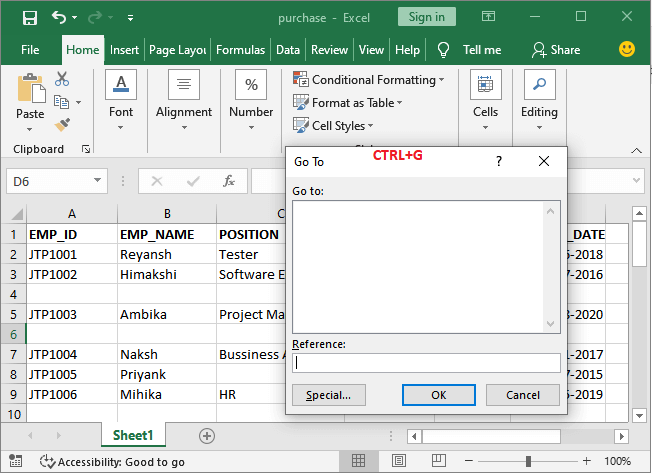
Step 3: Here, click on the Special button below to open the Go To Special. 
Step 4: A Go To Special panel will open as showing in the below screenshot. Here, mark the Blank radio button and then click the OK button. 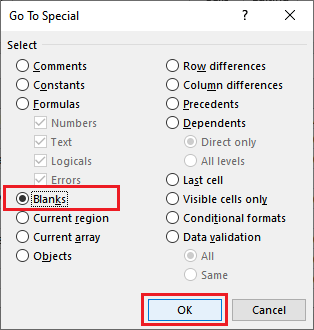
Step 5: See that it will automatically select all the blanks cells present anywhere in the currently active Excel sheet. 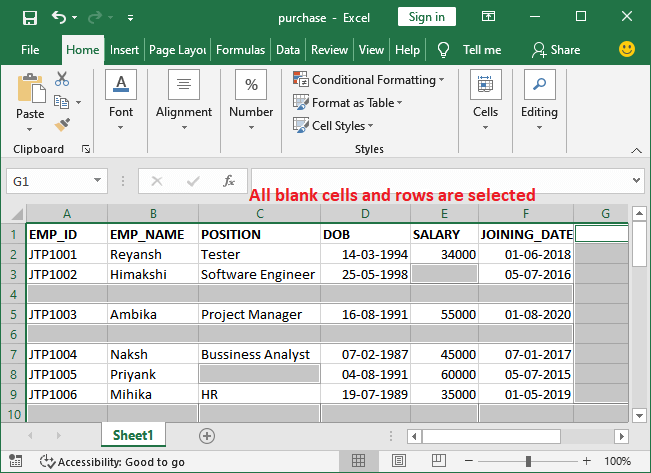
Step 6: Now, inside the Home tab, click on the Delete dropdown option in the cells group section and then Delete Sheet Rows. 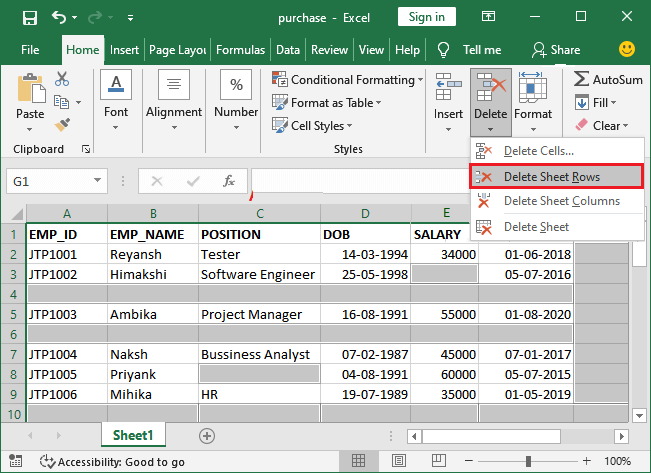
Result See the updated Excel sheet after deleting all those rows containing blank cells. 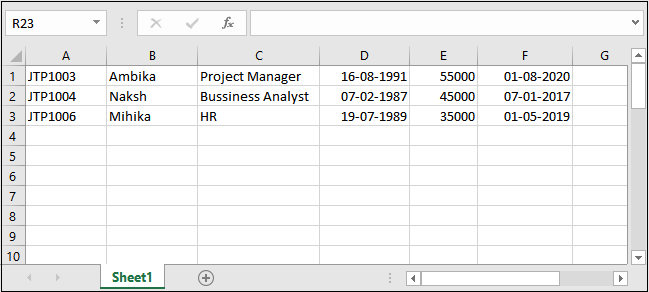
In the above steps, you have noticed that - this method has deleted the entire row only on finding a single blank cell in the row. Thus, you have lost your important data only because of a single blank cell. We have also lost the data for EMPID JTP1001, even not containing the blank cell. Hence, use this method only for simple Excel tables whose dozens of rows fit within a single screen. Delete blank rows within a rangeRather than deleting blanks rows from the entire worksheet, you can also delete the rows within a selected range. All steps are almost similar to the above method. It will delete the entire row if it finds even a single blank cell in the selected dataset. See the following steps below: Step 1: Open the Excel sheet. We have the following dataset, which has some blank rows and cells. 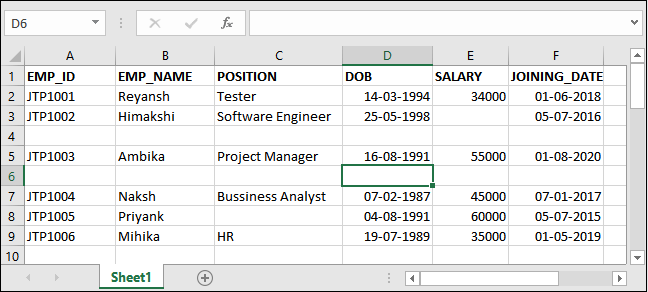
Step2: Select a range of cells in the given dataset using the Ctrl+A command. For example, we have selected total seven rows here. 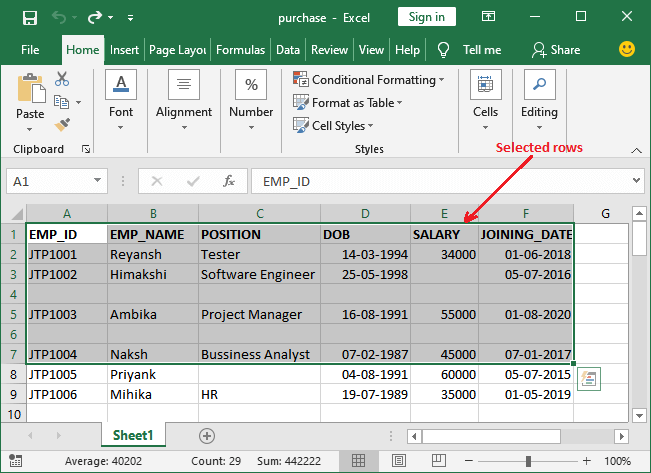
Step 3: Now, press the Ctrl+G shortcut command to open the Go To dialogue box. 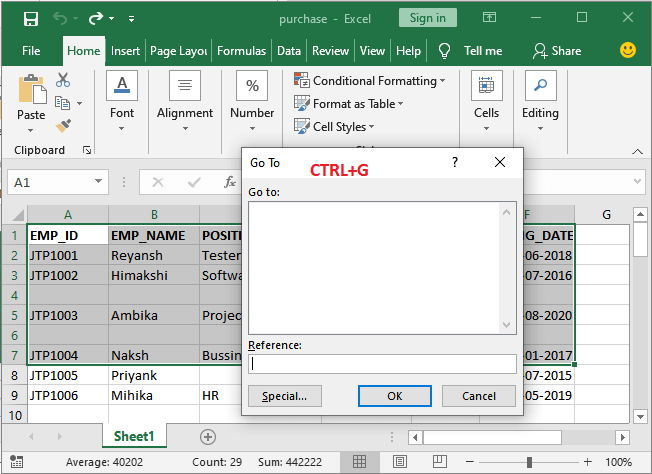
Step 3: Here, click on the Special button below to open the Go To Special. 
Step 4: A Go To Special panel will open as showing in the below screenshot. Here, mark the Blank radio button and then click the OK button. 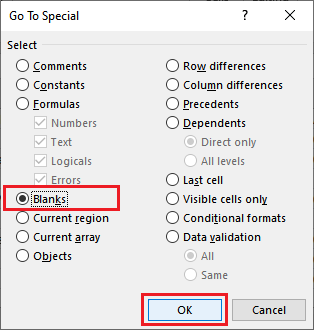
Step 5: See that it will automatically select all the blanks cells present within the selected range of data. 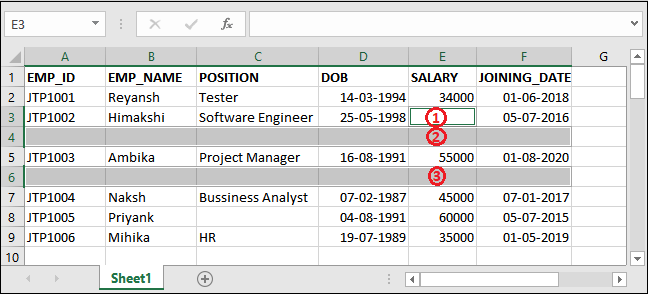
Step 6: Now, inside the Home tab, click on the Delete dropdown option in the cells group section and then Delete Sheet Rows. 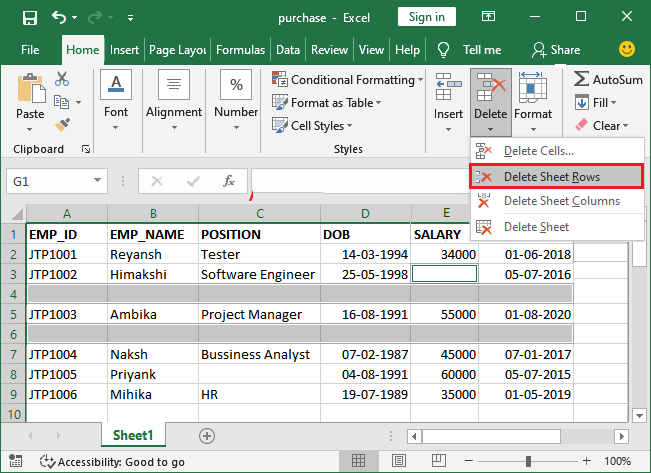
Step 7: See the updated Excel sheet after deleting the rows that contained blank cells till row 7. 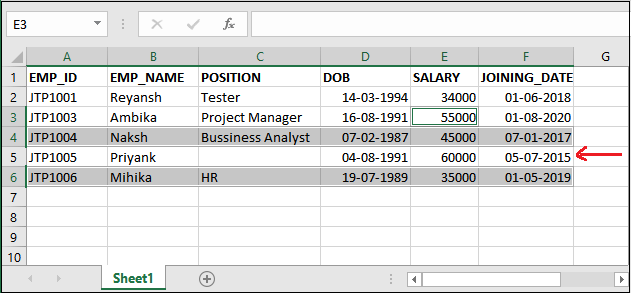
Note that the row 8 (currently row 5) is still present and not deleted even after having a blank cell. Delete blank rows using Find commandThis Find and blank rows deleting method is going to be very similar to the above method (Delete blanks rows using Go To Special method). All the steps are almost similar to the above method. The only difference is - we will select blank cells using the Find method of Excel. See the following steps below to see how it work differently than the above one: Step 1: Open the Excel sheet. We have the following dataset, which has some blank rows and cells. 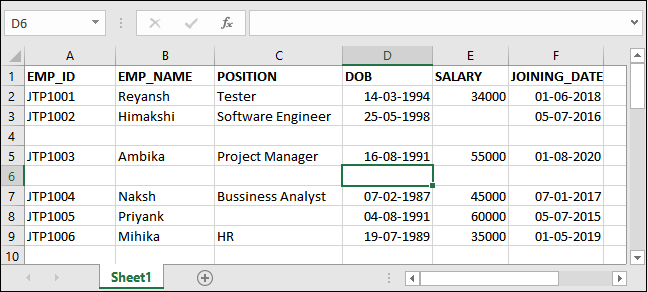
Step 2: Press the CTRL+F command to find the blank cells in the present dataset. Step 3: A Find & Replace dialogue box will open where click on the Options button expand the advanced options of Find menu. 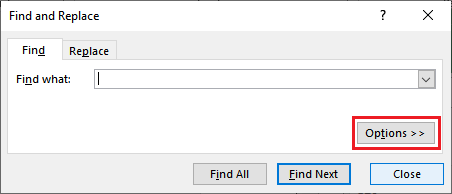
Step 4: Now, enter all the required information in the fields. 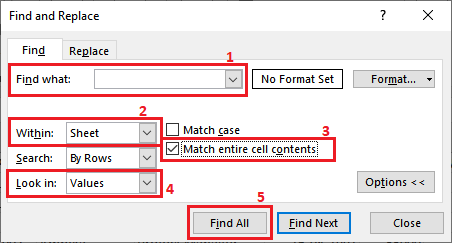
Step 4: It will bring all those rows containing blank cells. 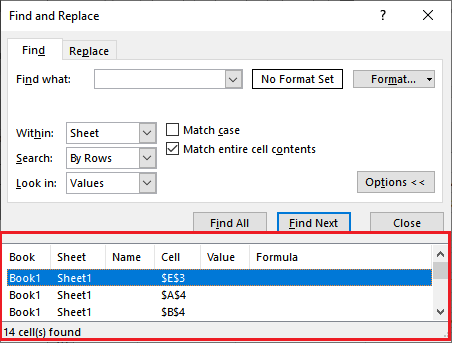
Step 5: Press the CTRL+A command to select all rows brought here in the Find & Replace panel and then click the Close button. 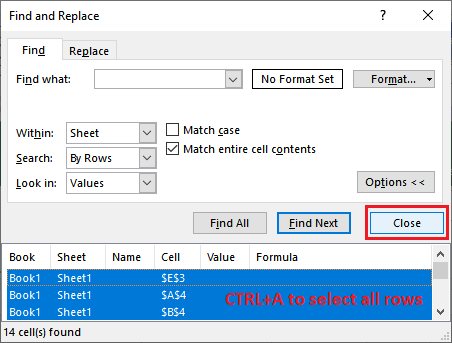
By selecting the cell here through the Find and Replace panel, rows will be selected in the opened Excel sheet. 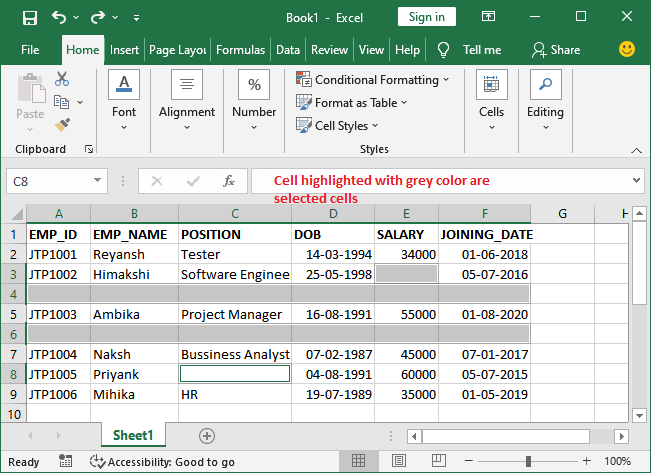
Now, you can delete the selected rows like before you have done in previous methods. Step 6: Right-click one of the selected row/cells here and click on the Delete option. 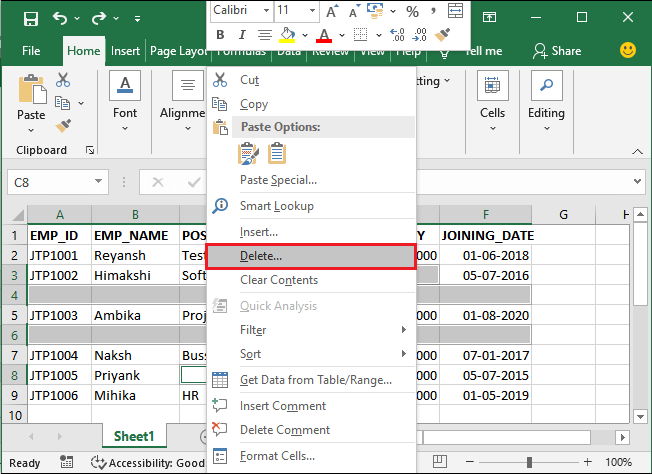
Step 7: A small popup will open where mark the Entire row radio button and click the OK button. 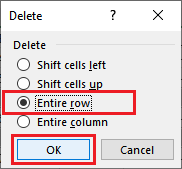
See that all rows are deleted, which was blank or even containing a single blank row. Only four rows are remained which are completely full. 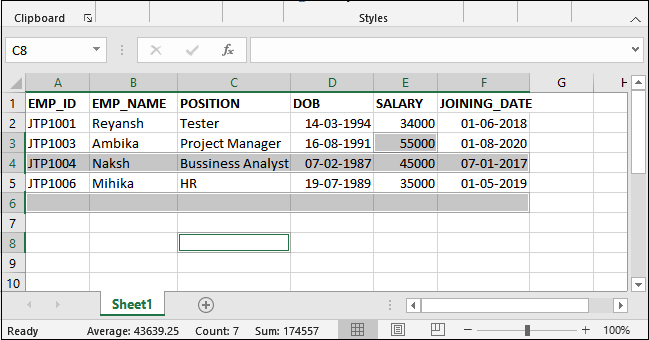
Next TopicExcel round off formula
|
 For Videos Join Our Youtube Channel: Join Now
Feedback
- Send your Feedback to [email protected]
Help Others, Please Share


