| |

What is Excel?MS Excel or Microsoft Excel is one of the most used software programs in the world. It offers a wide range of tools, functions, and facilities to popularize the software in global companies from various sectors. Therefore, it is necessary to know the basics of this powerful software and start organizing the data appropriately. In this article, we are discussing the basics of MS Excel or Microsoft Excel, which helps us understand what Excel is and how to work on it. 
Introduction to MS ExcelMicrosoft Excel is one of the most popular spreadsheet programs available in the Microsoft Office Suite. It allows us to record data in the form of tables. Also, it is a beneficial program when it comes to data analyzing, adding graphs, inserting pivot tables, performing calculations, macro programming, and more. For example, we can create an Excel spreadsheet to calculate weekly expenses, generate salary slips, accounting, and interactively sort/ filter data by different criteria. Since Excel stores data in tables, it has several rows and columns. By using this way, the data is well organized. Thus, we can find the desired information easily with or without Excel tools. Excel Version HistorySince Excel is one of the oldest spreadsheet software, it has received many small and large upgrades over time. The following table shows the various versions of Excel we have received so far, including the year of their release: For Windows
For Mac
Why should we learn and use Excel?It is quite usual that we deal with numerical data one way or another. This can be just a list of daily expenses or the list of all the transactions we made the entire month using our salary. Putting the data in an organized manner can help us get better analytical results and make any further decisions. Microsoft Excel seems the best option to record, store, and analyze any such data from small to large. Additionally, it allows us several other excellent features. Some of the most important benefits are discussed below: Easy to Store Data: The amount of information we can save in Excel mainly depends on the system resources and the capabilities. Thus, there is no particular limit to the information that can be stored in a spreadsheet. Since there is no actual limit for saving data into Excel, we can store as much data as we need. Easy to Recover Data: The process of obtaining information from files saved by physical means (i.e., data on paper) is challenging, and it may take a longer time. Besides, this is not an issue with Excel. The filtering of data is so easy that we can obtain any specific information quickly from the data saved in Excel. Thus, finding or recovering the information is very easy in Excel. Application of Mathematical Formulas: MS Excel also allows us to use a wide range of built-in or custom formulas on the data. This makes the complex calculation so easy and less time taking. That way, the data calculations have become more manageable by the application of mathematical formulas. More Secure: The data saved in Excel can be made secured using the passwords. This ultimately helps us to keep our data secured. Also, there is the slightest possibility of losing such data. However, if the data is written on paper, it is not secure as the data saved in excel. More Popular: MS Excel is currently the most popular and widely used spreadsheet software. It is used by many companies, small businesses, and organizations. Learning this software can be an excellent employment opportunity. Data at One Place: Previously, the data was stored in multiple registers, required multiple shelves. Now, we can save the different types of data in multiple worksheets saved within a single MS Excel file. Easy Data Sharing: The sharing of data saved in excel is much easier than the data written in registers or papers. We can share excel files over email or any other digital means in a minimal period. Neat and Clean UI: Since excel is one of the oldest excel software from one of the leading companies, it has gone through several updates. The data saved in excel is easily readable and understandable. Additionally, the user interface is clean and straightforward, making this software easy to learn. How to launch Excel?Before we can launch excel on our computer, we must ensure that the computer has a Microsoft office package/ suite installed. This is because Excel is a part of MS office. Generally, the computers do not come with the office suite. In such a condition, we will have to get it and install it on the computer. There are two ways to get an office suite. We can either purchase it from the authorized computer shop or download it and purchase its license key from the Microsoft official site. Once we have a key and the office suite setup, we can install it and activate it online to start working on it. Launching an Excel program is just similar to the running of any other program on Windows. So, once we have the office suite installed on the computer, we can launch the Excel using the steps discussed below:
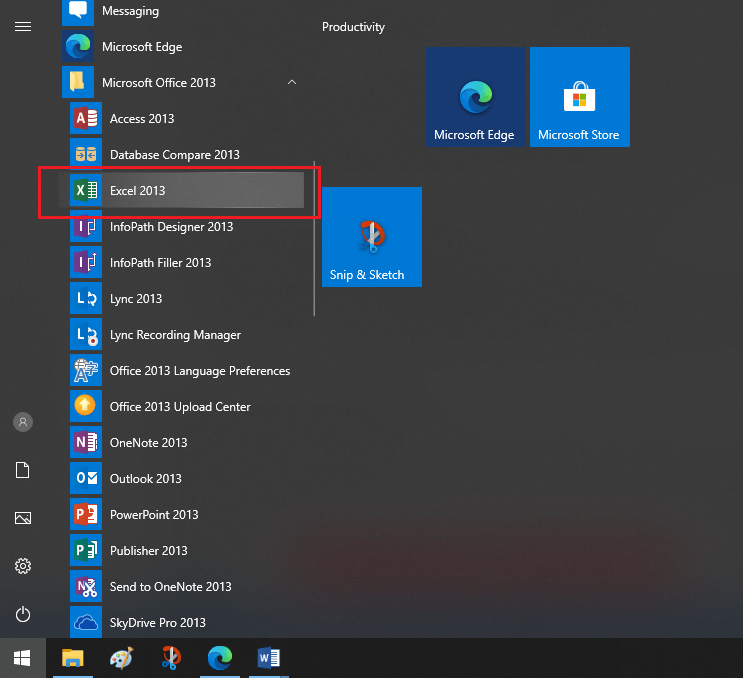
Alternately, we can launch it using the search option. This method is much quicker, i.e.:
Understanding the Excel UIIt is essential to understand the main sections of the Excel user interface. This helps us to know the work area in Excel and start working on it. The following image displays all the significant Excel sections, including the formula bar, row, column, cell, worksheet tab, etc. 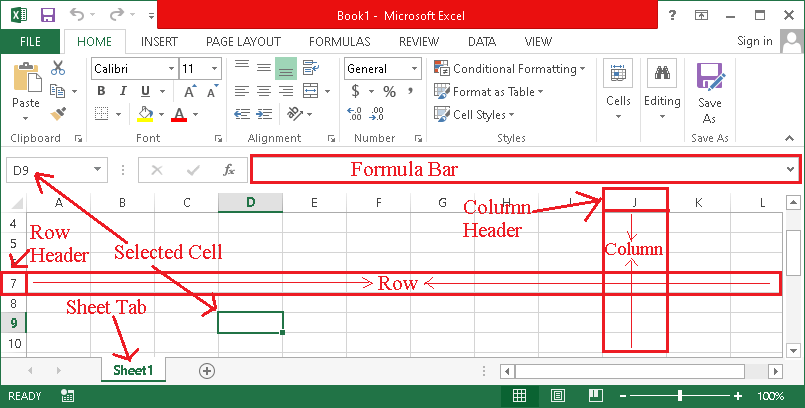
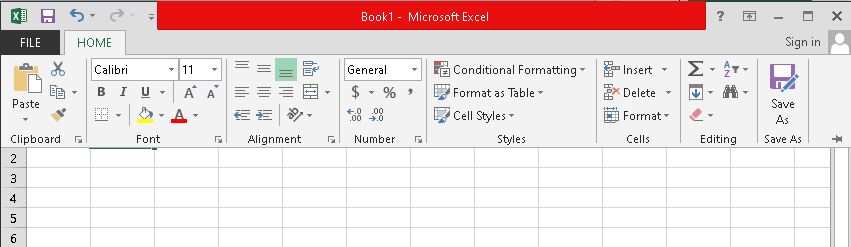
Let us discuss few essential terms in short: What is a Worksheet?An excel worksheet is defined as the collection of rows and columns, which jointly form a table. We can insert charts, shapes, and other supported objects in the worksheet. It is also called a spreadsheet and sheet. What is a Workbook?An excel workbook is the main file that includes worksheet(s) and related objects. What is a Row?A row is a horizontal data record stored in a table. Each row has a unique number, starting from 1. What is a Column?A column is a vertical data record stored in a table. Each column has a unique number, starting from the letter A. What is a Cell?The area created by the intersection of row and column is called a cell. It is the area that we use to input data. Each cell has a unique address generated by the letter representing a column and the number representing a row. Understanding the RibbonThe ribbon is usually situated on the top of the Excel. It consists of various shortcuts that we can use to give commands in Excel. Command refers to an action that the user wants to perform. For instance, a command to create a new document, opening a document, saving a document, printing a document, etc. The following image displays the basic options of ribbon found in Excel: 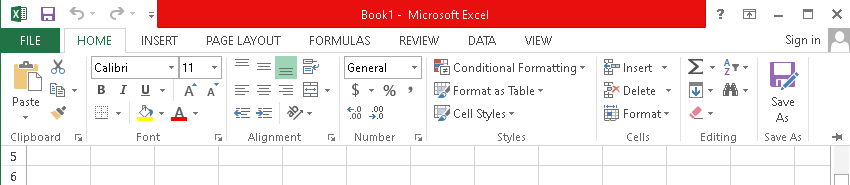
This ribbon is provided from Excel 2013. However, it is also almost the same for the other versions. In the image above, the components displayed in the ribbon are discussed below: Ribbon Start ButtonThe start button located on the ribbon is mainly used to access core commands such as creating a new document, saving an existing work, taking prints, accessing excel customizations, etc. 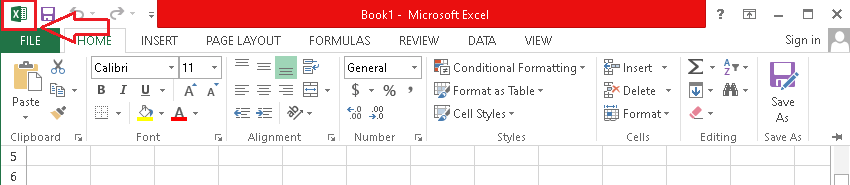
Ribbon TabsThe tabs are mainly used to group various commands in a small area. The following tabs are located on the ribbon:

Ribbon BarThe ribbon bar typically displays the commands situated under the tabs. However, the ribbon bar also contains various commands together but in similar categories. For example, the alignment category within the ribbon bar contains all the necessary commands required to align them together with different styles. 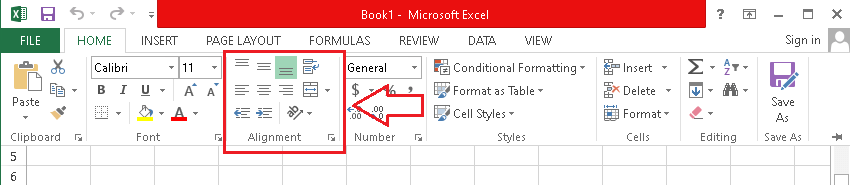
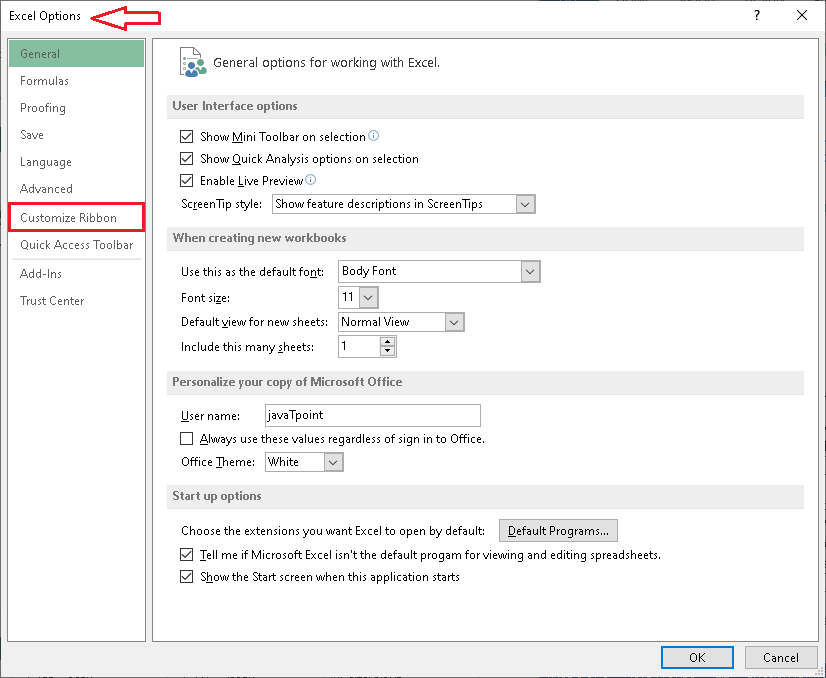
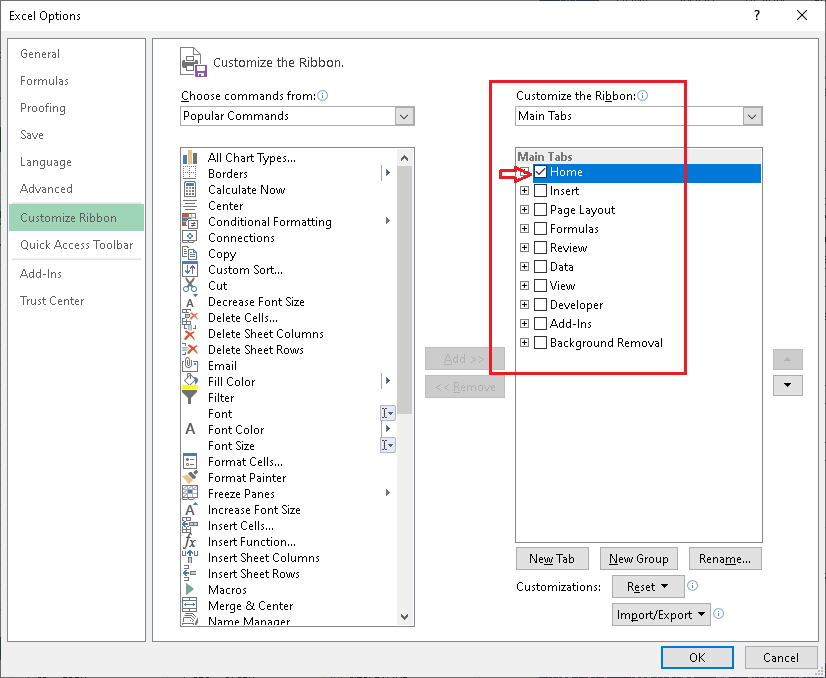
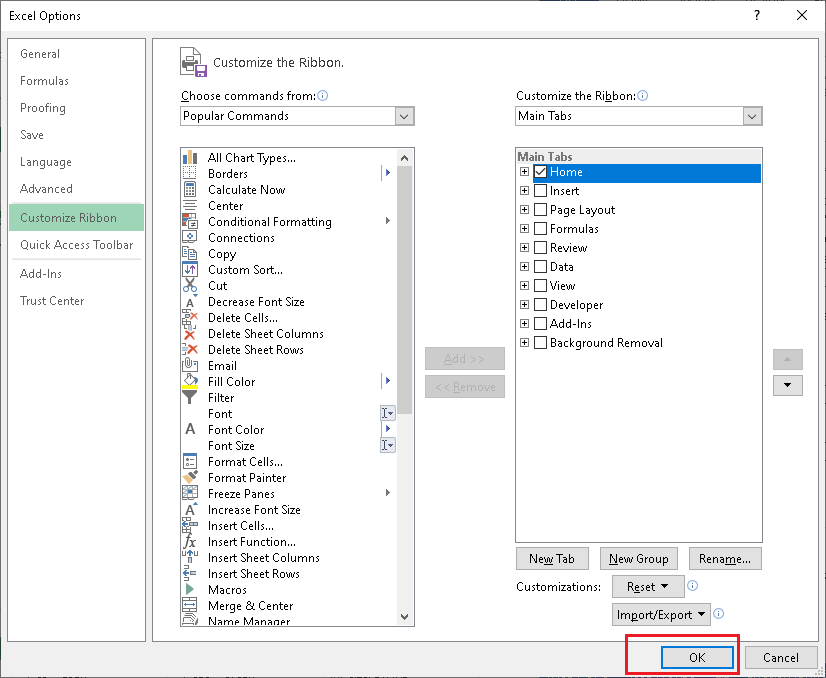
Customizing the Excel EnvironmentAlthough Excel contains all the quick shortcuts on the ribbon inside different tabs, we can also add/ insert options as per our choice. The defaults quick shortcuts are sufficient for everyday users. However, the heavy users can customize excel overall environment accordingly and increase the productivity of the working. The important customization option present in Excel are discussed below: Customizing the RibbonCustomizing the ribbon is one of the first tasks when it comes to the customization of Excel. Excel allows us to hide/ unhide the ribbon tabs and the shortcuts given inside the tabs. Apart from this, we can also add the desired tabs/ options in Excel from settings. Enabling/ Disabling Default Tabs To hide/ unhide the tabs or options in Excel, we need to follow the steps given below:
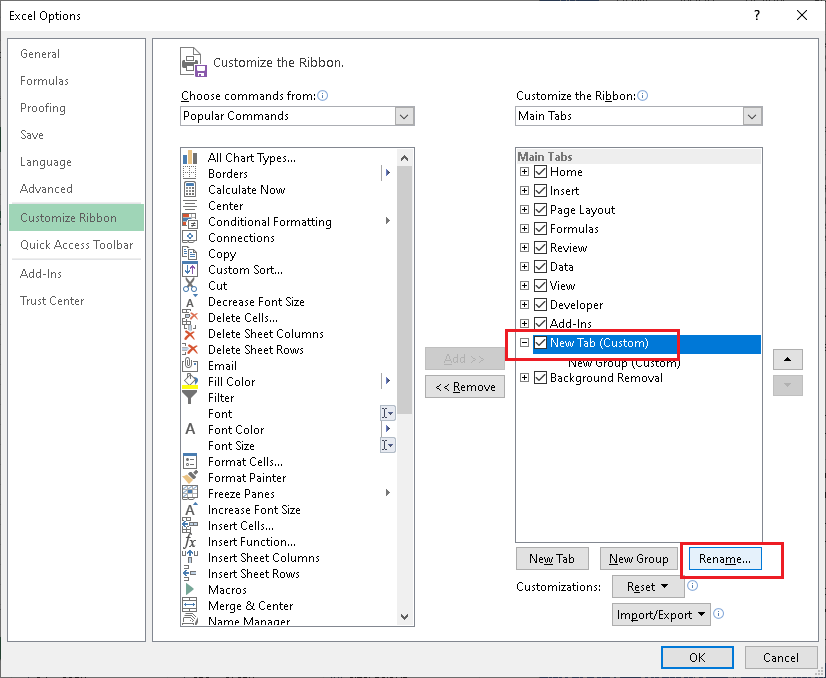
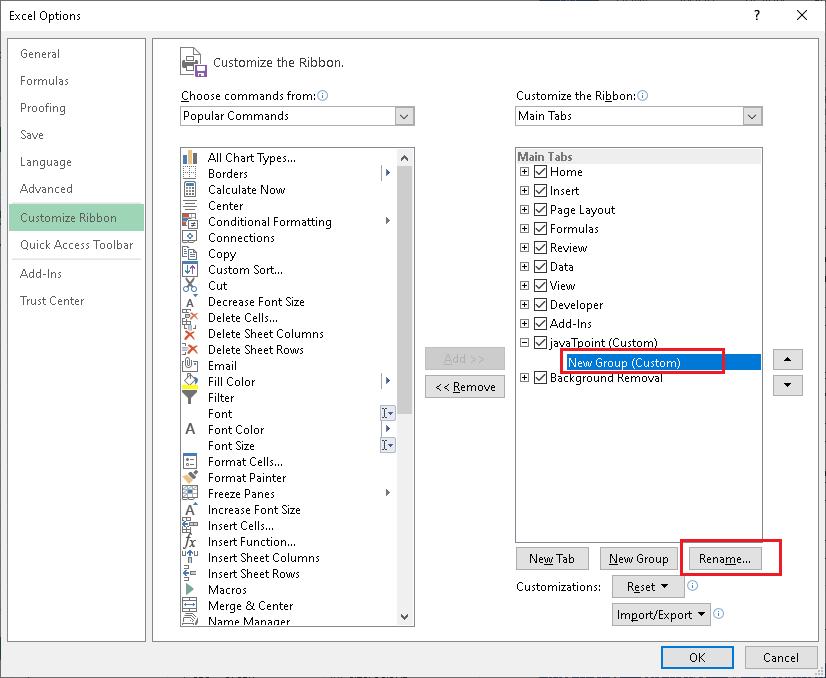
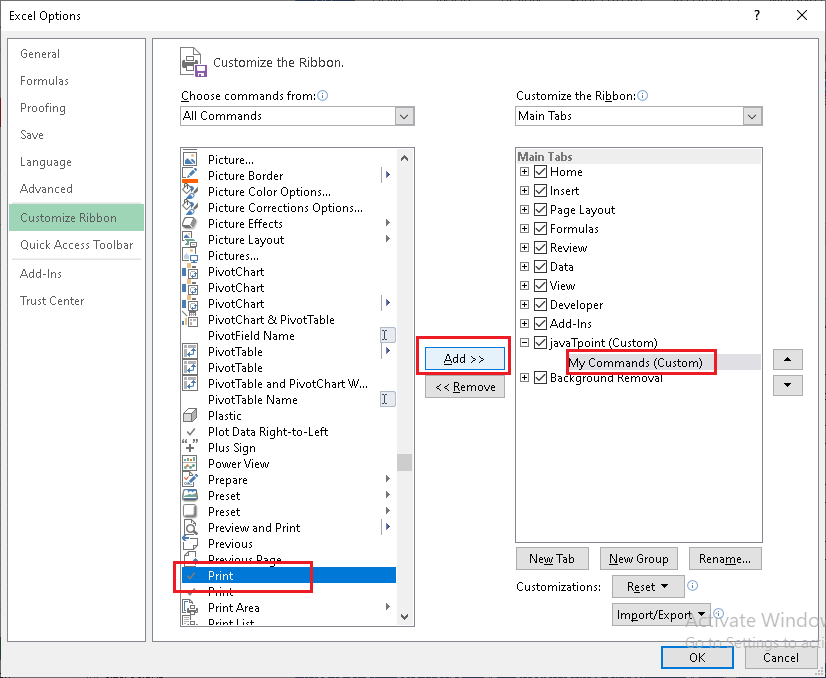
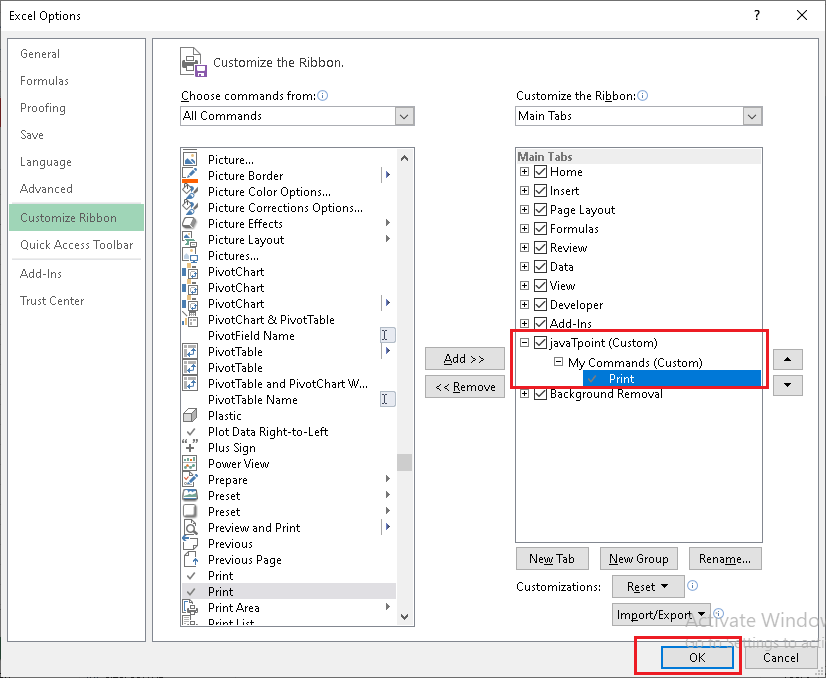
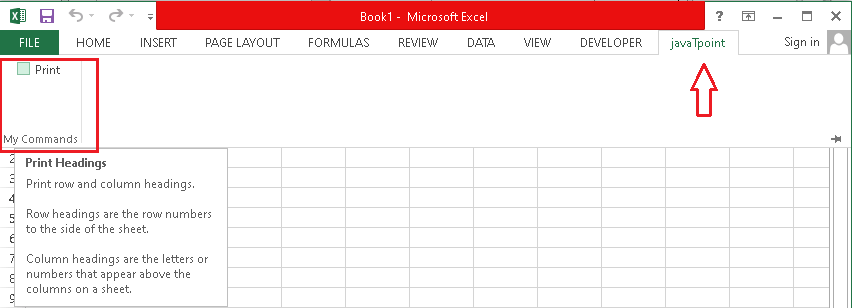
Adding Custom Tabs We can add a custom tab with the desired shortcuts/ commands in Excel using the following steps:
After doing this, we will see the text 'New Tab (Custom)' added under the primary tabs.
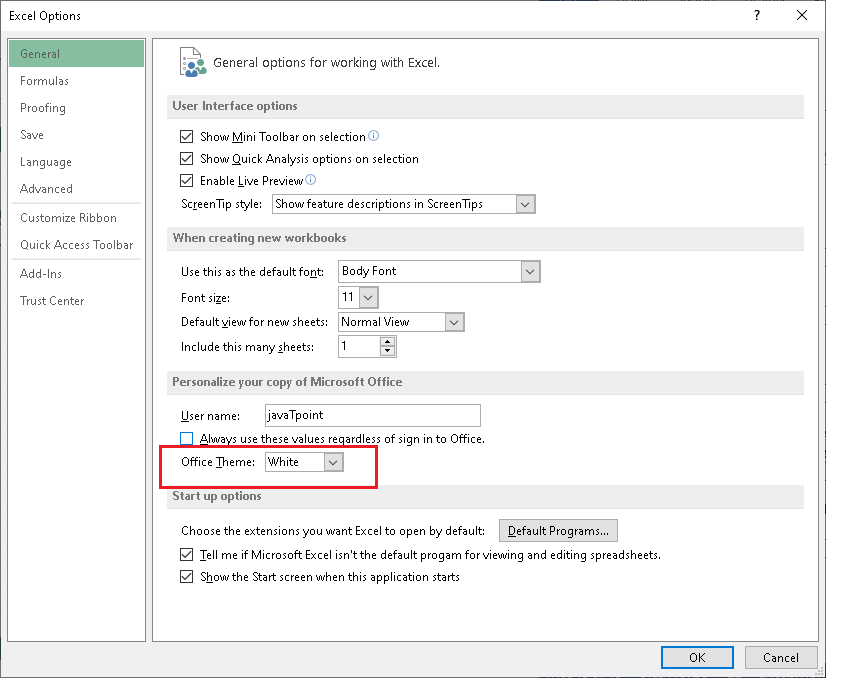
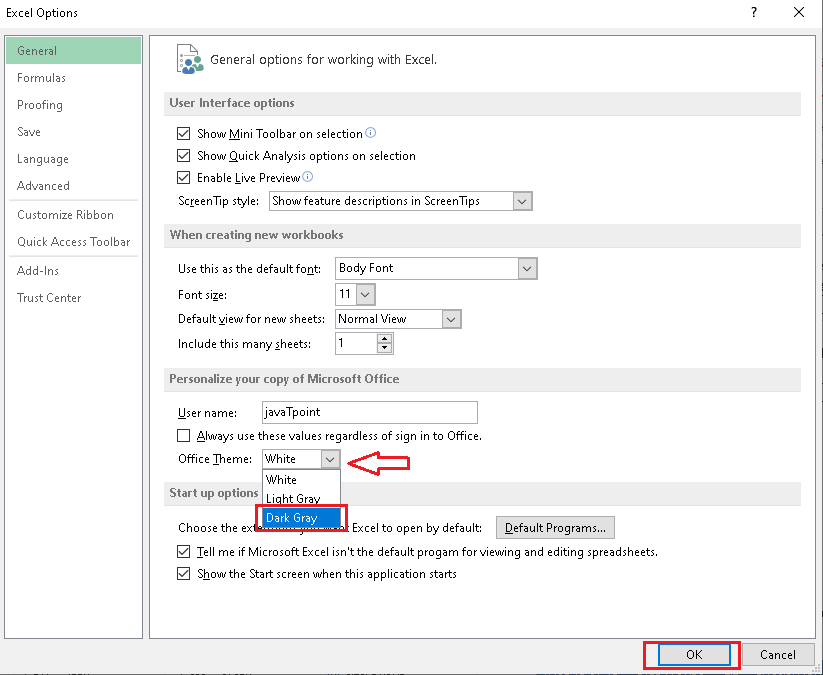
Customizing the Colour ThemeBy default, excel comes with a white color theme. However, we can change it to dark grey or light grey from the settings. To change the color theme for excel, we need to follow the steps discussed below:
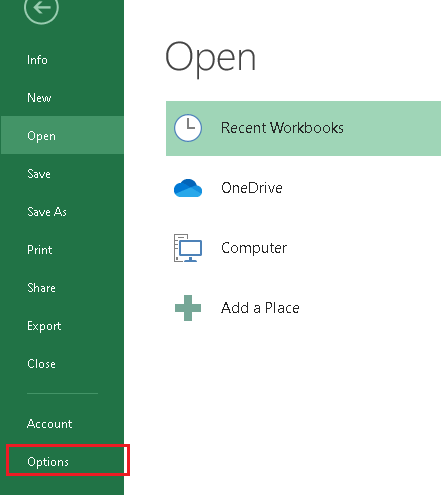
Caution: It is important to note that the same color theme will be applied for all the office products, such as Word, PowerPoint, etc. Customizing the Formulas SettingsWe can customize settings for the formulas in excel. This can be done from the 'Formulas' option given on the left-hand side of the 'Excel Options' window. Excel Options can be accessed by navigating to the File > Options. It looks like this: 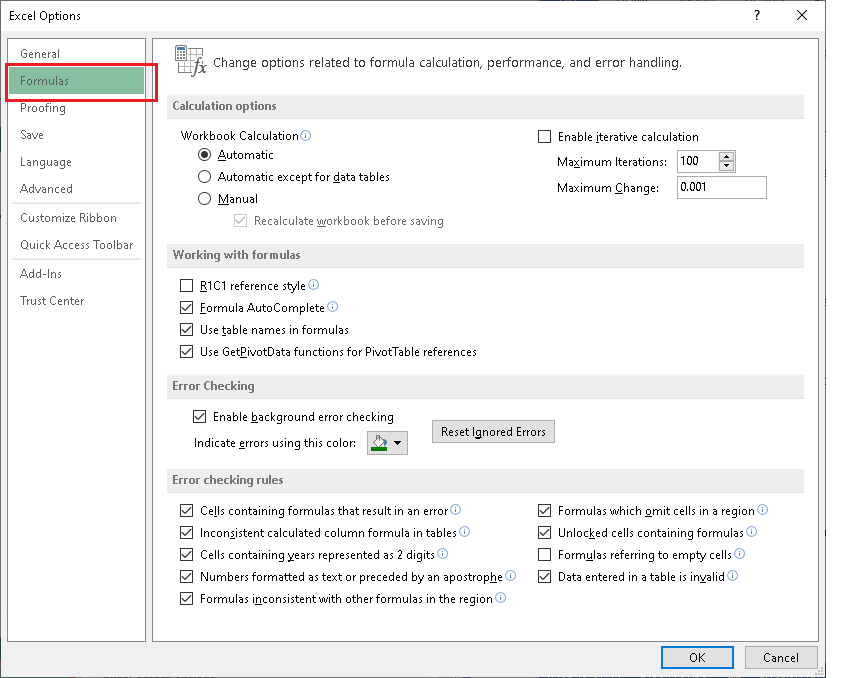
Here, we can change settings related to formula calculations, performance, and error handling. We are only required to check/ uncheck the boxes as per the requirements. It is mandatory to click on the 'OK' button after marking the checkboxes; otherwise, the settings will not be applied. Customizing ProofingCustomizing the proofing settings helps us to manipulate the text entered into Excel. More Specifically, we can changes settings to control how excel corrects and formats our texts in Excel. This usually includes options for the dictionary language, auto-correction, and suggestions of words. To customize proofing settings, we need to click on the 'Proofing' from the left-side panel on 'Excel Options'. It looks like this: 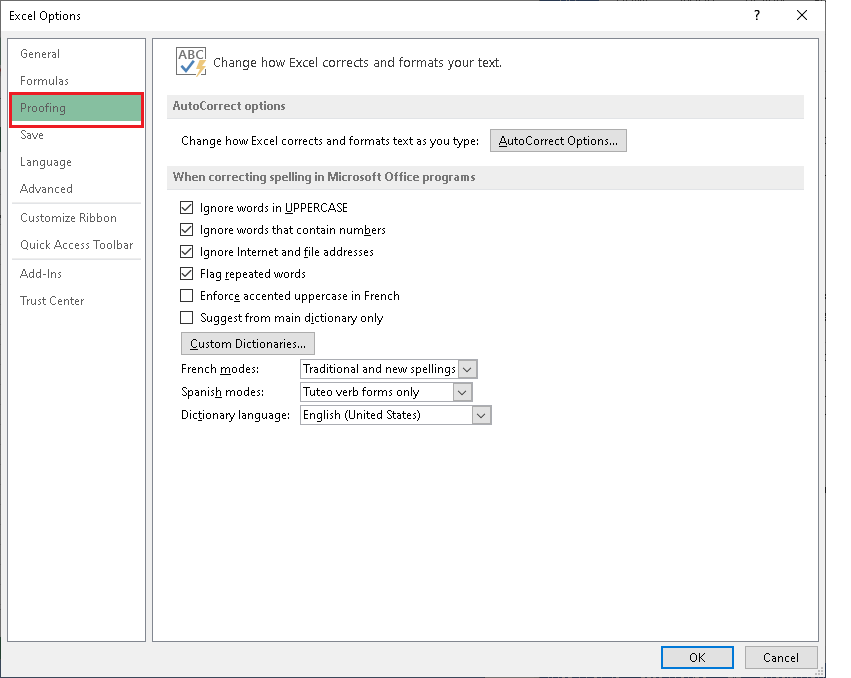
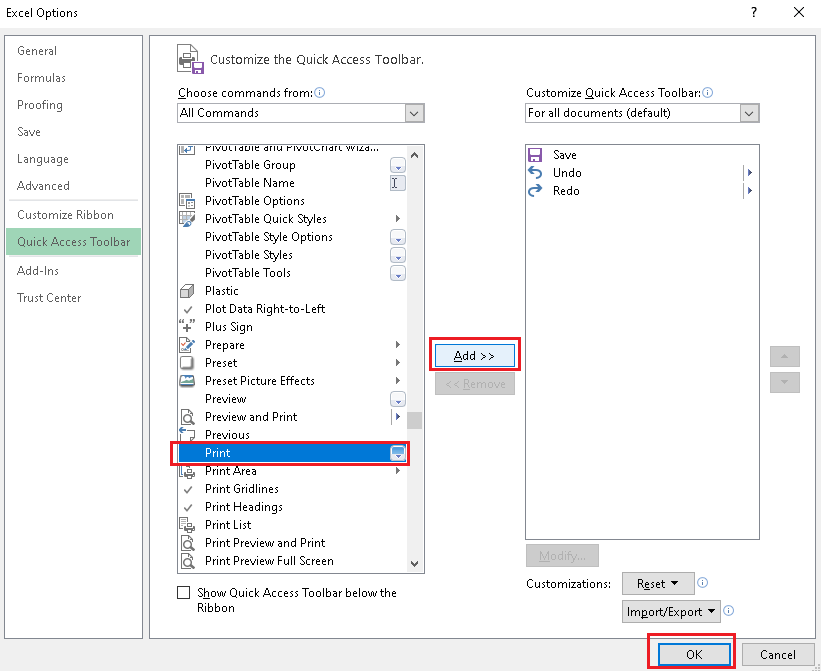
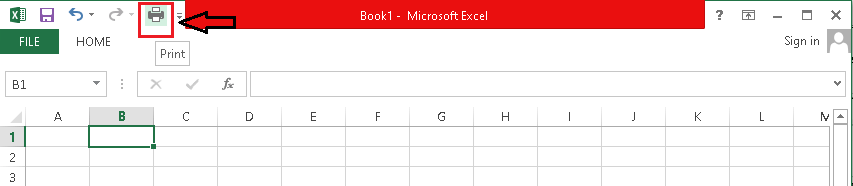
Customizing Quick Access ToolbarAdding a shortcut in a quick access toolbar can help increase the work process of Excel tasks. We can insert/ add commonly used shortcuts using the following steps:
Customizing Save SettingsWe can customize default settings for the file formats when saving them, enable/disable the auto-recovery of files if the computer gets off unexpectedly, and more. To customize the options for save settings, we need to click on the 'Save' from the left-side panel on 'Excel Options'. It looks like this: 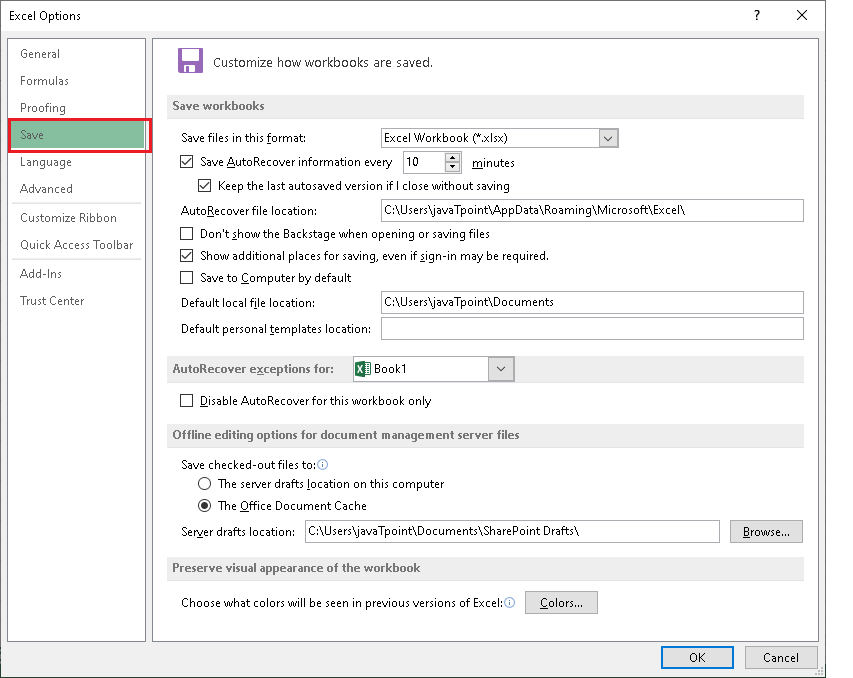
Similarly, we can also customize other settings of Excel. All the core settings are located on the 'Excel Options' window. Excel ShortcutsExcel is a powerful spreadsheet software with several great features. It allows us to use many keyboard shortcuts to perform actions quickly. The following table displays some important shortcut keys used in Excel:
Note: While using function keys (F1, F2, F3... F12), we may need to activate them first by pressing the 'Fn' key on the keyboard. However, this is not mandatory for all keyboards.Excel File ExtensionsExcel supports almost all the popular file extensions required for spreadsheet documents. Since there are several extension support, we can save our files accordingly. The following table displays some of the essential file extensions available in Excel:
Top 100 Microsoft Excel ShortcutThe respective Microsoft Excel is powerful spreadsheet software that offers several great features and allows us to use various keyboard shortcuts to perform actions quickly. Navigation ShortcutsThe various navigation shortcuts which are available in Microsoft Excel are as follows: 1. Ctrl + Home This Shortcut usually takes an individual to the beginning of the worksheet respectively. 2. Ctrl + End Ctrl+End is the Shortcut that takes an individual to the last cell of the worksheet, which is responsible for containing a massive amount of data. 3. Ctrl + Arrow Keys Ctrl+Arrow Keys basically allow an individual to move quickly to the last cell in a given row or the column containing out the data respectively. 4. Ctrl + Page Up/Down This respective Shortcut allows an individual to move between the worksheets in a given workbook. Selection ShortcutsThe various selection shortcuts which are available in Microsoft Excel are as follows: 5. Shift + Arrow Keys Shift+Arrow keys are the Shortcut that primarily allows an individual to select the cells in a specific direction respectively. 6. Ctrl + Shift + Arrow Keys And this particular Shortcut in Microsoft Excel helps an individual select the respective cells to the last cell in a given row or column responsible for containing the data. 7. Ctrl + A This Excel shortcut helps an individual select all the cells in a given worksheet respectively. 8. Ctrl + Shift + L Now this particular Shortcut toggles out the filter on and off in an effective and efficient manner. Editing Shortcuts The different types of the editing shortcut which are effectively available in Microsoft Excel are as follows: 9. F2 F2 is the Shortcut that allows an ndividual to edit the contents of a given cell as well. 10. Ctrl + C And this Shortcut in Excel is used to copy out the selected cells respectively. 11. Ctrl + X This Shortcut helps an individual cut out the selected cells as well. 12. Ctrl + V This Shortcut usually pastes out the copied or cut cells in a given sheet. 13. Ctrl + Z Ctrl + Z shortcut enables an individual to undoes the last action. 14. Ctrl + Y Ctrl + Y enables an individual to redoes the last action as well. Formatting ShortcutsThe various types of the formatting shortcut in Microsoft Excel are as follows: 15. Ctrl + B 16. Ctrl + I And this Shortcut italicizes the selected text respectively. 17. Ctrl + U This Shortcut enables an individual to underlines the selected text respectively. 18. Ctrl + 1 And this Shortcut in Microsoft Excel helps an individual open the Format Cells dialog box. Formula ShortcutsThe different types of the Formula shortcut which are effectively available in Microsoft Excel are as follows: 19. F9 This Shortcut enables an individual to calculate the selected formula respectively. 20. Ctrl + Shift + Enter This will enables an individual to enter an array formula in the Excel sheet. 21. Ctrl + ` This Shortcut toggles between the showing formulas as well as the showing values. View ShortcutsThe different types of the View Shortcut, which are available in Microsoft Excel, are as follows: 22. Ctrl + F1 This Shortcut helps an individual to hide or shows the ribbon effectively. 23. Ctrl + F6 This Shortcut allows an individual to switch between open workbooks as well. 24. Ctrl + G With the help of this shortcut an individual can opens the Go to dialog box respectively. 25. Ctrl + W This Shortcut enables an individual to close the current workbook. Macros ShortcutsThe various Macro shortcuts which are available in Excel are as follows: 26. Alt + F8 Alt+ F8 shortcut usually enables an individual to open the Macros dialog box. 27. Ctrl + Shift + F3 This Shortcut helps an individual to create a new macro effectively. 28. Ctrl + Shift + F8 This Shortcut selects or deselects cells for a macro as well. Charts ShortcutsThe different types of the Chart shortcut which are available in Microsoft Excel are as follows: 29. F11 This Shortcut helps an individual create a new chart on a new worksheet as well. 30. Alt + F1 This will enables an individual to create a chart of the selected data on the same worksheet. 31. Ctrl + Shift + F11 Ctrl+ Shift +F11 used for the purpose of creating a chart of the selected data on a new worksheet Printing ShortcutsThe various printing shortcut which is available in Microsoft Excel is as follows: 32. Ctrl + P This Shortcut helps an individual to open the Print dialog box. 33. Ctrl + Shift + F12 And this Shortcut in Microsoft Excel usually prints out the current worksheet. 34. Ctrl + F2 This enables a user to open the Print Preview window. Worksheet ShortcutsThe various worksheet shortcuts which are effectively available in Microsoft Excel are as follows: 35. Ctrl + N This Shortcut will help an individual to create a new workbook effectively. 36. Ctrl + O With the help of this shortcut an individual can open an existing workbook. 37. Ctrl + S This Shortcut enables an individual to saves the current workbook as well. 38. Ctrl + F4 This Shortcut will effectively close the current workbook. Function ShortcutsThe various Function shortcuts which are effectively available in Microsoft Excel are as follows: 39. Alt + = With the help of this an individual can inserts the SUM function. 40. Ctrl + Shift + A This Shortcut will help an individual to inserts the AVERAGE function. 41. Ctrl + Shift + M Now this Shortcut will help an individual to insert the MIN function efficiently. 42. Ctrl + Shift + X And this respective Shortcut will help an individual to insert the MAX function. Cell Reference ShortcutsThe different types of Cell reference Shortcut which are used in Microsoft Excel are as follows: 43. F4 It helps an individual to toggle between the absolute, relative, and mixed cell references. 44. Ctrl + Shift + Arrow Keys This Shortcut will help an individual to select the cells to the last cell in a given row or column that usually contains the data. 45. Ctrl + Shift + End This Shortcut will help an individual select all cells from the current cell to the worksheet's last cell, containing data as well. Data ShortcutsThe various types of Data Shortcut which are available in Microsoft Excel are as follows: 46. Ctrl + D This Shortcut will help an individual copy out the cell's contents just above the current cell. 47. Ctrl + R Now this Shortcut will help an individual to copy out the cell's contents to the left of the current cell. 48. Ctrl + Shift + L This Shortcut will allow an individual to toggle the filter on and off. Worksheet Management ShortcutsThe various types of Worksheet Management Shortcuts which are available in Microsoft Excel are as follows 49. Ctrl + Shift + N This respective Shortcut will enable an individual to create a new worksheet effectively. 50. Ctrl + Shift + F With the help of this Shortcut an individual can open the Find and Replace dialog box. 51. Ctrl + Shift + H And by making use of this Shortcut, one can easily open out the Replace dialog box. Cell Formatting ShortcutsThe different types of Cell Formatting Shortcuts which are available in Microsoft Excel are as follows: 52. Ctrl + 1 It also enables an individual to open out the Format Cells dialog box. 53. Ctrl + Shift + $ And this Shortcut enables an individual to apply the Currency format in the given cell. 54. Ctrl + Shift + % This Shortcut helps an individual to apply the Percentage format. Range Formatting ShortcutsThe various Range Formatting shortcuts which are available in Microsoft Excel are as follows: 55. Ctrl + Shift + ~ With the help of this Shortcut, an individual can easily apply the General format. 56. Ctrl + Shift +! It enables an individual to apply the Number format with two decimal places. 57. Ctrl + Shift + # This Shortcut enables an individual to apply the Date format with the day, month, and year respectively. Conditional Formatting Shortcuts The various Conditional Formatting shortcuts which are available in Microsoft Excel are as follows: 58. Alt + H + L This Shortcut allows an individual to open the Conditional Formatting menu respectively. 59. Alt + H + L + N This Shortcut will open the New Rule dialog box for an individual. 60. Alt + H + L + R This Shortcut is used to open out the Manage Rules dialog box. Table Shortcuts The different types of the Table shortcut which are available in Microsoft Excel are as follows: 61. Ctrl + T It will be helpful in converting a range of cells into a table. 62. Ctrl + Shift + L And this Shortcut will help an individual to toggle the filter on and off respectively. 63. Ctrl + Shift + * (asterisk) This Shortcut will allow an individual to select the current table. PivotTable ShortcutsThe various PivotTable shortcuts which are available in Microsoft Excel are as follows: 64. Alt + N + V This Shortcut enables an individual to open the Create PivotTable dialog box. 65. Alt + N + V + T This Shortcut allows the creation of a Pivot Table from the respective selected data. 66. Alt + J + T + F This Shortcut enables an individual to open the PivotTable Field List. Formula Auditing ShortcutsThe various types of the Formula Auditing Shortcut, which are available in Microsoft Excel, are as follows 67. Ctrl + [ This Shortcut helps an individual select all cells which are actively referred by the active cell. 68. Ctrl + ] It basically allows an individual to select all cells that refer to the active cell. 69. Ctrl + Shift + { And with the help of this Shortcut, one can easily select all cells directly or indirectly referred to by the active cell. 70. Ctrl + Shift + } This Shortcut selects all cells directly or indirectly referring to the active cell. Formula Building ShortcutsThe various Formula Building Shortcuts which are available in Microsoft Excel are as follows: 71. Ctrl + A It enables an individual to select all cells in a worksheet. 72. Ctrl + Shift + U This Shortcut allows expanding or collapsing the formula bar, respectively. 73. Ctrl + Shift + Enter This Shortcut helps an individual to enter an array formula into the selected sheet. Data Validation ShortcutsThe different types of Data Validation Shortcuts which are available in Microsoft Excel are as follows: 74. Alt + D + L This Shortcut enables an individual to open the Data Validation dialog box. 75. Alt + D + L + V With the help of this, an individual to efficiently open the Data Validation dialog box with the Validation Criteria tab selected. 76. Alt + D + L + S This Shortcut opens the Data Validation dialog box with the Settings tab selected. Worksheet Protection ShortcutsThe various Worksheet Protection Shortcuts which are available in Microsoft Excel are as follows: 77. Alt + T + P This Shortcut enables an individual to open the Protect Sheet dialog box 78. Alt + T + U This Shortcut helps an individual to open the Unprotect Sheet dialog box. Worksheet Protection ShortcutsThe various Workbook Protection Shortcuts which are available in Microsoft Excel are as follows: 79. Alt + T + P + W This Shortcut will open the Protect Workbook dialog box. 80. Alt + T + U + W This Shortcut opens the Unprotect Workbook dialog box Worksheet Navigation ShortcutsThe various Workbook Navigation Shortcuts which are available in Microsoft Excel are as follows: 81. Ctrl + Page Up/Down This Shortcut is to move between worksheets in a given workbook. 82. Ctrl + Home This Shortcut takes an individual to the beginning of the worksheet as well. 83. Ctrl + End This Shortcut takes an individual to the worksheet's last cell containing data. Worksheet Management ShortcutsThe various Workbook Management Shortcuts which are available in Microsoft Excel are as follows: 84. Ctrl + N This Shortcut creates a new workbook. 85. Ctrl + O This Shortcut opens an existing workbook. 86. Ctrl + S This Shortcut enables to saves the current workbook. 87. Ctrl + F4 This Shortcut closes the current workbook. Worksheet Splitting ShortcutsThe various Workbook Splitting Shortcuts which are available in Microsoft Excel are as follows: 88. Alt + W + S This Shortcut splits the worksheet into panes. 89. Alt + W + F This Shortcut freezes the top row of the worksheet. 90. Alt + W + R This Shortcut freezes the first column of the worksheet. Worksheet Zooming ShortcutsThe various types of the Worksheet Zooming Shortcut, which are available in Microsoft Excel, are as follows: 91. Ctrl + Mouse Scroll Wheel This Shortcut will allow the zooming in and out of the respective worksheet. 92. Alt + W + Q This Shortcut zooms to 100%. 93. Alt + W + This Shortcut will zoom to fit the selection. Worksheet Splitting ShortcutsThe various Worksheet Splitting shortcuts which are available in Microsoft Excel are as follows: 94. Alt + W + S This Shortcut helps an individual to splits the worksheet into panes. 95. Alt + W + F With the help of this Shortcut, an individual can quickly freeze the top row of the worksheet. 96. Alt + W + R This Shortcut will allow an individual to freeze out the first column of the selected worksheet efficiently. Worksheet Zooming ShortcutsThe different types of the Worksheet Zooming shortcut which are available in Microsoft Excel are as follows: 97. Ctrl + Mouse Scroll Wheel This Shortcut will help an individual zoom in and out of the worksheet. 98. Alt + W + Q This Shortcut helps an individual to zoom in to 100%. 99. Alt + W + X This Shortcut enables an individual to zoom in to fit the selection. 100. Ctrl + This Shortcut will allow an individual to open the Find dialog box respectively.
Next TopicExcelity login
|


 For Videos Join Our Youtube Channel: Join Now
Feedback
- Send your Feedback to [email protected]
Help Others, Please Share


