How to open Microsoft Excel files in separate windowsIt was well known that having the spreadsheets in two different windows makes many of the tasks in Microsoft Excel quite easier. And from that: one of the possible solutions is none other than viewing of the respective workbooks side by side, but this eventually eats up a lot of space, which could not be considered to be the best option. It was said that the opening of a Microsoft Excel document in a new instance is something new, more than just an ability to compare the respective sheets next to each other. In this, it is just like having a few different applications that are effectively running simultaneously - while Microsoft Excel is considered to be busy while recalculating one of our workbooks. Besides all that, we can continue working on another as well. Now in this tutorial, we will be discussing as well as discovering the various concepts as a part of opening Microsoft Excel files in the separate window, which are as follows:
How to open Microsoft Excel files in separate windows in Office 2010 and the 2007 version?We all know that in Microsoft Excel version 2010 and earlier versions, we have the Multiple Document Interface (MDI). Moreover, in this particular interface type, multiple child windows primarily reside under a single parent window, and only the parent window has a toolbar or a menu bar. Therefore, in these Microsoft Excel versions, all the individual workbooks are opened in the same application window and used in order to share a common ribbon UI (toolbar in Microsoft Excel version 2003 and earlier). Besides all these, in the case of the Microsoft Excel version 2010 and the case of the older versions, three important ways that can be used in order to open files in multiple windows that work. In contrast, each window is, in fact, a new instance of Microsoft Excel respectively:
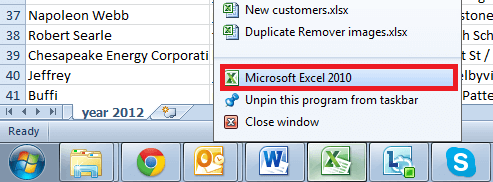
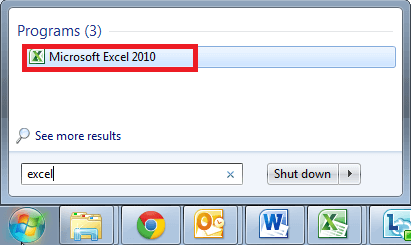
Now we will be discussing each of the above methods in detail in order to get a better insight as well: Microsoft Excel icon is present on the taskbar. To open out an Excel document in separate windows, this is what we need to perform effectively: Step 1: First of all, we will be opening our first File as we normally open in our day-to-day life of use respectively. Step 2: After that, in order to open another file in a different window, we will be making use of the one technique from the following given as well:
Microsoft Excel shortcut The other quickest, as well as the most important way that can be used to open Excel workbooks in the different windows is this: Step 1: First, we will be opening the folder in which our respective Office is installed. And the default path for Microsoft Excel 2010 is C:/Program Files/Microsoft Office/Office 14. If we have an Excel 2007, the name of the last folder is Office 12 respectively. Step 2: After that, we will be finding the Excel.exe application, and then we will be right-clicking on it as well. Step 3: Then we will choose the option in order to create a shortcut and send it to our desktop effectively. 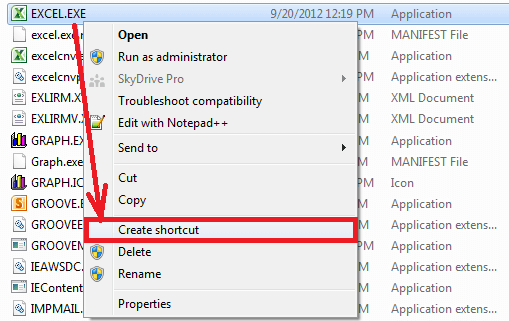
Whenever we need to open a new instance of Microsoft Excel, we will be double-clicking on this desktop shortcut as well. Microsoft Excel options that are present in the send to menu Now we will be following the below steps to create an Excel shortcut. Step 1: First of all, we will be opening this folder on our computer respectively: C:/Users/UserName/AppData/Roaming/Microsoft/Windows/SendTo Important note: It is known that the AppData folder is hidden. And to make it visible, we will go to the Folder options, which are present in the Control Panel, then switch to the View tab and select the Show hidden files, folders, or drives. Step 2: We will be then pasting the shortcut into the SendTo folder. 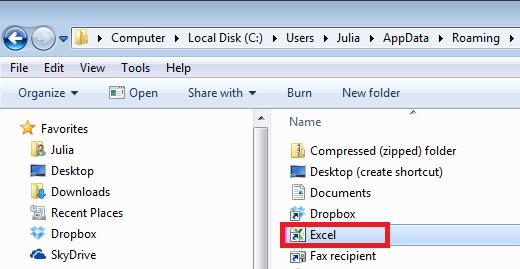
After that, we can avoid opening additional files from Microsoft Excel. Instead of that we can right-click on the files in Windows Explorer, and we will be choosing to Send to > Excel. How can one easily open the workbook in different windows in the 2013 version of excel and on the later version? Beginning with Office 2013, each Microsoft Excel workbook is just displayed in a separate window by default, even though it is the same Excel instance. And the reason is that Microsoft Excel 2013 just started using the Single Document Interface (SDI), in which each document is just opened in its respective window and can be handled separately. How do I open files in different windows in modern Excel versions? It is nothing special; we are liable to make use of the Open command in Microsoft Excel or will be double-clicking on a file in Windows Explorer. And to open a file in a new Excel instance, we will be following the below-mentioned instructions: How can I open Microsoft Excel sheets in separate windows? Now to get the multiple sheets of the same workbook to open in different windows, we will be carrying out these steps as well: Step 1: First, we will open the File of interest effectively. Step 2: On the respective View tab, in the Window group, we will be clicking on the New Window, as this will be opening out the other window of the same workbook effectively. Step 3: After that, we will switch to the new window and click on the desired sheet tab respectively. 
Important Tip: If we want to switch between the different windows that are useful for displaying the various spreadsheets, we can also use the Ctrl + F6 shortcut. How to open a multiple instances of Microsoft Excel?When we are opening out the multiple files in Microsoft Excel 2013 and later on, each workbook is displayed in a separate window. However, they all get opened in the same Microsoft Excel instance by default. But if we are moving to executing a long VBA (Virtual Basic for Application) code or recalculating the complex formulas in one workbook. In that particular case, other workbooks within the same instance may become irresponsive. As well. And opening each of the documents in a new instance to solve the problem: while Microsoft Excel performs a resource-consuming operation in one of the instances, we can work in various workbooks in other cases as well. Now here are some of the typical situations when it makes sense to open each of the workbooks in a new instance effectively: If in case we are working with some of the used large files that might contain lots of complex formulas as well: Here we can perform various plans to perform resource-intensive tasks. And we wish to undo actions only in some of the active workbooks. Below, we will see the 3 quick and efficient ways to create the various instances of the Microsoft Excel version 2013 and higher in some of the earlier versions. How one can create a new Microsoft Excel instance by making use of the taskbarIn Microsoft Excel, the fastest way that can be effectively used to open a new instance of Excel is as follows: Step 1: First, we will right-click on the Microsoft Excel icon usually present on the given taskbar. Step 2: After that, we will hold down the Alt key present on the keyboard, and then we will left-click the Excel in the given menu. 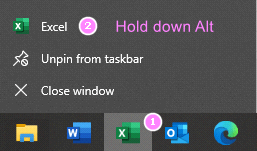
Step 3: In this step, we will hold down the Alt key until the confirmation dialog box also appears on the screen. Step 4: After that, we will click on the Yes option to get directly to a new Microsoft Excel instance effectively. 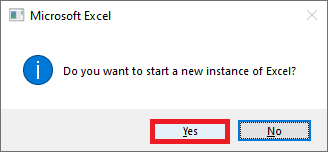
And this could also be achieved by making use of the mouse wheel: while holding the Alt key present on the keyboard, we will then click on the Microsoft Excel icon in the taskbar and then we will be clicking on the scroll wheel. How can one open out the Microsoft Excel file in a separate instance from Windows Explorer?It was well known that opening a specific workbook is considered more convenient from the respective File Explorer. Step 1: First, in File Explorer, we will be browsing for the target file effectively. Step 2: After that, we will double-click on the File (as we normally do to open it effectively), and immediately after that, we will press and then hold the Alt key from the given keyboard. Step 3: Now in these step we will be then keeping as well as holding the Alt key from the keyboard until the new instance dialog box gets pops up effectively. Step 4: After that we will be clicking " yes " in order to confirm that we want to start a new instance. How one can create a custom Microsoft Excel shortcut?And in order to create a shortcut for starting a new instance, this is what we need to do: Step 1: First, we need to get the target of our shortcut. And for this, we will be right-clicking on the respective Excel icon in the given taskbar, right-clicking on the Excel menu item, and clicking on the Properties. Step 2: In the Microsoft Excel Properties window, on the given Shortcut tab, we will be copying out the path from the Target field (including the quotation marks). If in the case of Excel 365, it would be as follows: "C:\Program Files (x86)\Microsoft Office\root\Office16\EXCEL.EXE" 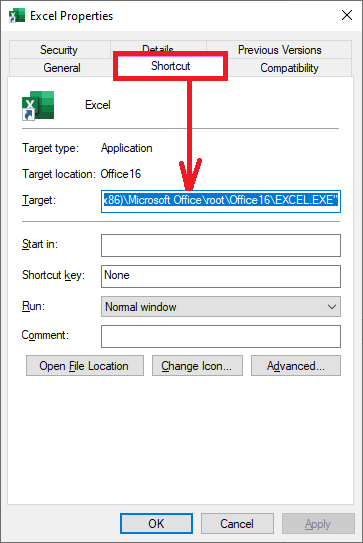
Step 3: Then we will be right-clicking on our desktop and click on New > Shortcut. Step 4: In the given item's location box, we will paste the target we have just copied, and then we will press the Space bar from our keyboard and type /x. "C:\Program Files (x86)\Microsoft Office\root\Office16\EXCEL.EXE" /x Step 4: After performing all the above steps effectively, we will click on the "Next" option. 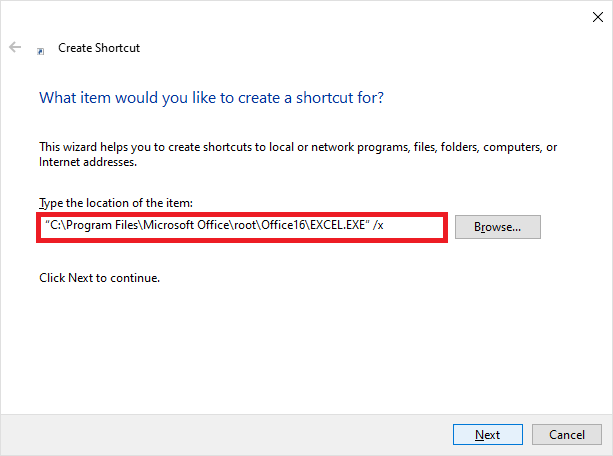
Step 5: In these step we will be give our shortcut a name and then again clicking on the Finish button respectively. Now after that, we will open a new instance of Microsoft Excel that takes just one mouse click respectively. How do we know which Microsoft Excel files are in which instance?And to check how many Microsoft Excel instances we have running, we will be opening the Task Manager (one of the fastest ways is to press the Ctrl + Shift + Esc keys from our keyboard altogether). 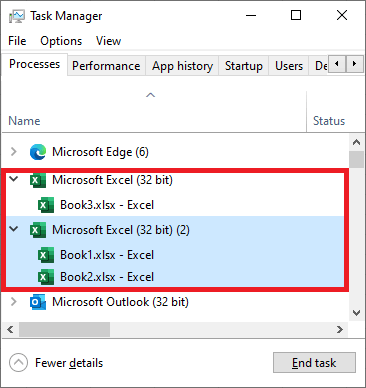
Next TopicHow to pin the home bar in Excel
|
 For Videos Join Our Youtube Channel: Join Now
Feedback
- Send your Feedback to [email protected]
Help Others, Please Share


