How to Shift Rows up in ExcelTransferring rows up is one of the number one operation in Microsoft Excel that makes facts reorganization simpler. This procedure could be very beneficial for filling in pointless spaces for your dataset or boosting how information is presented and established. Excel offers several ways to finish this operation, giving customers preference in keeping with their workflow and options. The "Cut" & "Insert" features or the consumer-friendly drag-and-drop characteristic is often utilized. Understanding the Excel Worksheet:Understanding the fundamentals of an Excel sheet is important before we move directly to studying how to change rows in Excel. Cells in an Excel worksheet is shaped with the intersection of rows and columns. Formulas, numbers, or text can all be saved in a cellular. In Excel, you need to click on the quantity of a row on the worksheet's left side to pick the total row for you to relocate it. It's also critical not to forget that an Excel workbook might have several sheets. This enables you to divide and arrange statistics into numerous sections or organizations. Click the + signal on the worksheet's bottom to feature an additional sheet. Additionally, you may rearrange and rename sheets by clicking on the data tab and choosing the suitable preference. Why Moving Rows in Excel is Important:You may optimize sorting, clarity, and data company in Excel by transferring rows. For instance, you may desire to arrange comparable data in certain rows if you manage a large dataset with many fact types. Transferring rows can also be useful if you locate that various rows include distinctive sorts of facts and need to integrate them to make sense of the facts. Furthermore, moving a row downward or upward can help ensure the records are organized in the required order if you arrange the data in a sure approach. Identifying mistakes or discrepancies in your records is another benefit of rearranging rows in Excel. You may find patterns or differences that were not apparent through reordering the rows. This might help you ensure the accuracy and dependability of your records by cleaning them up. Moving rows can also be a helpful device for teamwork. Rearranging rows in a spreadsheet to suit numerous desires or options can be important if you collaborate. You can make certain that everybody has the right to enter the information they require in a way that makes it easy for rows to be moved up or down. How to Select Multiple Rows in Excel:In massive dataset operations, you might need to shift several rows immediately. In Excel, you may select multiple rows by clicking on the row number you want to pick while conserving down the "Shift" key. As an opportunity, you can select every row quantity, in my opinion, by clicking on it whilst maintaining the "Ctrl" key. Remembering that rows have to be subsequent to each other whilst choosing numerous rows is crucial. Excel will best choose the first and final rows you click on, except the rows in between, if you try deciding on non-adjoining rows with the "Shift" key. Using Excel's "Select All" button is a further approach to choosing numerous rows. This button may be located above the row numerals and to the left beneath the column's letters within the upper-left portion of the worksheet. Clicking this button will select every row inside the worksheet. You may want to spotlight the rows you wish to select by clicking and dragging your cursor over the row values if you only prefer to select a subset. Step-by way of-Step Guide to Moving a Row up in Excel:In Excel, moving a row higher best calls for a few clean steps. Here is a step-by-step academic to help you in completing this mission: Step 1: Open Your Excel Spreadsheet:Open the worksheet containing the sheet containing the row you desire to relocate in Microsoft Excel. 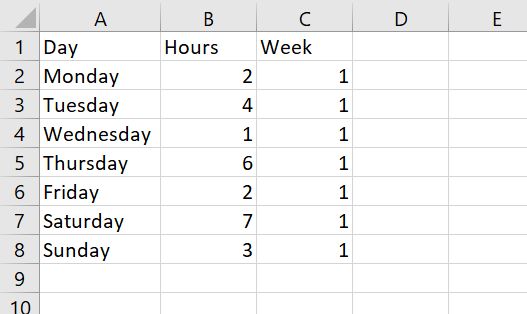
Step 2: Select the Row you need to Move:To pick out the complete row, click the row quantity at the left-hand facet within the Excel window. While selecting each row, use the "Ctrl" key to flow more than one row. 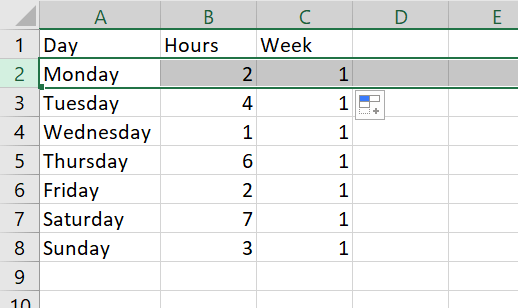
Step 3: Cut the Selected Row:To trim a chosen row, right-click on it and pick "Cut" from the resulting context menu or use a shortcut inclusive of "Ctrl" + "X." The selected row will be moved from its current area by way of executing this action. 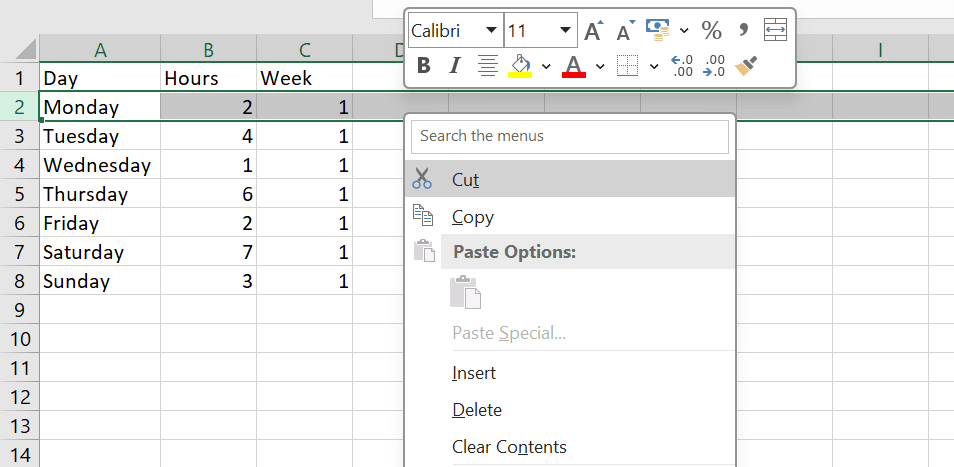
Step 4: Select the Destination Row:In order to put in the cut row, click over the row below. The selected row is going to be relocated to this row. Step 5: Insert the Cut Row:Select the destination row by means of acting a right-click and selecting "Insert Cut Cells" from the context menu. As an opportunity, you may insert the chopped row above the chosen destination row by way of the usage of your keyboard mixture "Ctrl" + "+". 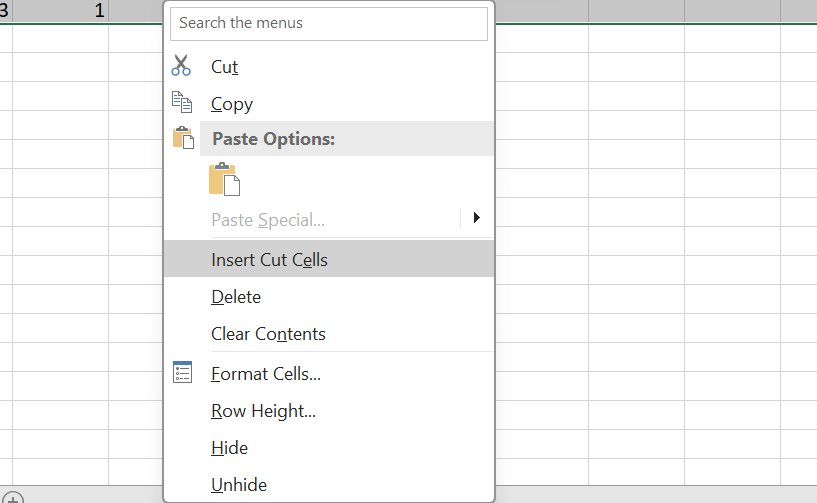
Step 6: Verify and Adjust:Verify that the row were effectively moved to the meant area by using going over the spreadsheet. Modify the surroundings round cells or carry out some other vital adjustments. 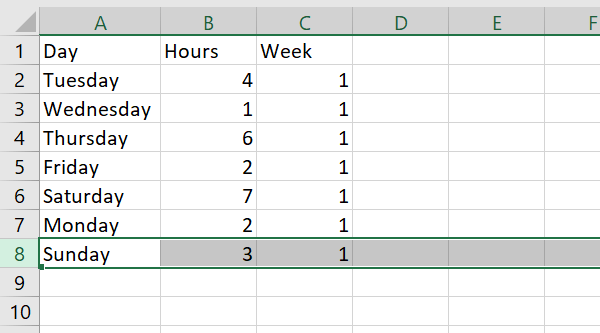
Using the Drag and Drop Method to Move Rows in Excel:Excel's drag-and-drop function makes shifting rows rapid and easy. Simply maintain down the cursor at the row you wish to relocate, then drag it upward or downward to the new spot to apply this technique. Holding urgent the "Ctrl" key permits you to move many rows immediately. The row will be added above the row in that you drop the mouse button when you operate the drag and drop approach, that is something to hold in thoughts. You may cut the row to the favoured period and then update it in the favoured spot. Furthermore, you could undo the change using the "Undo" command in case you by chance shift a row to the incorrect region. You can accomplish this by using choosing the "Undo" alternative within the toolbar or by means of hitting "Ctrl" + "Z". Shortcut Keys for Moving Rows in Excel:Additionally, Excel has a number of keyboard shortcuts that can make moving rows fast and simple. Nevertheless, there is no instantly shortcut key to transport rows left or right. Alternatively, you may circulate rows with the aid of using the "Cut" and "installed Cut Cells" commands. To trim a row, first pick out the row you want to transport, then click on "Ctrl" + "X". Then, select the spot where the reduce row need to be inserted, then click on "Ctrl" + "Shift" + "+" to drop the reduce cells. It's crucial to do not forget that with Excel, if you pass a row, all formulas and references that use that row are additionally relocated. Use the "Copy" or "Insert Copied Cells" instructions as an alternative of the "Cut" or "Insert Cut Cells" commands if you wish to maintain those formulation and suggestions of their unique locations. Tips and Tricks for Moving Rows in ExcelIt can take a variety of time to transport rows in Excel while handling big datasets. The following pointers and strategies will assist to streamline the method:
Troubleshooting Common Issues When Moving Rows in ExcelIt is probably worrying and time-eating to move rows in Excel in case you run into issues. The following are a few regular issues and their solutions:
Time-Saving Techniques for Moving Multiple Rows in Excel at Once:It can be beneficial to shift several rows immediately in Excel whilst running with massive datasets so one can keep time. The following strategies permit you to flow numerous rows in Excel in a green manner:
Conclusion:In conclusion, transferring rows up in Microsoft Excel is a simple method that may be carried out in a number of ways. Rearranging the rows on your spreadsheet is the equal no matter the tool you use-the "Cut" & "Insert Cut Cells" orders, the ability to tug and drop cells, or the "Sort" feature. The approach you use might be determined by means of your own requirements and tastes. The "Cut" & "Insert Cut Cells" functions offer a targeted method for manage and precision. The drag-and-drop technique makes rearranging rows smooth if simplicity is essential. Additionally, the "Sort" characteristic offers a strong solution for more complex situations whilst you desire to sort data according to precise standards. In the end, becoming talented in these techniques will permit you to correctly set up and work with the facts you have in Excel, improving your ability to handle and examine statistics greater without difficulty and adaptably. Shifting row up in Spreadsheet is a beneficial tool that makes using spreadsheets greater green and productive, irrespective of the size of the undertaking or complexity of the records set.
Next TopicHOW TO SUMMARIZE DATA IN EXCEL
|
 For Videos Join Our Youtube Channel: Join Now
Feedback
- Send your Feedback to [email protected]
Help Others, Please Share


