| |

Grafting DefinitionGraftingGrafting is an asexual plant propagation technique that unites plant components from several plants so they will develop and heal as a single plant. This method preserves clonal production, exploits better root systems, or propagates plants that do not root well from cuttings. Fruit tree growers and nursery personnel alike need grafting skills. Hobbyists can also pick up this helpful skill. The fundamental methods for grafting fruit trees and other plants whose cuttings or seeds cannot reproduce are covered in this article. In most cases, the stem or another aboveground plant portion known as the scion makes up the vegetative wood from the chosen variety to be reproduced. The new stem and branches will grow from a shoot with several latent buds. The portion of a plant known as the rootstock develops into the root system of a grafted or budded tree. The cambium layer of cells on both plant sections must line up and develop together for a graft or bud to be effective. All new plant development occurs between the xylem and phloem in this cambium area. 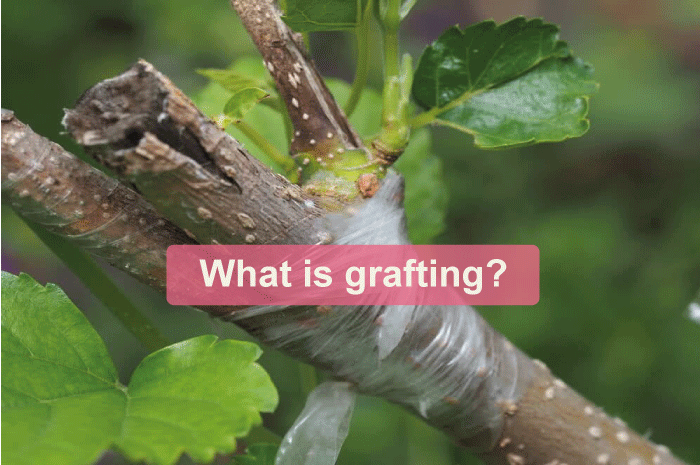
Budding is a part of grafting, often carried out with dormant scion wood in the winter or early spring. A mature single bud from the desired cultivar is inserted into the rootstock so that it comes into touch with the cambium to initiate the budding process. This operation is typically performed in the late growth season (July, August). In cultivating fruit trees, budding is becoming the method of grafting. Budding requires substantially less time and money since it employs incisions rather than significant cuts. Moreover, more plants may be generated using budding, employing separate buds per rootstock. The main drawback is that budding is mostly restricted to seasons of active development, during which other growing activities may have considerable workforce needs. While the processes differ, grafting and budding a tree are fundamentally equivalent. The type of plant, the season, the availability of plant materials, or the grafter's preference all affect the grafting technique. While apples and pears are frequently grafted, peaches, plums, and apples are typically propagated through budding. Why Graft?1. Vegetatively ReproduceSeveral plants cannot cheaply be propagated from vegetative cuttings or will not multiply from seeds (fruit varieties, flowering ornamentals, etc.) 2. Alter the VarietyOnce newer types are created, older orchards of fruit trees may need to be updated. Newer kinds could provide enhanced resistance to insects or diseases, greater taste, or larger yields. The older orchard can be top-worked with the new, better variety rather than destroying the established root structure. 3. Add a PollinatorCertain fruit trees cannot reproduce independently; they need another fruit tree, generally one of a different kind, to cross-pollinate them. Certain hollies have either male or female blooms but not both; a condition is known as dioecy. An adjacent male plant is necessary for the female plant to produce fruit properly. When this is not possible, grafting a scion from a male plant onto a female plant can improve the likelihood that cross-pollination will happen. 4. Alter the Root SystemThe growth habits, disease and pest resistance, and anchoring of some rootstocks are superior. For instance, certain rootstocks can boost resistance to crown gall and root aphids when used as rootstock for commercial apple types. Some are also used as rootstocks for dwarf plants. 5. Create Certain Plant ShapesWeeping plants are frequently grafted or budded onto a common rootstock. It can take several years of staking before the standard is big enough to sustain the weeping top. 6. Restore Damaged PlantsLarge trees or specimen plants are readily harmed at or above the soil level. Maintenance tools, illness, rats, bad weather, or vandalism might bring on harm. The terms "inarching," "approach grafting," and "bridge grafting" all apply to this vital technique. 7. Design ThingsFor more complex designs, such as hearts, chairs, or anything else they may think of, advanced grafters as they may choose to combine plants with the help of this technique. Grafting ToolsGrafting has been used for a very long time. Although tools have changed, concepts have not. The primary focus of this article is on inexpensive, basic gardening equipment. Grafting/budding knives come in a variety of styles. Grafting knives are distinguished by having a flat blade on one side. For clean cuts, sharpen the blade often. Before utilizing the blade, ensure all sharpening oil has been removed. Now, let's discuss the tools being used for grafting. 1. Budding Knife, Grafting Knife, and Box Cutter:A box cutter works well as a grafting knife substitute. The blade is very fragile and may break on bigger-diameter wood, which is a drawback. Many grafting instruments have been created to expedite the procedure and provide more accurate, matching slices. These tools function best when the sizes of the rootstock and scion are almost identical. 2. Popular Grafting Implements with a Variety of Cut TypesMore recent techniques use a stretchy plastic sheet (parafilm). The film creates a tight seal around the region and snugly binds the scion and rootstock together. When the graft grows, it is unnecessary to tear the film out because it degrades gradually. There are several widths of the film. 3. Utilizing Tools for GraftingScions and rootstocks with a diameter of three-eighths of an inch or less are ideal for use with grafting equipment. To successfully graft, the parts must be of identical size. Create a V-shaped notch in the rootstock with the tool, then cut a corresponding V-shaped scion. With grafting tape, firmly join and enclose the fragments. Two stem parts, one of which has a V-shaped notch and the other of which has a V-shaped tip. They are both the same size so they will fit together easily. 4. A Wrapped and Connected CutEach variety's bundles should be tied together and labeled. Mark wooden tags with a pencil or a horticulture pen. Make sure the name will remain on the tag no matter what kind you choose to use. Two stem bundles, one with a rubber band and the other with tape. Both have labels with the names of their respective varieties on them. 5. Scion Wood is Prepared for RefrigerationPlace each kind of scion wood in a wet (but saturated) media, such as sphagnum moss, sawdust, or paper towels, and place it in a sealable plastic bag to store. Each bundle must be tagged with the cultivar name and the collection date. For big volumes of scion wood, a waste bag works well. Keep the wood from drying out. The bundled bundles of propagating wood should be kept in a refrigerator at 34 to 38�F. Scion wood that has been kept properly should hold up well until it is time to utilize it in late winter or early spring. Collecting Scion Wood for BuddingScion wood or blossom wood should be harvested in the morning when it is still chilly outside, and the plants are still completely turgid. Carrying a cooler with ice to the field is a good idea to ensure that cuttings stay fresh. The latent wood from the previous year's or the current season's growth typically produces the greatest vegetative buds. The best buds to use are mature ones, throw-away terminals, and younger buds. When you gather the bud wood, put it into plastic bags or cover it in wet towels to prevent it from drying out, getting heated, or freezing (depending on the season). The leaves should be quickly removed after choosing the bud wood, leaving only a little portion of the leaf petiole connected to the bud wood. Put only one type of bud wood in a bag with a label. Bud sticks that will not be used immediately should be packaged, marked, and maintained in moisture-retentive receptacles like plastic bags or waxed cardboard boxes that should be kept cold (between 32- and 45 degrees Fahrenheit). Generally, bud wood kept longer than a few days should be thrown away. RootstocksFor grafting or budding, you need a rootstock compatible with the plant variety you want to connect. A cheap approach to getting a rootstock is to cultivate your own from seeds of the kind of plant you are propagating. Typically, it takes at least a year to produce a rootstock large enough for grafting. All common tree fruit seeds must be chilled before germinating, including apple, pear, peach, and persimmon. Stratification is the term used to describe this process. Once the seeds have been gathered, they must be refrigerated in a sealed container. Seeds for pears and apples should be kept for 70 to 90 days before planting. Peach and persimmon seeds must be kept cool for 90 to 120 days. Ordering from businesses specializing in producing rootstocks is another way to obtain rootstock (see Grafting Supply Resources below). These businesses provide both clonal and seedling rootstocks for sale. Clonal rootstocks were created to control tree growth and frequently resist pests and diseases spread through the soil because they possess well-known qualities that seedling rootstocks do not; these are recommended. Grafting Techniques1. Whip and Tongue GraftWhip grafting is done on seedlings or clonal rootstocks in early February or early March when they are still dormant. After grafting, they are kept at around 45 to 50 degrees Fahrenheit in wet sawdust, peat, or sphagnum moss. Check them for drying as they are being stored; they should be damp but not wet. They can also be planted immediately into pots and stored safely to prevent freezing. As a final resort, you can plant in the nursery row or right in the hole where the tree will go. Usually, this is completed in April. Use a sharp knife to make incisions about an inch long at the base of the scion and the chosen location on the rootstock. Grafting should be done 10-12 inches above the roots of the clonal rootstock. Grafting occurs 1-2 inches above the roots of the seedlings. To create the "tongue," make a second incision in each piece that goes halfway through. A diagonally cut end of a stem is sliced by a box cutter blade halfway through. After that, align the cut surfaces of the scion piece and the rootstock, ideally on both sides. Finish the whip and tongue grafting procedure by wrapping the graft with tape, film, or a rubber band and applying a tree wound dressing. Many vegetables are also grafted using the whip graft, a straightforward variation of this grafting method. 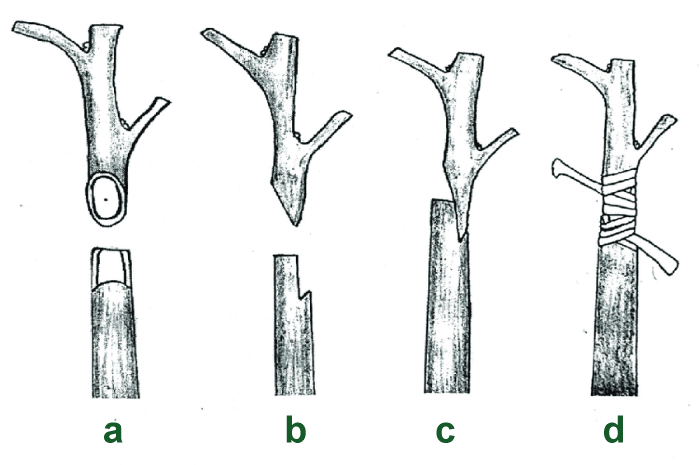
2. Cleft GraftCollect and keep scion wood, as previously discussed. The best time for cleft graft is in late February or early March before new growth starts. Cut the required limbs off with a smooth cut for cleft grafting. These limbs need to have a diameter of at least one inch. Use a hatchet or cleft grafting tool to split the stock, taking care not to fracture any knots. Open the split by driving a screwdriver or the end of the cleft grafting instrument into its core. A cutting tool used to retain a stem that has been sliced open. Leaving a nursing limb while cleft grafting is advisable to keep the tree alive until the grafted scions develop properly. If the scions develop well, the nursing limb may be cut off in the middle of the summer or top-worked the following winter. Scions with three or four buds on the bottom should be sliced on both sides, creating a wedge-shaped cut with narrower opposing sides. The thin side of the scion should be facing the middle of the stock as you insert it into the cleft. So that the stock may close firmly around the scion, carefully pry out the cleft grafting tool or screwdriver. The cambiums of the scion and stock must be matched with the utmost care. Wrap it all up in parafilm to complete. A cutting tool keeps a stem's cut end open while a replacement limb is inserted into the gap. The film around the sliced area held the two stems together. The tape or film on two sides of the stock should be removed from the grafts six to eight weeks after they start to develop, avoiding the potential for girdling. Let the tape alone peel off naturally; do not remove it. 3. Bark GraftBark grafts are applied on branches or rootstocks with a more than 2 inches in diameter. The best time to do this sort of graft varies on the crop. However, it is often done in late spring when the rootstock's bark is more manageable.
Next TopicHaemoglobin Definition
|
 For Videos Join Our Youtube Channel: Join Now
Feedback
- Send your Feedback to [email protected]
Help Others, Please Share


