| |

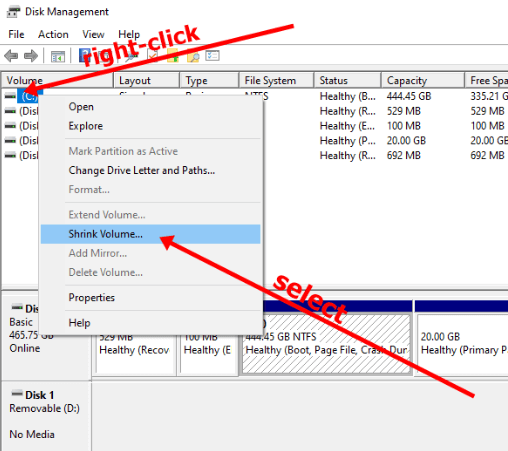
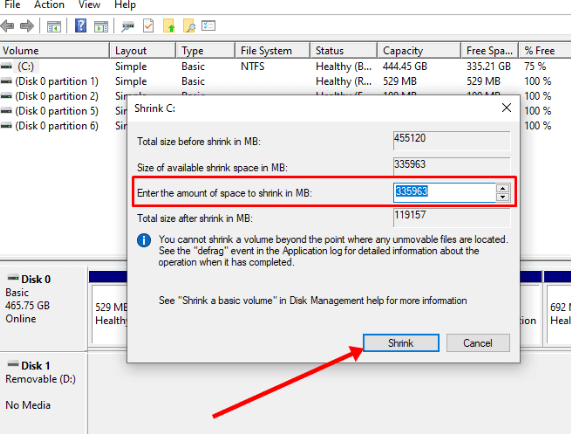
Dual BootIn most operating systems, there is only one built-in OS, but in some machines, there is a possibility to operate on two operating systems simultaneously. The process of using two OS simultaneously on a single machine is called dual booting. This enables the user to switch between the operating systems depending on the tasks and programs that the user performs. It is simple to perform a dual boot in a system. It can be done across Windows, Mac and Linux OS. You can either use two different operating systems or different versions of two operating systems. BootingBooting is the term that is used for starting or powering the system, usually when using a desktop or a laptop. In dual booting, the term is used for booting manager. This is a program that is handled by the motherboard. When the user powers on a system. The power supply unit provides power to the motherboard of the system first. The motherboard is the component responsible for managing the entire system. Sometimes you may see some text on the desktop screen before the windows are loaded into the computer. This tells you that the motherboard is loading. Before the operating system is loaded into the system, the boot ensures that all the components of the system are properly connected to the system. It scans equipment such as CDs, DVDs, and graphic cards. Once the motherboard establishes the state of the system's hardware, once the state of every component is established, all the information regarding the drive is passed to the boot manager. Boot Manager is the first program loaded when you power up the computer. It starts up the drives that the user wants to perform the tasks. The function of the boot manager is to locate the operating system in your drives. In most Mac and Windows operating systems, the user may have never used the boot manager in the system. It is because they usually have one built-in operating system. Therefore they don't switch between the operating system. The Apple Boot Camp software is used for dual booting between the Mac and windows operating systems. Its separate booting menu enables the user to change between the two operating systems. In the case of Linux and windows operating systems, the user uses the boot manager to change between the operating systems in the system. Why need Dual Boot?It is not possible to provide optimal solutions for all operating systems. One modern operating system can meet the needs of the normal user. A normal user uses the computer to perform generalized tasks such as storing information, playing games or music, etc. But for someone who does specialized work that requires specialized programs or wants to use a new operating system. The dual booting options allow the user to use both operating systems without sacrificing the system's usability. It provides a flexible solution to these issues. When the developers develop a newer version of the operating system, it increases the performance of the operating system in many aspects. But at the same time, they may remove or degrade the performance of certain features that some users use. This also allows the user to use different versions of the same operating system on the same machine. With every new Windows operating system launch, updates are made to all the drivers and graphic tools. For example, Windows 11 provides great performance and a range of new features, such as application programs and games. Still, the older applications in the latest versions perform poorly as they no longer provide developer support. If suitable updates are not made to the applications, there is a possibility that they may not function properly. Dual booting enables the user to change the operating system while working on them, it brings the system's maximum performance, and you can divide tasks between the OS while working on one. Performing the Dual BootBefore performing the given steps, the user must ensure that the user performs proper backup for all the files and documents in the system. When you install a new OS on your desktop or repartition the disk drives, the repartitioning of disk drives allows preparing separate sections in the drives that can be used for different OS. There is always a possibility that the existing data can be overwritten or deleted. So it's better to take precautionary measures. Dual Boot Two Windows Operating SystemsThe user can use the dual boot to run two different versions of the same operating system on the same device. The performance of the new version is improved, but sometimes there are instances when some programs are no longer supported in the latest update. So, by using the dual boot, the user can work with such programs, and at the same time, the user can also enjoy the enhanced performance provided by the latest version. Here, we will perform dual booting for Windows 7 and Windows 10. The steps to install the windows are the same. It is possible to perform dual boot with older versions than Windows 7. But it is comparatively difficult to find copies of the previous versions. Get another copy of the windowsSuppose the user wants to perform dual boot. The first requirement is to have a copy of another version of Windows. For example, if you are currently using Windows 10 in your system, you would require a copy of the Windows 7 versions that you can install. You can buy a copy of Windows from Microsoft. However, Microsoft no longer sells Windows 7, but you can purchase a copy from any third-party vendor. It is available on websites such as eBay. But if you are using Windows 7 already, you can easily purchase the Windows 10 version from the Microsoft website. Preparing the Bootable MediaIf your second copy of the Windows is to be installed from a DVD, then the user need not perform this step. The user can directly use the DVD to install the Windows without preparing the partitions. But if you have a copy of Windows downloaded from the internet, the user will require an empty disk or a flash drive with at least 8 GB of space available. This space will be used for creating bootable media. This drive or disk will have its operating system in it. Microsoft provides you with the tools that can be used for downloading and building bootable media for Windows OS. The user can download the tools from the website by simply putting in the Windows product key and following the instructions mentioned below: Creating a New Window PartitionFor a desktop, the simplest and most secure way to use dual boot is by purchasing and installing a new hard, hard drive or SSD for the new operating system. This is secure and uses this method. You won't have to compromise the space provided to the existing OS. There will be no requirement for repartitioning either. You can skip stepping four if you are performing dual boot in a new device. Else the user will have to create space for installing the new Windows on your existing drive.
This will create a new partition in the Windows operating system. Follow the instruction on the tool to finish creating the new partition. Installing the Windows OSUntil now, the user is required to boot the system from the created installation media, but when using the dual boot for Windows 7 and 10, the user has a more handy way to perform the installation by using the file explorer.
Using Windows Boot Manager The user can use the manager to switch between the OS. Finally, the Windows dual boot is now ready. Dual Boot Windows with Linux OS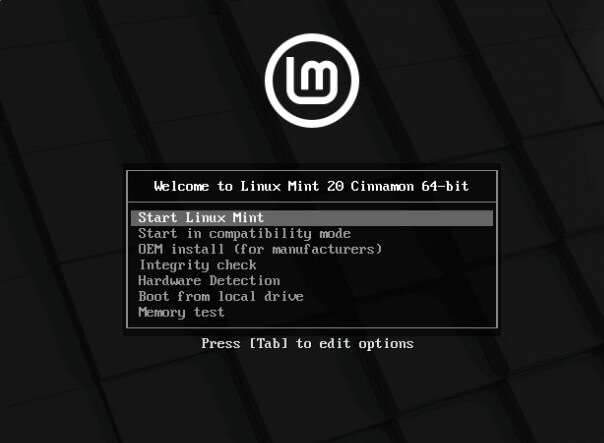
It is possible to dual boot using two different operating systems. Suppose you want to run Windows with Linux operating system in your system. Then the user must first determine the distribution you want to run in your system. Some popular distributions of Linux OS are Mint and Ubuntu, with many distributions to choose from. Each distribution has its unique features that can be used to perform different functions. Here, we will use the Linux Mint operating system. The steps are similar for installing the other distributions as well. The only change is that the user needs to download the disk image associated with the Linux distribution you want to install for the dual boot. If you want to learn more about the distribution you are using or having trouble choosing one, then you can refer to the distribution documentation. It contains details about the installers of the Linux distribution too. Finding a Linux Disk ImageThe user can download the disk images from the internet. The images are available on the official Linux website. Go to the official website and download the image for the Linux Mint. Create Bootable MediaThis step is similar to the one performed using two windows operating systems for the dual boot. You will require an empty flash drive. If the files contain any data, the data will be lost. The simplest way to convert your flash drive into a bootable installation media is using a Universal USB installer. The user can download it from the official website. The website also contains instructions about how to use the installer. Creating a Partition for the Linux OSFor a desktop, the simplest and most secure way to use dual boot is by purchasing and installing a new hard, hard drive or SSD for the new operating system. This is secure and uses this method. You won't have to compromise the space provided to the existing OS. There will be no requirement for repartitioning either. You can skip stepping four if you are performing dual boot in a new device. Else the user will have to create space for installing the new Windows on your existing drive. For Windows 10, the user needs to perform the given steps:
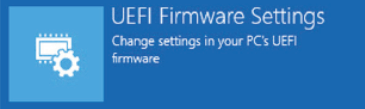
A new feature has been introduced in Windows 10. The feature is known as the Secure Boot. This feature was introduced to ensure that there is no tampering with the installation of the Windows OS. But if this software is enabled, this option can cause trouble when using the dual boot with the Linux OS. This step disables the feature which may not be necessary but depend on your hardware. Still, it is better to disable the option as a preventive step so that this does not create any problems in the future during installation. Follow the below steps to turn off the secure boot in your operating system:
Perform the boot from your installation media.For the next step, ensure that the USB drive you have downloaded from the Linux installer is attached to your system. Now go to the boot manager of your system. To open the boot manager:
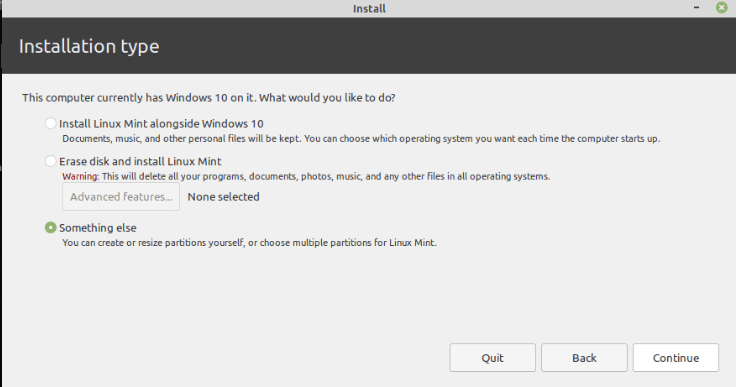
Once you have performed the above steps, restart the system, and the boot manager will be opened. Then use the up and down arrow keys on your keyboard to go to the USB Linux Drive. Once you reach there, select it and click on Enter. Creating partitions for the Linux OSPerform the steps as instructed by the installer. Follow them until you reach the type screen in the installer. Then press something else option. You would want to split the space into at least three partitions. These three partitions are as follows:
If the user uses a new hard drive to install the operating system, then find the hard drive and continue. Otherwise, find the free space created by the user before and use it. Creating the /root partitionAfter selecting the space where you want to create the partitions, that is either the new drive or the space in the existing drive. Select the + sign. Now you will see the window to create a partition. These windows allow the user to create the main Linux partition. In the next step, the user needs to provide space to the system that the partition will use to store the files and programs of the operating system. The minimum recommended space for the proper functioning of the operating system is 10 GB. It can be up to 5 GB. But if you want to install multiple additional programs in the OS, the user will have to assign the storage accordingly. The size that is allotted to create the partition is entered in megabytes, so 1 GB is almost equal to 10,000 MB. Select the options as stated below:
Creating the Swap partitionSelect the + sign. Now the user needs to create the swap partition. This will act as the temporary RAM of the system. It is the temporary memory that is assigned when space is not available in the system RAM. It is recommended to be of the same size as your system RAM. For example, if your system has 8 GB RAM, assign 8000 MB space for the partition. Select the following options for creating swap partitions:
Creating the home partitionYou must follow the same steps above to create the home partition. This partition will be used to store all the files and documents. This will occupy most space available on the drive. You can assign the remaining space to the home partition. Select the following options to create a home partition:
Once you have set up the partitions, you need to click on the Install button to install the Linux OS. After installing, you will have to choose a time zone and the layout for the keyboard. The user must also create a new username and password for the same. 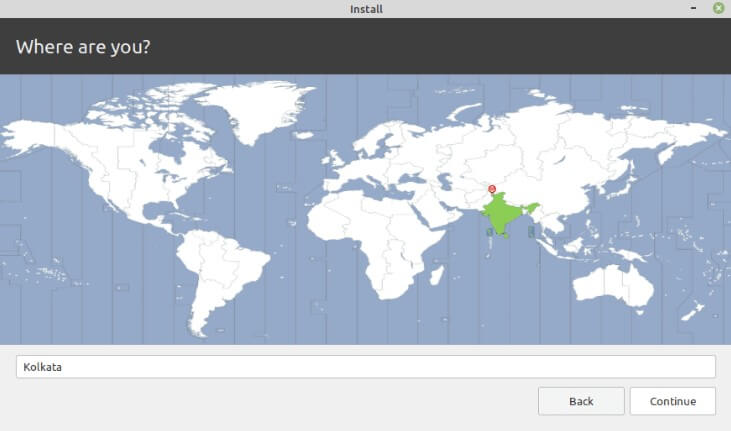
Next TopicWhat is a Cable modem
|
 For Videos Join Our Youtube Channel: Join Now
Feedback
- Send your Feedback to [email protected]
Help Others, Please Share


