What is a Slide Master?
Slide Master is a powerful feature of presentation software that allows users to create a consistent design and layout across multiple slides. The Slide Master is essentially a template that defines a presentation's overall look and feels, including the background, fonts, colors, layout of text, and other visual elements.
By using a Slide Master, users can save time and effort by creating a consistent design for all their slides at once, rather than having to format each slide individually manually. This also ensures that the presentation has a professional and polished appearance, which can help to engage and impress the audience.
To access the Slide Master, users typically need to navigate to a specific tab or menu within their presentation software, such as the "View" tab in Microsoft PowerPoint or the "Slide" menu in Google Slides. Once in the Slide Master view, users can make changes to the design and layout of the slides by adding, removing, or modifying various elements.
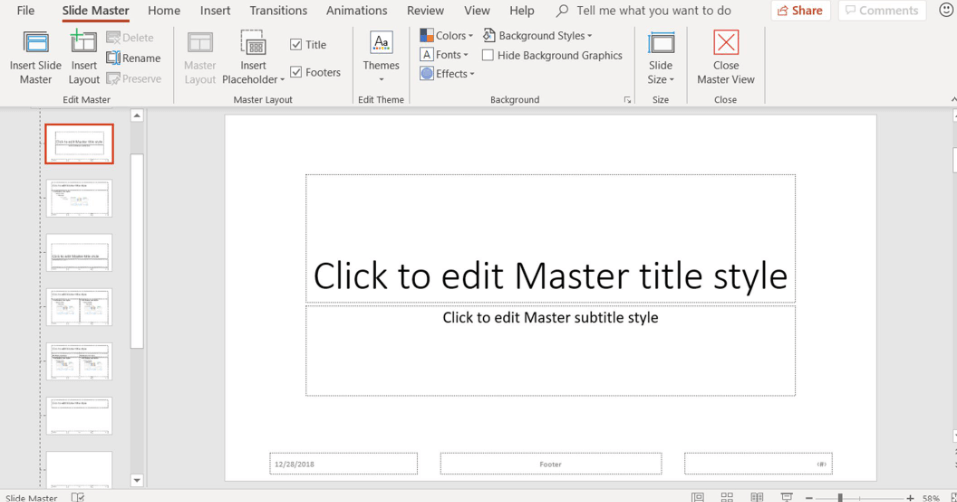
One of the key advantages of using Slide Master is the ability to simultaneously apply changes to all slides in the presentation. For example, if the user changes the font size or color, they can update the Slide Master, and the change will be reflected on all slides that use that template.
How to access and edit the Slide Master in Microsoft PowerPoint or Google Slides
Accessing and editing the Slide Master in Microsoft PowerPoint or Google Slides is a simple process that can be done using a few steps. Here are the steps to follow:
Accessing the Slide Master in Microsoft PowerPoint:
- Open the PowerPoint presentation you want to edit.
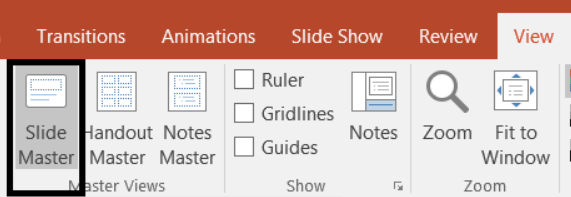
- Click on the "View" tab in the ribbon at the top of the screen.
- Click on "Slide Master" in the "Master Views" section of the ribbon.
Accessing the Slide Master in Google Slides:
- A Google Slides presentation that needs editing should be opened.
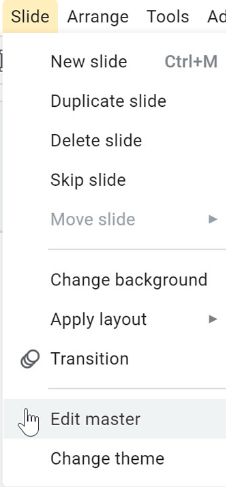
- Choose "Slide" from the top navigation bar's menu.
- At the bottom of the drop-down menu, click "Edit Master."
You can start altering your presentation's layout and design once you are in the Slide Master view. Here are some tips and guidelines for editing the Slide Master in Microsoft PowerPoint or Google Slides:
- Modifying the Slide Master: The Slide Master contains all of the design elements for your presentation so that you can modify anything from fonts and colors to backgrounds and layouts. You can add or remove text boxes, images, or any other elements on the Slide Master that will appear on all slides in the presentation.
- Customizing Fonts and Colors: By editing the Slide Master, you can customize your presentation's font and color scheme. You can choose from various fonts and color palettes or create your own.
- Adding Logos and Branding: You can add your company's logo or branding elements to the Slide Master to ensure a consistent look and feel throughout the presentation.
- Adding Page Numbers: If you want to include page numbers on all of your slides, you can do this by adding a text box to the Slide Master and inserting a placeholder for the page number.
- Creating Custom Layouts: Besides the Slide Master, you can create custom layouts for individual or group slides. This allows you to have different design elements for different content types or highlight individual slides in your presentation.
- Saving and Applying Changes: Once you have made changes to the Slide Master, you can save these changes and apply them to all slides in your presentation by clicking "Close Master View" or "Close" in Google Slides.
Customizing the Slide Master
Creating a professional-looking presentation requires you to customize the Slide Master. The design of each slide in your presentation is managed by a template called the Slide Master. Customizing the Slide Master allows you to apply consistent formatting and design elements to all slides. Here are some tips for customizing the Slide Master:

- Layout: The Slide Master controls the layout of all slides in your presentation. You can customize the layout of the Slide Master by adding or removing placeholders for text, images, charts, tables, and more. You can also adjust the size and position of placeholders to meet your specific needs. By customizing the layout of the Slide Master, you can ensure that all slides in your presentation have a consistent design and layout.
- Themes: Themes are a predefined set of colors, fonts, and effects that can be applied to your presentation. You can choose from various themes in Microsoft PowerPoint or Google Slides or create custom themes. By customizing the theme of the Slide Master, you can apply a consistent look and feel to all slides in your presentation.
- Colors: The Slide Master also controls the color scheme of your presentation. You can customize the colors of the Slide Master by selecting a color palette or creating your custom colors. By customizing the color scheme of the Slide Master, you can create a visually appealing presentation that matches your brand or message.
- Fonts: The Slide Master also controls your presentation's font style and size. You can customize the font style and size of the Slide Master by selecting from various fonts or creating your custom font. By customizing the font style and size of the Slide Master, you can create a consistent and professional-looking presentation.
- Background: The Slide Master also controls the background of your presentation. You can customize the background of the Slide Master by selecting a color or adding an image. By customizing the background of the Slide Master, you can create a visually appealing presentation that captures your audience's attention.
- Animations and Transitions: The Slide Master also controls the animations and transitions applied to all slides in your presentation. You can customize the animations and transitions by selecting from various options or creating custom ones. Customizing the animations and transitions allows you to create a visually engaging presentation that keeps your audience interested.
How to rename the Slide Master
Renaming the Slide Master in Microsoft PowerPoint or Google Slides is a simple process that can be done using a few steps. Here's how to rename the Slide Master in both applications:
Renaming the Slide Master in Microsoft PowerPoint:
- Open the PowerPoint presentation you want to edit.
- Click on the "View" tab in the ribbon at the top of the screen.
- Click on "Slide Master" in the "Master Views" section of the ribbon.
- In the "Slide Master" view, click on the thumbnail of the Slide Master that you want to rename.
- Click on the "Rename Master" button in the "Edit Master" section of the ribbon.
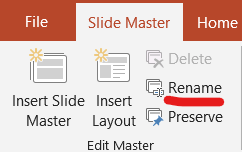
- In the dialog box that displays, enter the new name for the Slide Master, then click "Rename."
In Google Slides, renaming the slide master:
- A Google Slides presentation that needs editing should be opened.
- Choose "Slide" from the top navigation bar's menu.
- At the bottom of the drop-down menu, click "Edit Master."
- Click on the Slide Master thumbnail you want to rename in the "Master" view.
- On the toolbar above the thumbnail, select "Rename." Type the new name for the Slide Master in the dialog box that appears, and click "OK."
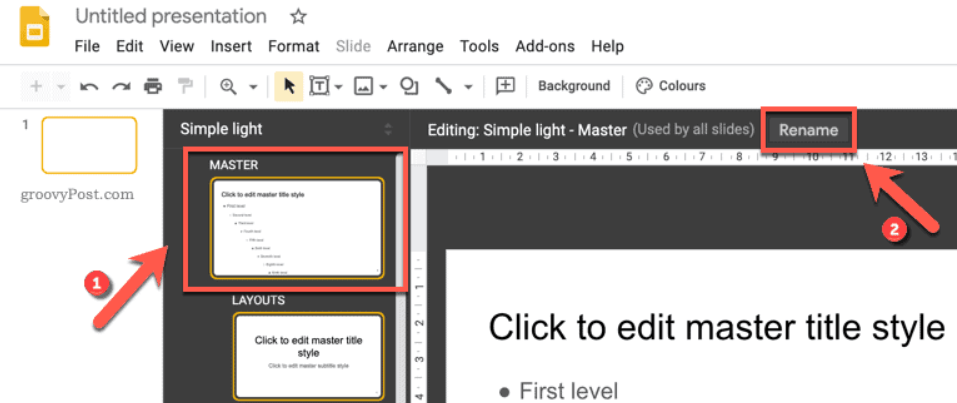
By renaming the Slide Master, you can make identifying and managing your presentation design easier. For example, you might want to rename the Slide Master to reflect the presentation's content or your organization's branding.
In addition to renaming the Slide Master, you can create multiple Slide Masters in a single presentation. This can be useful if your presentation has different sections or themes requiring different design elements. To create a new Slide Master, go to the "Master Views" section of the Microsoft PowerPoint ribbon or click the "New Master" button in the toolbar above the thumbnails in Google Slides.
Returning to Normal View
After making changes to the Slide Master in Microsoft PowerPoint or Google Slides, it's important to return to the normal view to see how the changes look in the context of your presentation. Here's how to do it:
In Microsoft PowerPoint:
- Click the "Slide Master" tab in the ribbon at the top of the screen.
- Click the "Close Master View" button in the "Close" section of the ribbon.
- The presentation will return to the normal view, where you can view the changes, you made to the Slide Master.

In Google Slides:
- Click the "Slide" menu in the top navigation bar.
- Click "Normal" in the drop-down menu.
- The presentation will return to the normal view, where you can view the changes, you made to the Slide Master.
Returning to the normal view lets you see your changes to the Slide Master in the presentation context. This can be helpful to ensure that the design is consistent and that the slides look how you intended.
Note: If you want to make additional changes to the Slide Master, you can easily return to the Slide Master view by following the steps outlined in the previous sections. Click the "Slide Master" tab in the ribbon in Microsoft PowerPoint, or click the "Slide" menu and then "Edit Master" in Google Slides.
The benefits of using Slide Master
Using Slide Master in your presentations can offer several benefits to help you create a more polished and professional-looking presentation. Here are some of the benefits of using Slide Master:
- Consistency: Slide Master allows you to create a consistent design for all the slides in your presentation, including font, color, background, and layout. This consistency can help your presentation look more professional and cohesive.
- Time-saving: Using Slide Master can save you time by allowing you to simultaneously apply design changes to multiple slides. Instead of manually changing the design on each slide, you can make the change in the Slide Master, which will automatically apply to all the slides.
- Branding: Slide Master can be used to create a design that aligns with your brand or company image. Using consistent branding across all slides can reinforce your brand message and help build brand recognition.
- Flexibility: With Slide Master, you can easily make changes to the design of your presentation at any time. This flexibility can be particularly useful if you need to make a last-minute change or update your presentation.
- Efficiency: Using Slide Master can help you work more efficiently by allowing you to focus on content creation instead of design. By creating a design template in the Slide Master, you can quickly create new slides and add content without worrying about formatting.
- Accessibility: Slide Master can help make your presentation more accessible to a wider audience. By using clear and consistent design elements, you can make your presentation easier to understand for people with visual impairments or other disabilities.
|


 For Videos Join Our Youtube Channel: Join Now


