What is the Formatting Toolbar?
The Formatting Toolbar is a user interface element in word processing software or graphic design programs, such as Microsoft Word or Adobe Illustrator. The Formatting Toolbar allows the user to apply the desired formatting to text or graphics with just one click, saving time and effort compared to navigating through menus or using keyboard shortcuts. A row of icons or buttons provides quick access to various formatting options for text or graphics. The Formatting Toolbar can be customized to include only the most frequently used formatting options and can be docked or floating, depending on the user's preference. Overall, the Formatting Toolbar is essential for users who need to format text or graphics quickly and efficiently.

Purpose of Formatting Toolbar
The Formatting Toolbar is designed to enhance the overall user experience by providing a fast and intuitive way to format text and graphics. The purpose of the Formatting Toolbar is to provide quick and easy access to various formatting options for text or graphics in word processing or graphic design software. It streamlines the formatting process, allowing users to apply specific styles and formatting to their documents or designs with just a few clicks. The Formatting Toolbar saves time and effort compared to searching through menus or memorizing keyboard shortcuts, making it convenient for users of all skill levels. Additionally, the Formatting Toolbar can be customized to include only the user frequently uses options, making it even more efficient.
Standard formatting options and how to use them
The standard formatting options available in the Formatting Toolbar vary depending on the software being used but typically include the following:

- Font style and size: This option allows you to change the font style and size of the selected text. To use it, select the text you want to format, then click the font drop-down menu to select a font style and size. The font style refers to the lettering design, such as Times New Roman, Arial, or Calibri, while the font size refers to the lettering height in points. Changing the font style and size can significantly impact the look and feel of your text and help you convey your message effectively.
- Bold, italic, and underline: These options allow you to emphasize the selected text. Bold makes the text appear thicker and darker, italic slant the text to the right, and underline a line under the text. These options are commonly used to highlight important words or phrases or to create visual interest in your document. To use them, select the text you want to format, then click the relevant button to toggle bold, italic, or underline on or off.
- Text and background colour: These options allow you to change the colour of the selected text or the background behind it. To use them, select the text or background you want to format, then click the text or background colour button to select a colour from the palette. Choosing colours that are legible and easy to read, especially for long paragraphs of text, and considering the purpose and tone of your document when selecting colours is essential. Choosing the right colour can help you convey your message effectively and make your text more visually appealing.
- Text alignment: This option allows you to align text to the left, right, and centre or justify it. Select the text you want to format, then click the appropriate button to align the text as desired. Left-aligned text is flush against the left margin and is the most commonly used alignment for text in books, articles, and other documents. Right-aligned text is flush against the right margin and is used less often but can be effective in certain situations, such as when you want to emphasize a particular word or phrase. Centre-aligned text is centred between the margins, making it useful for titles or headings. Justified text is aligned along the left and right margins, creating a clean and organized look.
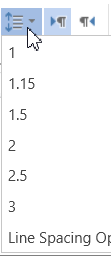
- Paragraph formatting: This option allows you to adjust a paragraph's spacing, indents, and line breaks. To use it, place the cursor within the paragraph you want to format, then click the appropriate button to adjust the paragraph's formatting. Line spacing refers to the amount of space between lines of text, and you can adjust it to create more or less white space in your document. Indents create a visual hierarchy by shifting the first line of a paragraph to the right or left, creating a margin within the text. Line breaks, also known as complex returns, are used to create a new line of text, and you can adjust the spacing before and after them to create more or less white space.
These are just a few standard formatting options in the Formatting Toolbar. It's essential to understand how they work and affect your text's appearance or graphics to use them effectively. Experimenting with different options and formatting combinations can help you find the best way to format your documents or designs to achieve your desired effect.
Advanced formatting options and how to access them
Advanced formatting options can include various features for enhancing a document's visual appearance and organization. Some standard advanced formatting options are:
- Columns: Allows you to create multi-column layouts within a document, which can be helpful for newspaper-style articles or other documents that benefit from a columnar format.
- Margins: Adjusting the margins of a document can control the white space around the text and help you achieve a desired visual appearance.
- Page background and borders: This option allows you to set a background colour or image for the page and control the appearance of the page border.
- Page numbering and header/footer: This option allows you to add page numbers, headers, and footers to your document and control their appearance and placement.
- Watermarks: This option lets you add a visual element, such as a logo or text, to the background of the page, which can help identify the document or add a professional touch.
- Section breaks: This option allows you to create separate sections within a document, which can help control page numbering, header/footer, and other formatting options on a per-section basis.
- Page orientation: This option lets you switch the page's orientation between portrait and landscape.
- Page size: This option lets you adjust the size of the page, which can help create custom page sizes or match a specific document format.
These are a few examples of the advanced formatting options in text editing or word processing software. The exact options available will depend on the software program being used.
Comparison of the Formatting Toolbar in different software programs and platforms
The formatting toolbar is a common feature in many software programs and platforms, used to apply formatting to text, images, and other elements. However, the exact features and options included in a formatting toolbar can vary depending on the software program or platform.
- In a word processing program like Microsoft Word, the formatting toolbar typically includes options for font, font size, bold, italic, underline, text colour, highlight colour, text alignment, and bullet points, among others.
- In a web-based platform like Google Docs, the formatting toolbar may have similar options but may also include the ability to add hyperlinks and tables.
- The formatting toolbar may include options for stroke width, fill colour, transparency, and other design-specific features in a graphic design program like Adobe Illustrator.
- In a presentation program like PowerPoint, the formatting toolbar may include options for slide layouts, background colours, and adding images and shapes.
Note: The exact features and options included in a formatting toolbar can also vary based on the specific version of the software program or platform being used. However, the primary function of the formatting toolbar remains the same across most software programs and platforms, providing a convenient and centralized location for users to apply formatting to their content.
How to enable the formatting toolbar
Enabling the formatting toolbar is a simple process. Here are the steps:
- Open the application in which you want to enable the formatting toolbar.
- Go to the "View" menu and select "Toolbars".
- From the Toolbars list, select "Formatting".
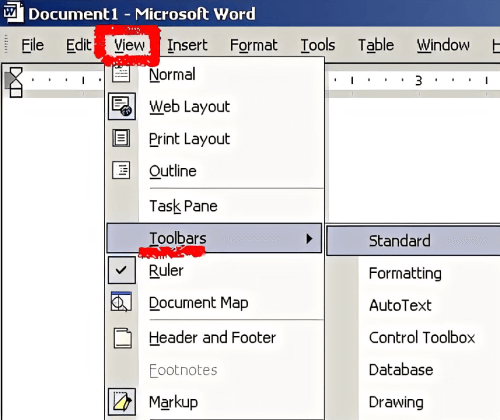
- The formatting toolbar will now appear at the top of the application window.
- You may need to move the formatting toolbar to a different location on the screen. To do this, click and drag the toolbar to the desired location.
- You can also customize the formatting toolbar to your liking. To do this, right-click on the toolbar and select "Customize".
- A dialogue box will appear. Select the options you want to appear on the formatting toolbar and click "OK".
The formatting toolbar is now enabled and ready for use. It provides quick access to formatting options and is an excellent tool for quickly making changes to the text in your documents.
|

 For Videos Join Our Youtube Channel: Join Now


