Javatpoint Logo
Javatpoint Logo

How do I set up a home network?

Users can play network games and share printers, files, broadband Internet access, and many more with the help of setting up a home network. Make a list of everything you want to be able to accomplish with your network before you set it up. The following options will lead you to a number of different computer networks that you may set up at home.
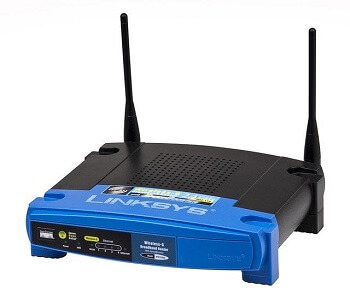
How do I set up a home network

Peer-to-peer network

A peer-to-peer (P2P) network is when two or more computer systems are connected and share resources without the need for a second server computer. Two computers, which are linked with the help of a Universal Serial Bus (USB) for the purpose of sharing data, a peer-to-peer (P2P) network is an ad hoc connection between them. A peer-to-peer network can also refer to a long-term infrastructure that uses copper lines in order to connect a half-dozen computers in a small firm.

Estimated setup time: 10-15 Minutes

Advantages and capabilities

  • A peer-to-peer network has the potential to connect two computers.
  • It allows the users to share files, as well as play network games.
  • It's simple to expand the peer-to-peer network with the help of adding new nodes. This only increases the system's ability to share data.

Disadvantages

  • Only two computers in peer to peer network can be linked to the network at a time.
  • As the data is scattered across numerous computers and there is no central server, backing it up is difficult.
  • As each system is independent and maintains its own data; therefore, providing overall security in a peer-to-peer network is not easy.

Required hardware and software

  • Two computers with installed and operational 10/100 Ethernet network cards.
  • Network crossover cable

Microsoft Windows 95 and 98 steps

  1. In the device manager, check that your network cards are properly installed and that you have the most recent network drivers for the cards you have installed.
  2. Next, connect the two computers with the help of using a USB cable.
  3. You may view Network properties with the help of navigating to Start > Settings > Control Panel and double-clicking "Network."
  4. Check to see if your network card is displayed as a component of a network. It's important to note that this is not the dial-up adaptor.
  5. Make sure your network adapter supports TCP/IP and IPX/SPX. You will need to install one or both of these protocols if one or both aren't listed for your network device.
  6. Click the "File and Print Sharing" option in the Network box once the protocols have been installed. You must choose whether or not to share files and prints on this machine in this window. Apply this technique to all of the machines.
  7. With the help of selecting the network adapter's TCP/IP protocol and clicking the "Properties" button to configure it, set up the TCP/IP protocol.
  8. Select "Specify an IP address" from the Properties menu. Fill in the blanks with a value to the one shown in the example.
    IP Address: 102.55.92.1
    Subnet Mask: 255.255.255.192
  9. Once the IP address and Subnet mask have been established, close all windows and restart the computer system.

Microsoft Windows ME, 2000, and XP steps

  • In the device manager, check that your network cards are properly installed and that you have the most recent network drivers for the cards you have installed.
  • Next, connect the two computers with the help of using a USB cable.
  • You may view Network properties with the help of navigating to Start > Settings > Control Panel and double-clicking "Network."
  • Then, Local Area Connection" should be double-clicked.
  • Select "Properties" from the drop-down menu.
  • Make sure your network adapter supports TCP/IP and IPX/SPX. You will need to install one or both of these protocols if one or both aren't listed for your network device.
  • Once the protocols have been installed, make sure that File and Print sharing is enabled in the Network window. If you wish to share files and prints on this system, click the install button and select File and Print Sharing.
  • You may configure the TCP/IP protocol by choosing the Internet Protocol (TCP/IP) protocol for the network adapter and clicking the "Properties" button.
  • From the Properties menu, choose "Specify an IP address." Enter a value that resembles the examples below.
    IP Address: 102.55.92.1
    Subnet Mask: 255.255.255.192
    The IP address of each machine must be unique. As a result, it could be 102.55.92.2 with the same subnet mask on the second machine.
  • Once the IP address and Subnet mask have been established, close all windows and restart the computer system.

Network with file sharing

In the same house, a coworker, or a friend in another country, the process of transferring one or more computer files through a network with someone is known as file sharing. With the help of file sharing, you can also access your files remotely.

Advantages and capabilities: It allow you to connect more than two computers to the network.

Disadvantages: It needs additional hardware as well as funds.

Estimated setup time: 20-30 minutes.

Required hardware and software

  • Standard network cables
  • Installed and operational 10/100 Ethernet network cards on computers
  • Network Switch or Hub

Microsoft Windows 95 and 98 Steps

  1. In the device manager, check that your network cards are properly installed and that you have the most up-to-date network drivers for the cards you have installed.
  2. The network switch or hub should be connected to each machine.
  3. You may view Network properties with the help of navigating to Start > Settings > Control Panel and double-clicking "Network."
  4. Check to see if your network card is displayed as a component of a network. It's important to note that this is not the dial-up adaptor.
  5. Make sure your network adapter supports TCP/IP and IPX/SPX. Then, for your network adapter. you need to install the protocol if one or both of these protocols are not displayed.
  6. Once the protocols have been installed, check that File and Print sharing is enabled in the Network pane. If you wish to share files and prints on this system, click the install button and select File and Print Sharing.
  7. With the help of selecting the network adapter's TCP/IP protocol and clicking the "Properties" button to configure it, set up the TCP/IP protocol.
  8. Select "Specify an IP address" from the Properties menu. Fill in the blanks with a value to the one shown in the example.
    IP Address: 102.55.92.1
    Subnet Mask: 255.255.255.192
    The IP address of each machine must be unique. As a result, it could be 102.55.92.2 with the same subnet mask on the second machine.
  9. Once the IP address and Subnet mask have been established, close all windows and restart the computer system.

Microsoft Windows ME, 2000, and XP steps

  • In the device manager, check that your network cards are properly installed and that you have the most up-to-date network drivers for the cards you have installed.
  • The network switch or hub should be connected to each machine.
  • You may view Network properties with the help of navigating to Start > Settings > Control Panel and double-clicking "Network."
  • Then, Local Area Connection" should be double-clicked.
  • Select "Properties" from the drop-down menu.
  • Make sure your network adapter supports TCP/IP and IPX/SPX. Then, you need to install the protocol if either one or both of these protocols are not displayed for your network adapter.
  • Once the protocols have been installed, check that File and Print sharing is enabled in the Network pane. Click the install button and select File and Print Sharing if you want to allow file and print sharing on this machine.
  • With the help of selecting the network adapter's TCP/IP protocol and clicking the "Properties" button to configure it, set up the TCP/IP protocol.
  • Select "Specify an IP address" from the Properties menu. Fill in the blanks with a value to the one shown in the example.
    IP Address: 102.55.92.1
    Subnet Mask: 255.255.255.192
    The IP address of each machine must be unique. As a result, it could be 102.55.92.2 with the same subnet mask on the second computer system.
  • Once the IP address and Subnet mask have been established, close all windows and restart the computer system.

Network with modem Internet sharing

Advantages and capabilities: In the house, the modem connection can be shared by all computers.

Disadvantages

  • It needs additional hardware as well as funds.
  • The connection appears to be very slow if numerous people are surfing or downloading files at the same time; because a modem has limited bandwidth.

Estimated setup time: This network takes 30-40 minutes to establish the connection.

Required hardware and software

  • Installed and operational 10/100 Ethernet network cards on computers
  • Usually, it requires a hub, switch, or network router.
  • A computer with a software proxy installed.

Network with broadband Internet sharing

Advantages and capabilities: In the house, the broadband Internet connection can be shared by all computers.

Disadvantages

  • It needs additional hardware as well as funds.

Estimated setup time: This network takes 40-50 minutes to establish the connection.

Required hardware and software

  • Installed and operational 10/100 Ethernet network cards on computers.
  • A computer that has a proxy program installed.
  • It requires a hub, switch, or network router.

Router requirements

When choosing a network router, look for the qualities listed below.

  • WAN Port
  • Support for NAT
  • Uplink ports

Hardware setup

There are two methods for constructing this network, as indicated in the picture below. We suggest selecting "Method One" is the best approach because it enables the connection of many computers. It is possible to save money with the help of not acquiring a network hub or switch.
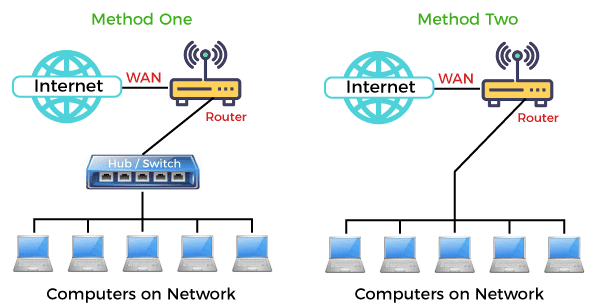
How do I set up a home network

Method one

  • Connect the router's WAN port to the broadband Internet connection.
  • Connect the router to a network hub or switch.
  • Connect the hub or switch to each of the computers.
  • Your broadband provider will offer you network settings; you need to enter this setting in your network router.

Method two

  • Connect the WAN port of the router to your high-speed Internet connection.
  • Connect the router to each PC. You will have to use the first technique to set up the network if each computer does not have enough ports.
  • Your broadband provider will offer you network settings; you need to enter this setting in your network router.

Wired vs. Wireless Home Network

Because most routers support both wired and wireless networks, it is not necessary to choose one over the other when purchasing a router. The devices themselves, their capabilities, and how you want to use them will decide the connection you choose.

Over the last two decades, wireless networks have improved to the point where they can in the present compete with wired networking in terms of maximum performance. Wi-Fi 6 (802.11ax), the most recent iteration, offers a theoretical maximum bandwidth of around 1,200 Megabytes per second or 9.6 Gigabits per second. That's on par with the fastest Ethernet connections; however, such speeds are challenging to attain reliably even in near-ideal conditions.

As compared to speed, more important is Wi-Fi 6's capacity that has the potential to support many more devices on the same network across numerous channels. It allows more devices to run at near-peak levels, decreases network congestion, whether they are transmitting streaming material or data across the internet.

Unfortunately, Wi-Fi 6 is only supported by high-end routers and a small number of wireless gadgets. Wi-Fi 5 (802.11ac) is more widely available, yet it's still fast, with a theoretical maximum speed of 438 Megabits per second (3.5 Gigabits per second). On the same network, it is not as effective at handling large groups of users, although that's more of an issue for those with more than a few users at once, especially if they are using their devices close together.

Wired home networks, on the other hand, may easily maximize network performance and are unaffected by congestion, with the only real constraints being the speed of their Ethernet cables and network interfaces. Unlike wireless networks, Ethernet cables may be routed through walls and do not suffer from signal loss.

Wired Ethernet cables are still the best option for the fastest connection; however, they are the most dependable connection. Also, they're not as portable or versatile as wireless. As a result, fixed devices such as game consoles, desktop computers, and televisions are best served by a wired home network. A Wi-Fi connection is typically the ideal solution for laptops, tablets, smartphones, and other internet-connected smart devices.

Setting Up a Home Network

It's time to set up the network now that you have all of the necessary hardware. The first step is to set up the modem that was most likely given by your Internet service provider. Turn it on and connect it to your phone line.

It is a good idea to eliminate the router functions with the help of turning the modem to bridge mode at this stage if you want to use your own router and your original modem also serves as a router. You will need to log into the admin panel to do so. The IPCONFIG command is also used in Windows' Command Prompt, or the IP address in order to know how to connect to it.

You can disable it in the Wi-Fi settings as well if your modem/router has its own Wi-Fi connection. Also, if you are not linked to your new home network with an Ethernet cable, you will lose your connection; thus, make sure you are connected to your new home network with an Ethernet cable.

Turn on your router and connect it to the modem with the help of using an Ethernet connection at this point. If a dedicated LAN port isn't available, connect it to the first Ethernet port, either 0 or 1. Then, using an Ethernet wire, connect whatever device you are using to set up the router to the new router.

In the same way that you did with your previous modem/router, log into the admin panel of the new router. It's a good idea to alter the default password if you wish to improve security; they can be easy to guess or brute-force hack. Also, change your Wi-Fi password to something more unique.

Upgrading the firmware is also a good idea to take this opportunity. The manufacturer's website has the most recent firmware available; you can download it from there. This can assist in increasing security and guarantee that the router is operating at peak performance.

You may use fixed IP addresses for devices that will stay on the network, or at the very least utilize it on a regular basis while connecting your particular devices to the router. Dynamic IP addresses (DHCP) can be used; however, they change frequently, which can be problematic for some networked devices, such as printers, and if something goes wrong, it makes troubleshooting difficult.

If you wish to manually assign an IP address, go to the device's IP address settings. This can be accessed with the help of right-clicking the network connection and selecting Properties in Windows.

If you want to use powerline or MoCA adapters, Wi-Fi extenders, or network switches in order to expand your network, do so now and configure them according to the manufacturer's instructions. Once they are set up, you will be able to start adding devices to the network with the help of using an Ethernet cable or with the of connecting them into a free Ethernet port on the router/switch to connect them to the router/switch.


Youtube For Videos Join Our Youtube Channel: Join Now

Feedback


Help Others, Please Share

facebook twitter pinterest

Learn Latest Tutorials


Preparation


Trending Technologies


B.Tech / MCA