| |

What is a Boot Menu?Boot Menu:The Boot Menu is a menu that appears when a computer boots up for the first time. It may include a variety of boot choices, including a LAN, CD, DVD, flash drive, or hard disc (network). The Boot Menu allows a user to load up new operating systems or applications, even if the computer already has an installed operating system. A boot menu is useful for installing a new operating system on a computer since the user can choose which device to use. The boot sequence, also known as boot options or boot order, specifies which devices a computer should search for the boot files for its operating system. It also details the sequence in which devices are verified. The list can be modified and rearranged in the BIOS of the machine. How to Access the Boot Menu?While the computer is loading up, the user can launch the Boot Menu by pressing one of many keyboard keys. Esc, F2, and F10 are common keys for launching the Boot Menu. Depending on the motherboard or computer's manufacturer. Generally, the starting screen of the computer specifies which key to push. A user can choose which device to launch an operating system or program from while the computer is booting using the Boot Menu. 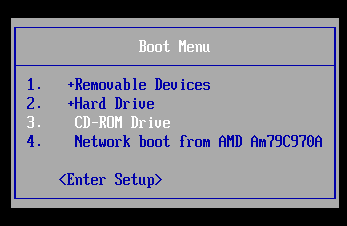
The Boot Menu's device listing order, often known as the boot sequence, can be modified as needed. The Boot Menu application: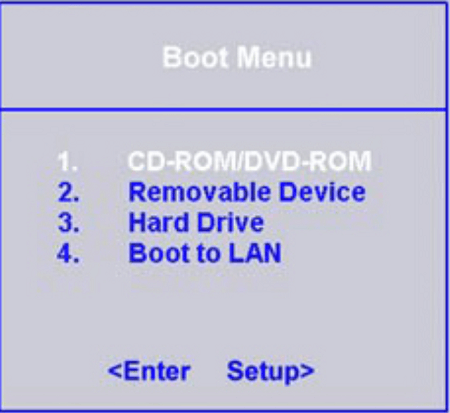
If you want to temporarily change the initial startup device without making any changes to the Setup utility settings, use the Boot Menu software. You can temporarily change the first startup device without altering the settings in the Setup utility by using the built-in, menu-driven Boot Menu application. Follow these instructions to use the Boot Menu program: Deactivate the server. Start the server again. Press F12 when the Select Boot Device prompt appears. A submenu item (USB Key/Disk) is shown if a bootable USB mass storage device is installed. Press Enter after choosing an item from the Boot Selection Menu using the Up and Down arrow keys. When the server starts up again, it goes back to startup sequence. Boot Menu versus Boot SequenceThe user can choose the boot device to use when the machine boots via a boot menu. The BIOS configuration option known as the boot sequence instructs the computer in what order to look at the available boot devices on a system. In other words, each time the computer boots, the boot sequence is performed. In other words, the boot sequence is always carried out automatically and without human input each time the machine boots. The user must press the key to enter the Boot Menu and then choose the boot option to use a Boot Menu option. Boot Options in Windows:Boot Configuration Data (BCD), a firmware-independent boot configuration and storage system, and BCDEdit, a boot option editing tool, are both part of the Windows boot loader architecture (BCDEdit.exe). During development, you can modify boot settings in BCDEdit to test, debug, and troubleshoot your driver on computers running Windows 11, Windows 10, Windows 8, Windows Server 2012, Windows 7, and Windows Server 2008. The boot loading architecture, which is intended to load Windows rapidly and securely, includes components for the Windows boot loader. It makes use of three main elements.
In this design, the system-specific boot loaders are optimized for the system that they The Windows Boot Manager is broad and does not take into account the requirements for each operating system, whereas the system-specific boot loaders in this architecture are optimized for the system that they load. When a computer has more than one boot entry and at least one of those entries is for Windows, the Windows Boot Manager starts the operating system and interacts with the user. The boot loader is loaded, the boot menu is shown, and the boot parameters are given to the boot loader. Each Windows partition contains the boot loaders. As soon as they are chosen, the boot loaders assume control of the boot process and load the operating system using the chosen boot parameters. Data for Boot Configuration:On PCs with BIOS- and EFI-based operating systems, Windows boot choices are saved in the Boot Configuration Data (BCD) store. A standard, firmware-independent boot option interface is provided by BCD. It allows Administrators to allocate privileges for controlling boot options and is more secure than prior boot option storage configurations. BCD is accessible at all times, including throughout the system setup process. 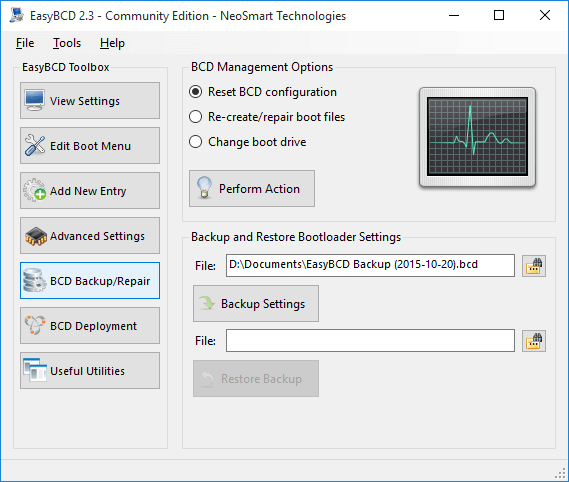
You can remotely manage BCD and when it is used when the system boots from a different media than the media on which the BCD store is saved. This capability can be utilized for debugging and troubleshooting when a BCD store needs to be restored when executing Startup Repair, through USB-based storage media, or even remotely as well. Applications linked to booting are designated by GUIDs and names like "Default" in the BCD store because of its object-and-element architecture. CD has a unique set of boot options. See BCD Boot Settings Reference for further details on these boot options. How to Modify Boot OrderTo change the BIOS boot order, adhere to these procedures. The order in which devices boot will change if the boot sequence is altered. Start or restart your computer as the first step. Watch for a notification during the POST when you turn on or restart your computer that will tell you which key to hit to activate the BIOS setup program, which is typically Del or F2. As soon as you see the message, press this key. Enter the BIOS Setup Utility in step two. You'll enter the BIOS Setup Utility after pressing the appropriate keyboard shortcut from the preceding step. Since every BIOS utility varies somewhat, yours might resemble this or might seem entirely different. No matter how they seem, they are all essentially a collection of menus with a variety of hardware options for your computer. In this BIOS, the menu options are shown horizontally at the top, the hardware options are listed in the center of the screen (in the grey area), and the instructions for navigating the BIOS and making modifications are listed at the bottom. Using the instructions provided to access your BIOS tool, look for the choice to alter the boot sequence. Changes in the sample BIOS
Steps:Step 1: Launch the BIOS setup program on your computer. Frequently, you must hit a key (or occasionally a key combination) on your keyboard as soon as your computer boots up to enter BIOS. Restart your computer and pay attention for the information displayed on the screen at the very beginning of the startup process if you're not sure which key this is. It will frequently state something like "Press some key to enter setup" somewhere in this. If you want to try again, restart your computer, and hit the setup key as soon as your machine starts loading from its internal disc. 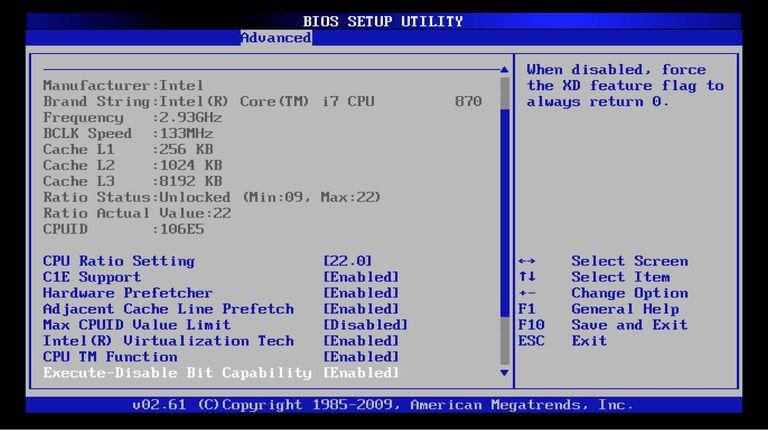
Step 2: Access the BIOS boot order menu. Find the option to change the boot sequence once you have accessed the BIOS setup program on your machine. Although each BIOS utility varies somewhat from the others, it may be found under the Boot, Boot Options, Boot Sequence, or even the Advanced Options tab. 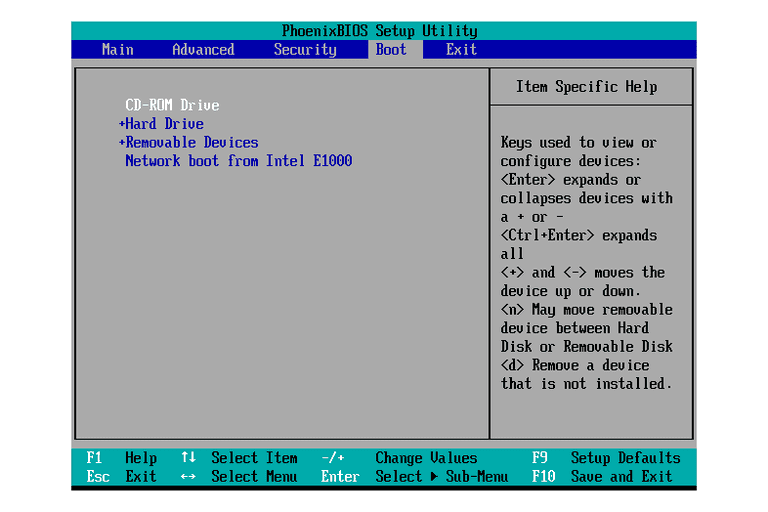
Step 3: Rearrange the boot order You'll notice a list of choices that your computer can load from once you've found the BIOS page for boot order options. The following options are commonly available on computers: Hard Drive, Optical (CD or DVD) Drive, Removable Devices (such as USB or Floppy), and Network. These options will again vary slightly between systems. A USB device or removable device should be listed first in the list. 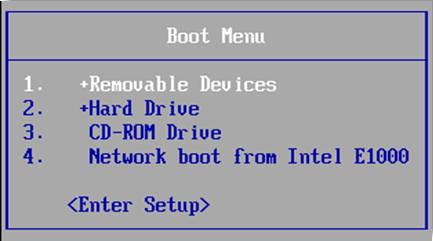
Step 4: Save your modifications. To ensure that your changes are applied, save your changes before quitting BIOS. Select the "Save Changes" or "Exit with Changes Saved" option from the Save and Exit or Exit menu (or something similar) As you exit the BIOS, you can see a confirmation notice. Make sure you thoroughly read it before selecting the appropriate button to accept the changes. Once you quit BIOS, your machine will restart itself. BOOT MENU FOR WINDOWS 8STARTUP SETTINGS:To change how Windows will start up next, choose one of the options from the list on the Windows 8 Startup Settings Boot Menu. You must be careful because once you make your choice, there is no turning back, and Windows will immediately start using that option. Each choice has a distinct functionality, as will be covered below: Enable Debugging - Only useful if a kernel debugger is connected to your machine and you wish to give it control over system execution. The majority of advanced Windows users choose this option. 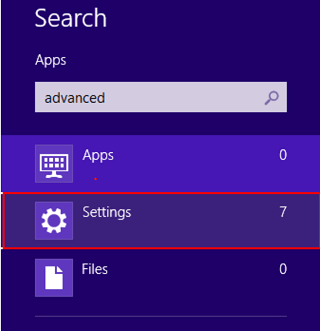
Enable boot logging: If you want to know what is happening while the computer is booting up. By selecting this option, Windows is compelled to produce a log file at the location C:WinodwsNtbtlog.txt, where you may obtain thorough information on the boot process. The log file will contain the necessary information, for instance, if a certain driver is having trouble beginning. Regularly used by intermediate to advanced users. 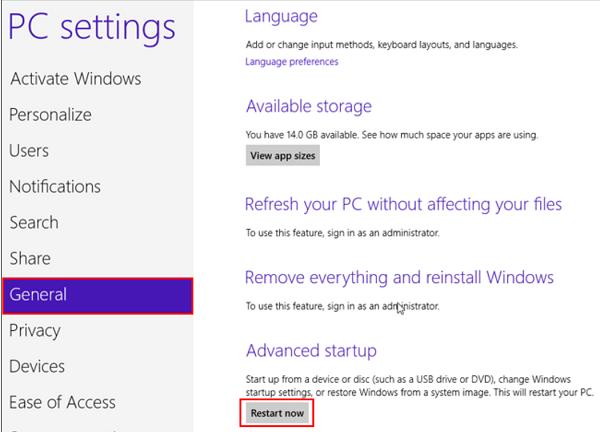
Enable low-resolution video: If your video graphics card is giving you problems and you are having issues seeing Windows. By selecting this option, Windows will be able to boot up in a low-resolution mode from which you can choose the ideal video resolution for Windows to use. 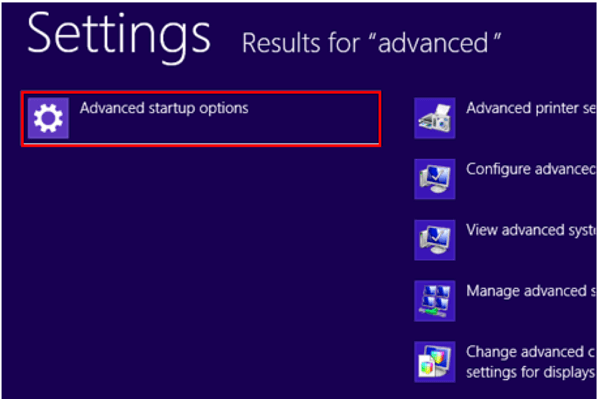
Enable Safe Mode - Useful if you want Windows to use the universal VGA.sys driver in place of the standard video card driver. With this selection, Windows will launch in a minimal mode and load just the programs that are absolutely necessary for it to function. Expect to be unable to connect to the Internet or your local network because network support is disabled in this mode. Enable Safe Mode with Networking - This mode delivers functions comparable to those of the earlier Enable Safe Mode (Option 4) and adds network functionality to enable connectivity to the local or global network. 
Enable Safe Mode with Command Prompt - When you want Windows online but simply a command prompt to type commands into rather than the typical Windows GUI desktop, enable Safe Mode with Command Prompt. Windows will only load the minimal number of programs required to execute in this mode. Windows will use the VGA.sys driver in place of the standard visual card driver. Contrast this mode, where Windows runs offline, with the Windows 8 Recovery Environment Command Prompt. 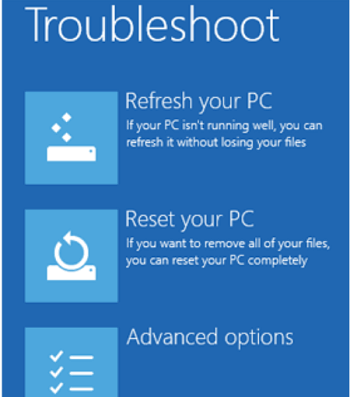
Disable driver signature enforcement- Enable unsigned drivers that require kernel privileges by disabling driver signature enforcement. Normally, Windows won't let drivers that need kernel privileges load unless it can confirm the driver's developer's digital signature. You must use this option extremely cautiously because you are removing the security precautions that would typically stop malware drivers from entering your machine. 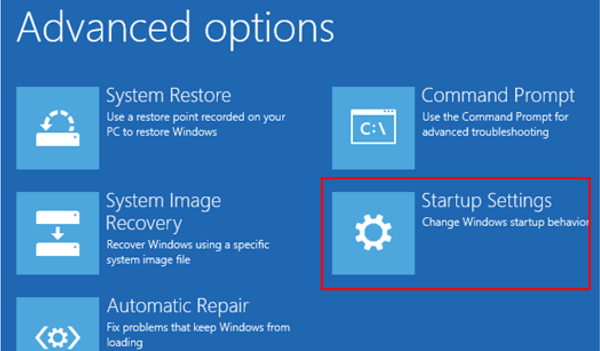
Disable early-launch anti-malware protection - Useful for avoiding driver conflicts that impede Windows startup. The licensed anti-virus can load its drivers before Windows can load any other third-party drivers thanks to a new feature in Windows 8. As a result, all drivers can be scanned with antivirus software before being loaded. The antivirus application blocks any malware if it is found. 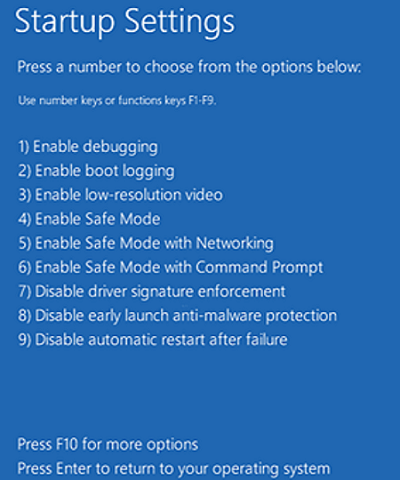
Disable automatic restart after failure - This is beneficial if Windows restarts too soon after a crash, making it difficult to study the crash information. Windows typically shows an error message following a crash before rebooting. You might not be able to see the information shown if Windows restarts quickly. With this option selected, Windows won't restart after a crash, allowing you time to review the error message and take the necessary action. Launch the recovery environment- This will have access to the instruments for recovery and diagnosis. You may access this option by pressing F10 in the Startup Settings Boot Menu. The Advanced Options Menu contains these choices. Boot Keys in HP Laptop (for reference):I'll show you the boot menus for the HP desktop and HP laptop, which are slightly different from one another. Startup Menu for HP Desktop What is the HP desktop's Start Menu settings and matching keys? System Information (F1): This displays the fundamental data about your computer, such as its maker, the product's name, its SKU number, its serial number, its BIOS revision and date, its processor type, its speed, how much memory it has, etc. (How to fix a PC that won't boot after a BIOS update?) System Diagnostics (F2) is a set of tests that examines your computer's hardware for malfunctions. Even if you cannot access the operating system, this HP Hardware Diagnostics program enables you to examine the essential PC parts. (How to resolve the error 'operating system not found'?) Boot Device Options menu (F9): You can choose from UEFI Boot Sources (such as Windows Boot Manager and the network card) and Legacy Boot Sources (such as the hard drive, USB flash drive, and CD/DVD drive) under the Boot Device Options menu (F9). BIOS Setup (F10): You can quit UEFI and enter BIOS by choosing BIOS Setup (F10). You can modify PC BIOS Settings using the BIOS Setup's five tabs. System Recovery (F11): By utilizing System Recovery, you can restore your computer to its default settings. This can assist you in resolving challenging issues like an inaccessible boot device. Network Boot (F12): As the name implies, this option enables you to start your computer from a network disc. If you need to activate the f12 boot menu key.The BIOS option can be accessed by hitting the appropriate BIOS key for your system to open the BIOS menu. When BIOS Setup starts, select [ENABLE] in the Main area for the f12 Boot Menu. Press F10 to save and leave BIOS currently. How do I access Windows' boot menu?Your computer's manufacturer or firm will determine this. If you want to start, click startup options for your computer by selecting ""how to get to boot menu,"" you may see what manufacturer your machine is by clicking on it. The keys on the boot menu are specific to machines rather than operating systems like Windows or Linux. How can I exit the boot menu?Ans. Simply press the "ESC" key on your keyboard, and if a "Yes" or "No" prompt appears, choose "Yes." How do I use the bios to boot from a USB?Ans. You only need to restart your computer and then press the boot menu key when it starts up to boot from USB. A pop-up box will now display, allowing you to choose your device before pressing the Enter key. Which key opens the boot menu?Ans. It varies from system to system and is entirely dependent on the maker of your machine. Esc, F12, F11, F10, or Del all work.
Next TopicWhat is an ATX-style connector
|
 For Videos Join Our Youtube Channel: Join Now
Feedback
- Send your Feedback to [email protected]
Help Others, Please Share


