| |

How To Connect Printer To ComputerA Printer is an essential part of a computer that allows us to print the intangible data onto a paper sheet. Generally, people go to cyber cafes for print out works. It is because they do not have a computer in their homes or are not computer users and are not knowledgeable about the technical world. If you have to Google such a question, it probably means that you are a technical person or computer user, owns a printer or has purchased one and wants to learn how to connect your printer to the computer. If you have a printer at home, it will not only save your money as well as time that you put in visiting Cybercafes. Also, sometimes at midnights, it becomes urgent to take out print outs, no cyber cafes open, so a personal printer at home is a good option. Here, we will discuss the methods through which we can connect our printer to the computer. We will see the types of printers available and also look at both wired and wireless methods of adding a printer to our computer. Types of PrintersBefore moving to the connection steps, we should briefly discuss the types of printers available at present:
Now, we will discuss the methods of connecting a printer to the computer. Connecting a Wired Printer (Local Printer) on ComputerA local printer refers to the printer that is not connected to the network. A wired printer comes with a USB port that allows connecting the printer to the USB port of the computer using a USB printer cable. The requirement is to have a USB printer cable. 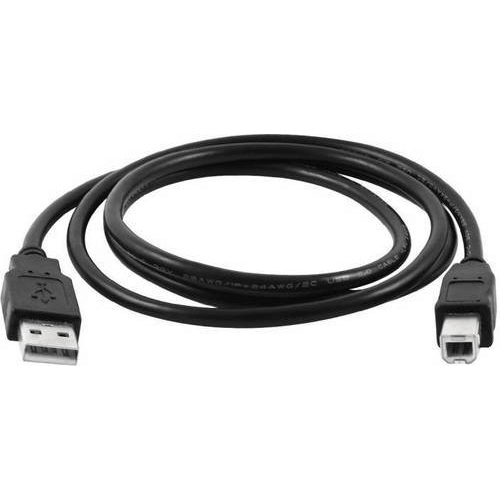
Step 1: Keep your printer near to your computer because the length of the USB cable is limited. So, the printer should not be placed at a far distance from the computer. Step 2: Now, you need to plug-in the computer and printer to the power source and then press the power button on both the devices so that both printer and computer are turned on. Step 3: Connect the printer to the computer using the USB cable. 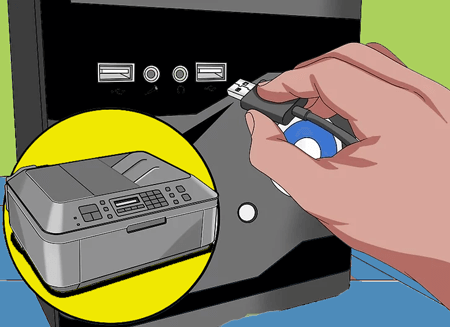
Step 4: Unlock your Windows and open Settings by pressing the 'Windows' button on the keyboard or clicking the Windows icon present on the bottom-left corner of the taskbar. A screenshot is shown below: 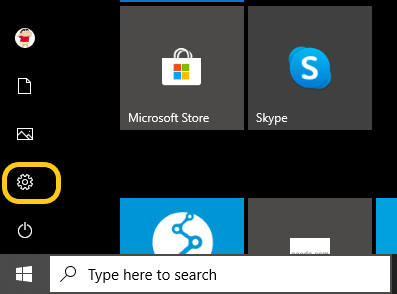
Step 5: The Windows Settings page will open, as shown in the below snapshot: 
Step 6: Click on the 'Devices' icon present under Settings. A snapshot is shown below: 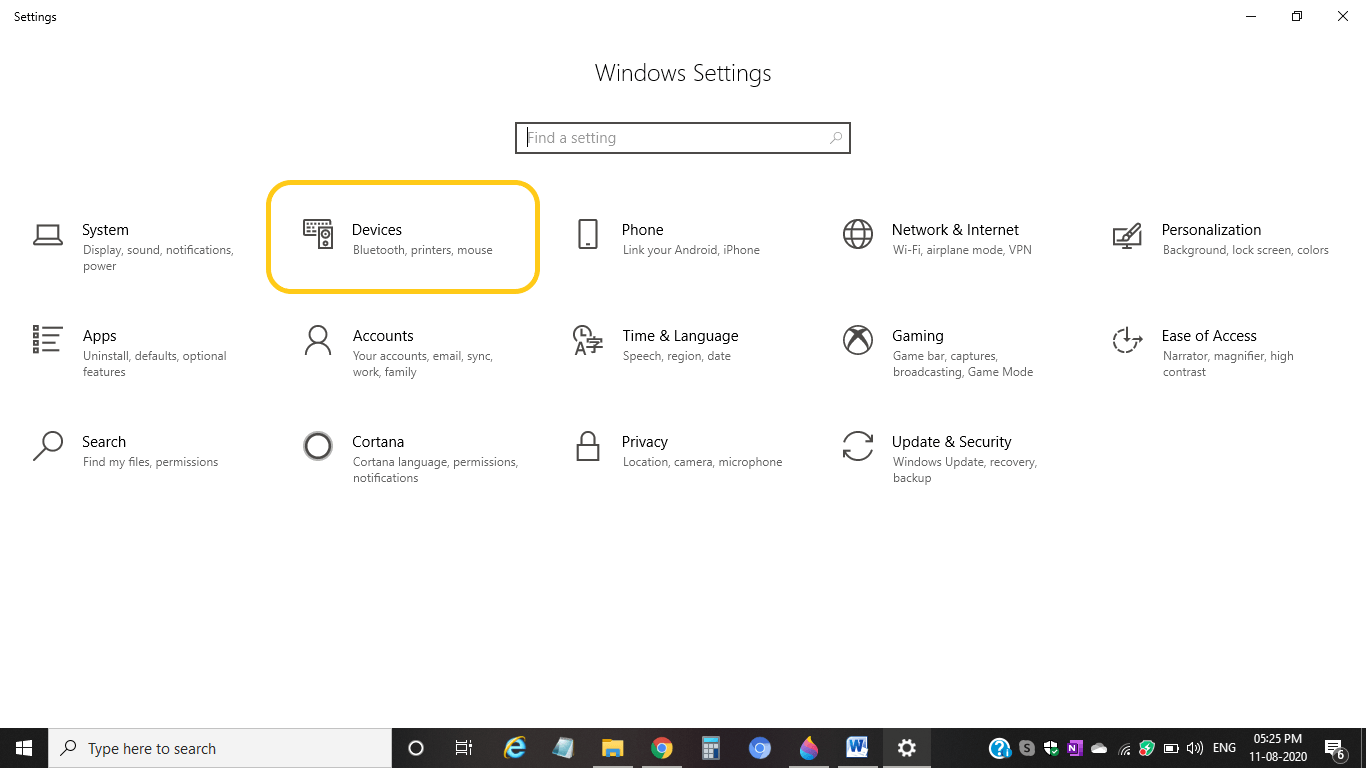
Step 7: The Devices page will open. Under the 'Printers & scanners' option, click on 'Add a printer or scanner' (+) button. It will search for the connected device, as shown in the below snapshot: 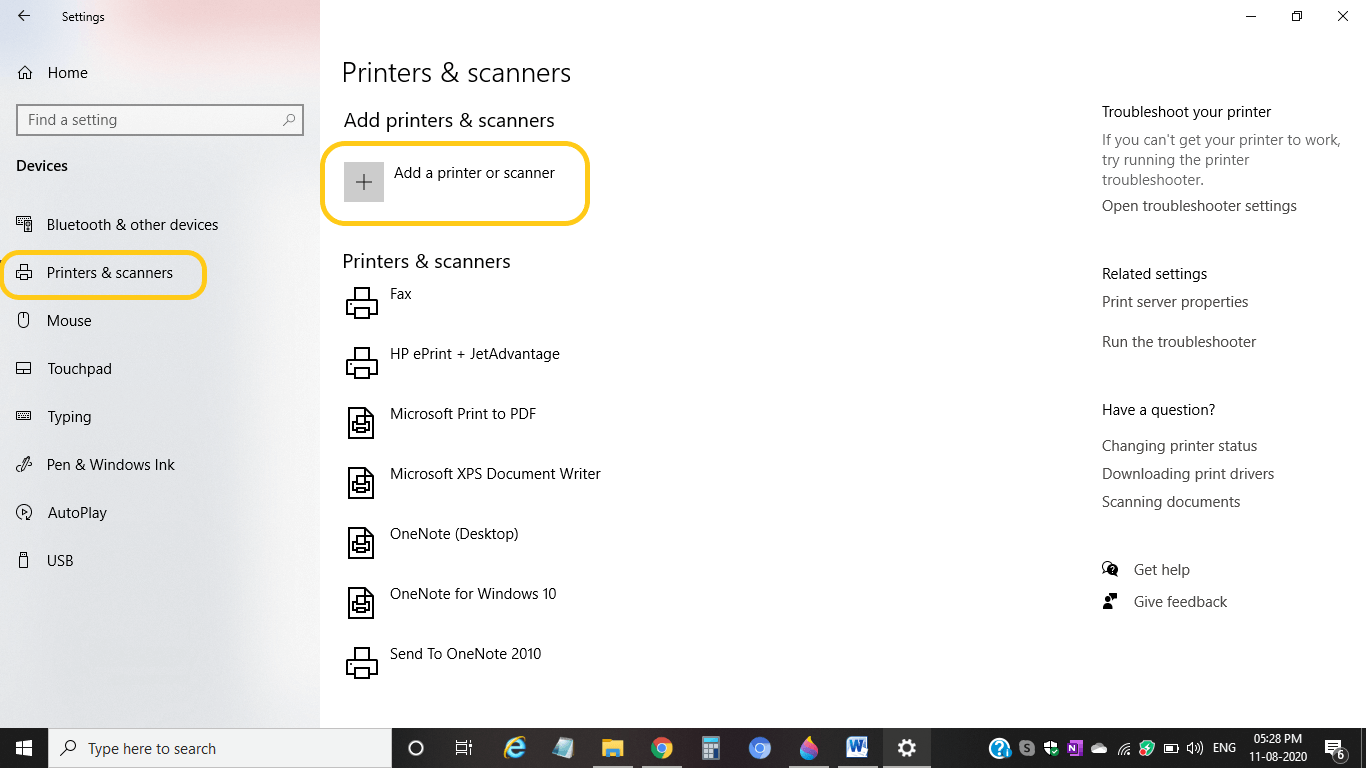
Step 8: After a successful search, the name of the printer that is connected to the computer will get displayed, click on the Add device present under the printer's name. 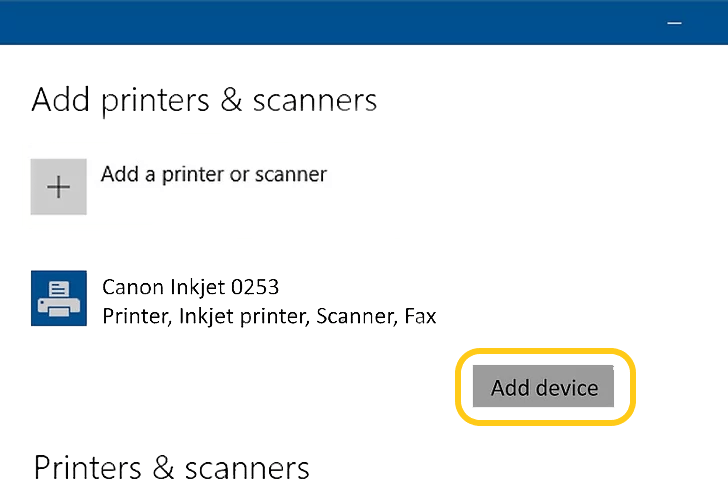
However, if you don't see the name of the attached printer below, click on "The printer that I want isn't listed" option. A snapshot is shown below: 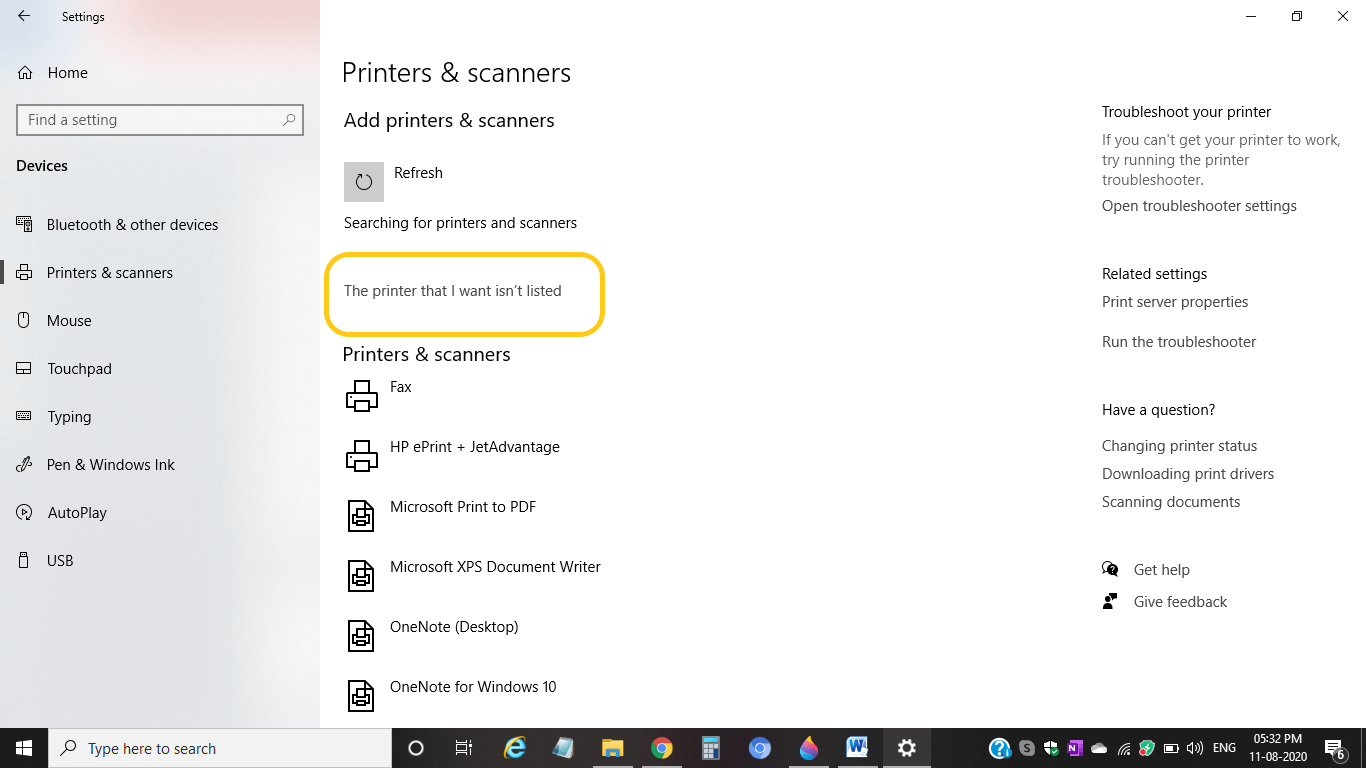
Step 9: A confirmation dialog box will open, namely 'User Account Control', that will ask for the permission. Click on 'Yes' under it, and your printer will get installed on the system, and you can use it whenever you need it. So, in this way, you can connect a wired printer with your computer system. Connecting a Wireless Printer to ComputerThe wireless printers are different from the Wired printers because the method to install a wireless printer differs as per the manufacturers. There are following network connections you can find when you connect a wireless printer to the computer:
There are following steps you need to follow in order to connect your printer to the computer: Step 1: Make the appropriate network connection according to the manufacturer of the printer and place your printer under the range of the router to get good network signals. Step 2: Turn on the power button of the printer by pressing on the power button. Before this, plug in the printer and computer to the power source. Step 3: Every printer or electronic device always carries a manual within its box. Pick out the manual you got with the printer. Read and follow each instruction to make connections in the right manner. However, if you do not possess the manual, just visit the manufacturer support site, and you can find the instructions and follow them. Step 4: Now, you need to prepare the printer for connection. For doing so, use your printer screen for setting up the Wi-Fi network. For the Wi-Fi setup, enter the network password, and the Wi-Fi setup should be the same for the computer as well as the printer. If your connection is through Bluetooth, Setup your system for Bluetooth connection. For Bluetooth setup, press the crooked Bluetooth icon present on the printer, and pair your printer with your computer system. 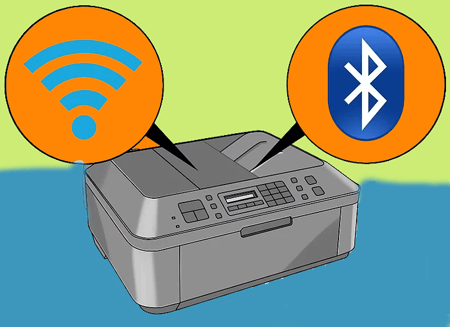
Step 5: Open 'Settings' on the Windows by directly searching on the search bar or pressing the 'Windows' button present on the bottom-left side of the taskbar. The windows settings page will open, as shown in the below snapshot: 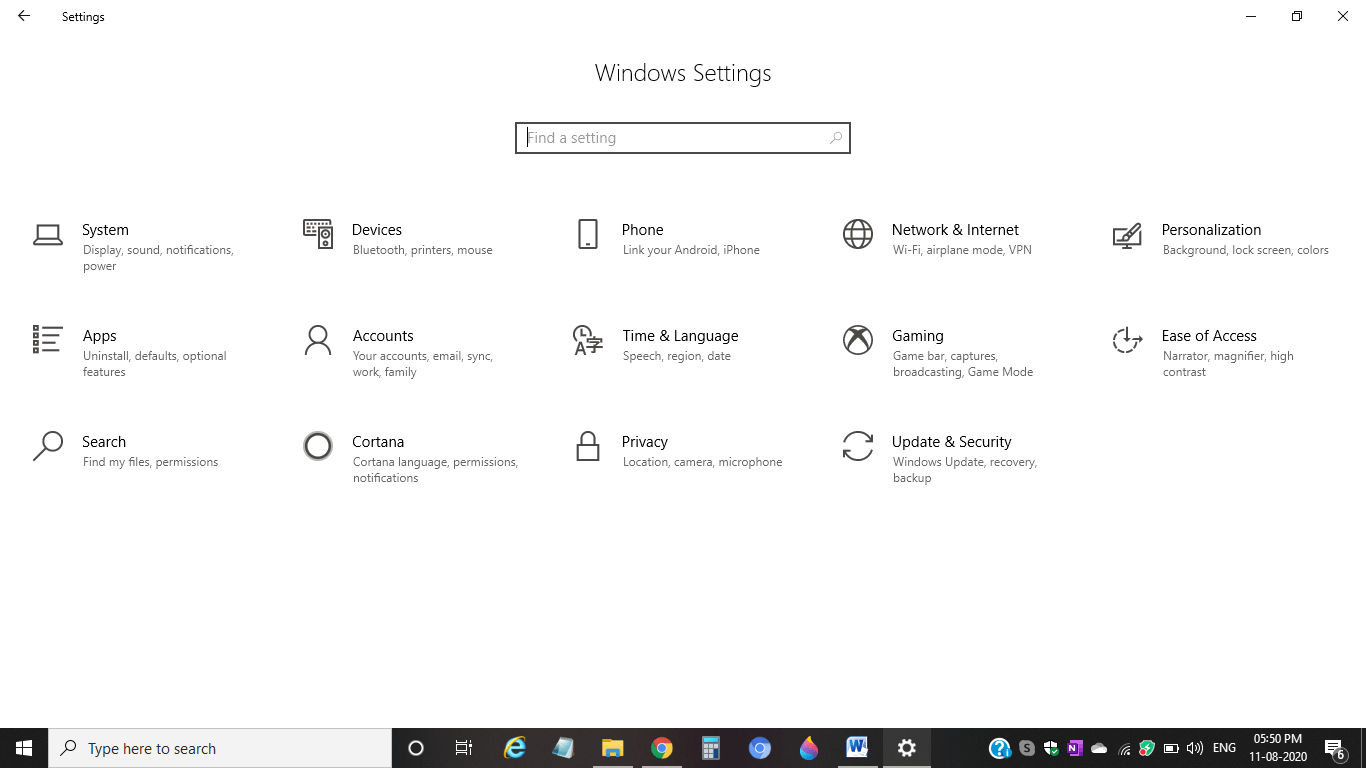
Step 6: Click on 'Devices' icon under the Settings page and the Devices Window will open as shown in the below screenshot: 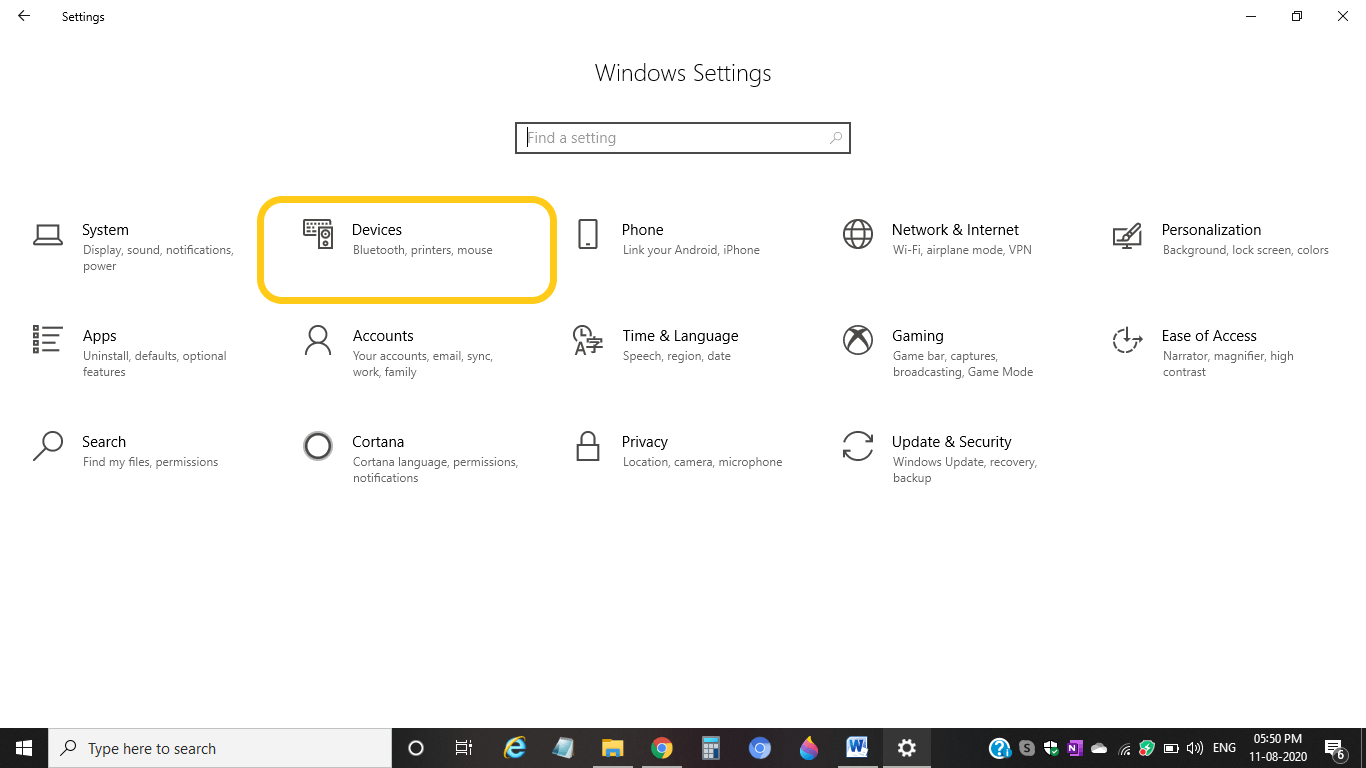
Step 7: If it is a Wi-Fi connection, click on the 'Printers & Scanners' connection option and click on the respective option by choosing it from the left menu panel (as discussed in wired connection). If it is a Bluetooth connection, choose 'Bluetooth & other devices' option from the left menu panel. For Wi-Fi Connection 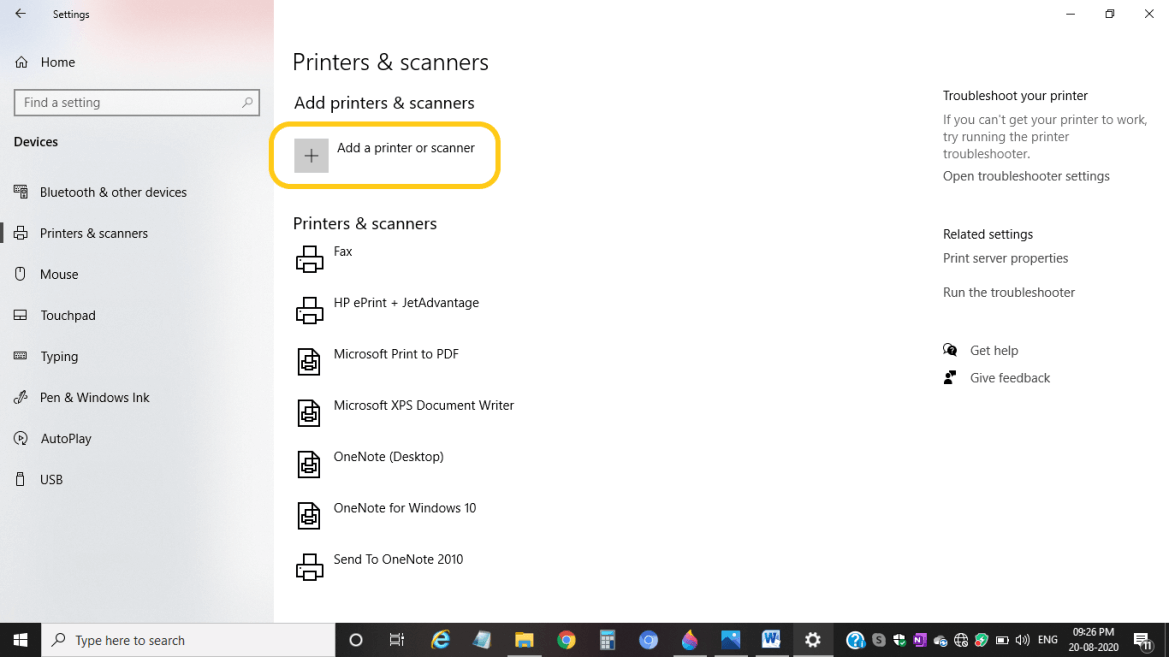
For Bluetooth Connection 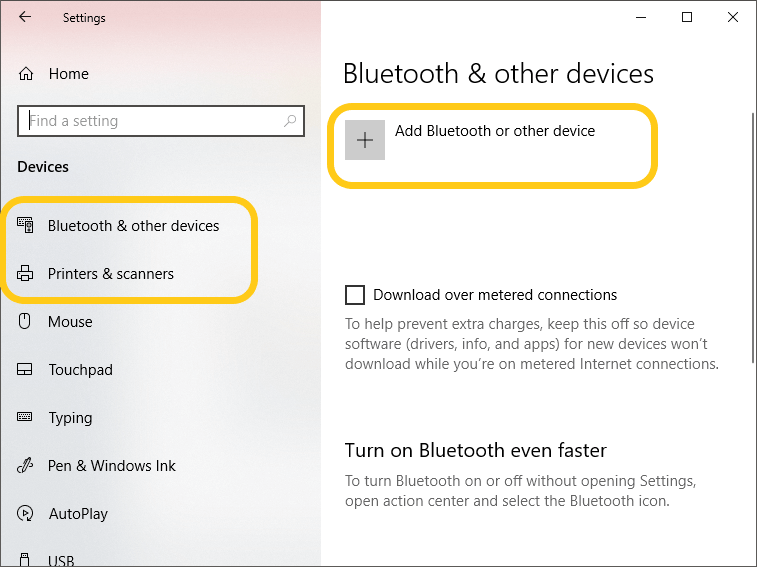
Step 8: Now, open the respective option and click on the 'Add a printer or scanner' option or 'Add Bluetooth or other devices' option, present at the top of the respective pages. If it is a Wi-Fi connection, the computer will start searching for the connected devices, and after a successful search attempt, the name of the connected printer will get displayed. If it is a Bluetooth connection, turn on the Bluetooth on the computer, and then it will search for the connected printer. Step 9: When the name of the printer gets displayed in the list, click on 'Add device' under the name, and the printer will get connected to the computer. 
Connecting Shared Printer on a NetworkA shared printer is required when we want to print pages from more than one computer or device. For such a task, we use a shared printer by setting up sharing settings in the system for the computer. There are following steps you need to follow to share a printer on a network: Step 1: Install the printer on the computer you want to share by making a wireless connection or wired connection (as we have discussed above). Step 2: Open 'Settings' on Windows either by searching on the search bar or pressing the Windows icon and selecting 'Settings' option from it. Step 3: The Windows settings page will open and click on the 'Network & Internet' icon, as shown in the below snapshot: 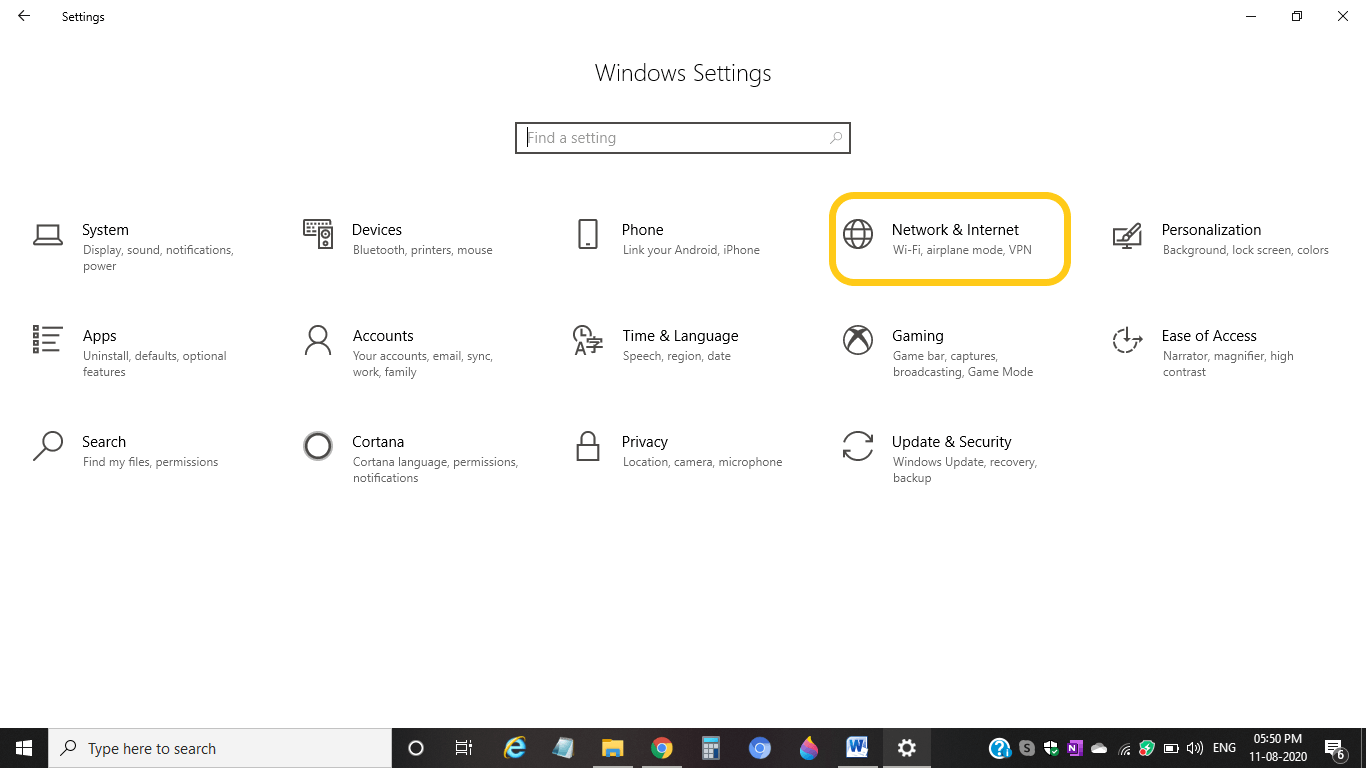
Step 4: Now, the 'Network & Internet' settings page will open, click on 'Status' from the left menu panel, as shown in the below snapshot: 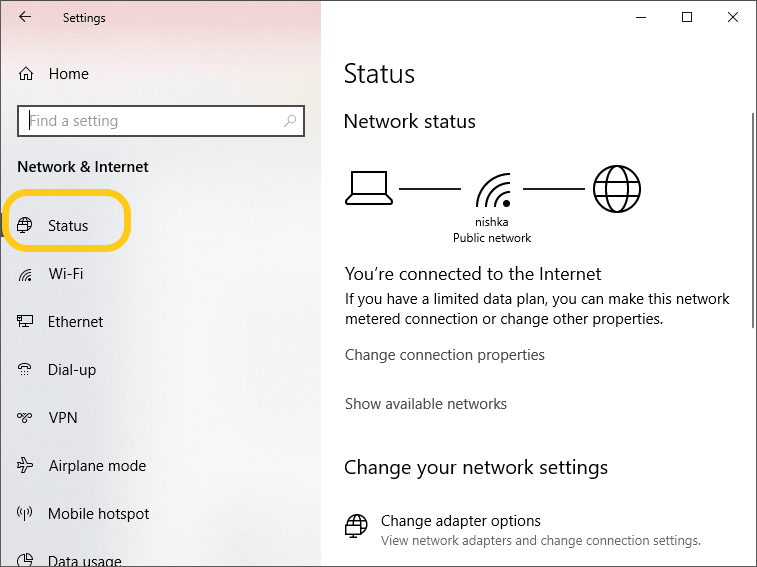
Step 5: Under 'Change your network' settings, click on 'Sharing' options. It will enable to decide what you want to share. A screenshot is shown below: 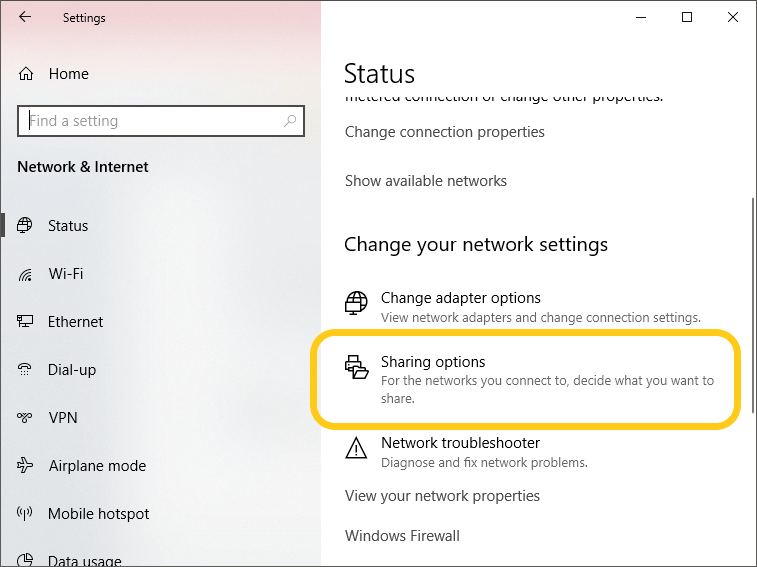
Step 6: The 'Sharing' options window will open in which click on the 'Expand (^)' button present on the right side of 'Private' as shown below: 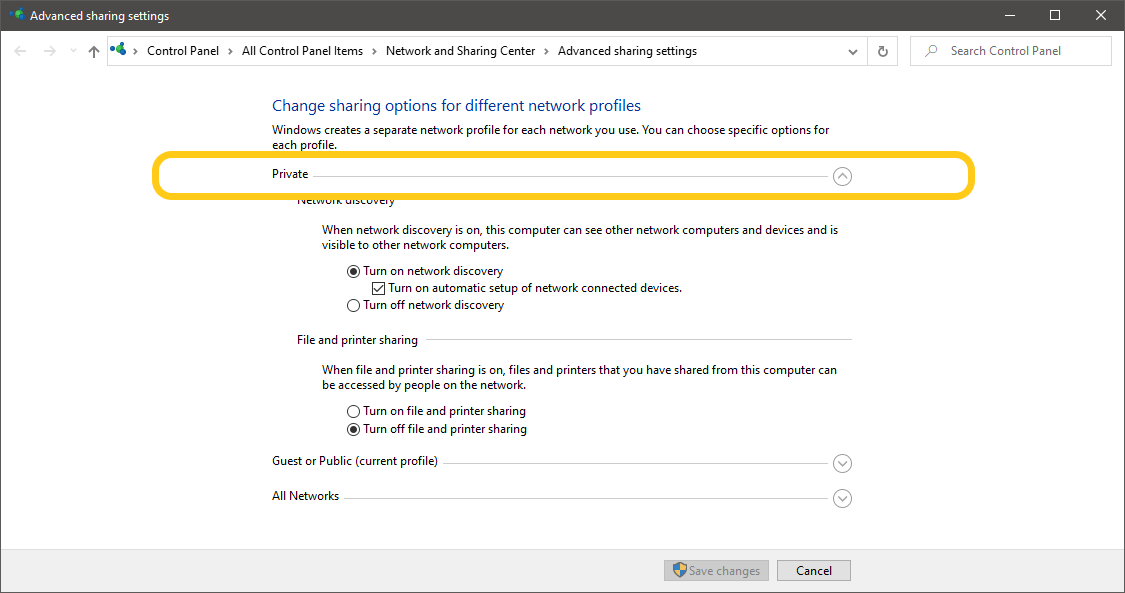
Step 7: Under 'File and printer sharing', check the 'Turn on file and printer sharing' checkbox option to enable the sharing of printer and file over the network, as shown below: 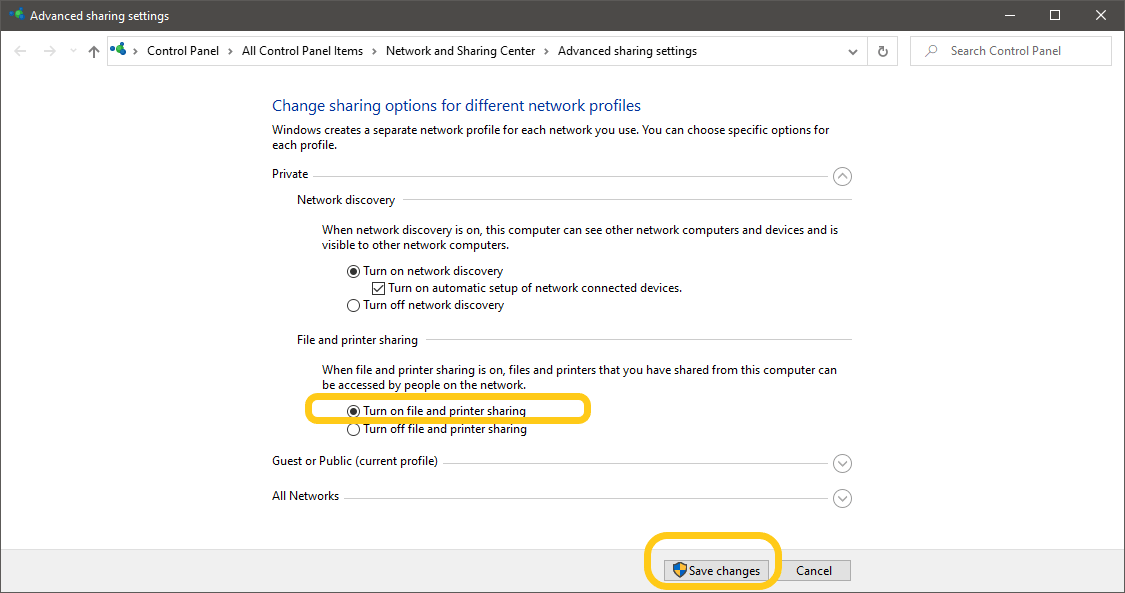
Step 8: Now, connect to the shared printer by clicking on 'Add device' under the shareable printer name. Note: Make sure that the computer that is sharing the printer has enabled the connection or not.So, these are the possible methods through which one can connect a printer to a computer system.
Next TopicWhat is Computer Programming
|


 For Videos Join Our Youtube Channel: Join Now
Feedback
- Send your Feedback to [email protected]
Help Others, Please Share


