| |

How to install a computer motherboardIt is not easy work to install a motherboard into a computer system. The installation process of motherboard is difficult. This page contains all the information and general steps on how to install a motherboard. Also, please refer to the manual and configuration guide that comes with the motherboard for specific installation and setup instructions. 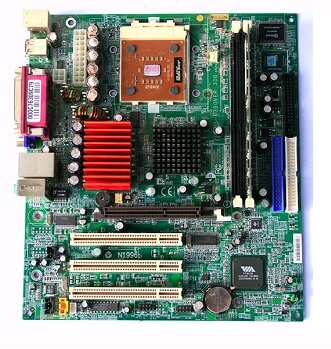
Note: If you are thinking about replacing an existing motherboard in your computer system with a new one, you are required to remove your old motherboard first. You can also use these steps in order to remove the old motherboard by following all steps in reverse order.Prepare your ToolsMake sure you have all of the essential equipment before installing the motherboard or any other PC component. A long-head screwdriver with a magnetic tip is needed in this circumstance for quickly screwing and unscrewing the system as well. You must have a pair of needle-nose pliers on hand when you are required to fish out any screws that have dropped on the PC casing. Wear anti-static wristbands and other safety clothing when completing an installation as well. Ascertain that you have adequate lighting before beginning to place a component on a non-conductive surface. When you are doing the installation, it will prove to be very useful if you have the motherboard manual handy and you have any concerns concerning the board. Before getting started
Form factorBefore installing a motherboard, double-check that the form factor of your motherboard is supported by the case. In today's world, the majority of computer motherboards are ATX or microATX. Verify and set jumpersBefore installing the computer motherboard, double-check that all of the jumpers and dip switches are in working order. The jumpers and dip switches on the motherboard can be changed once it is installed. When the motherboard is removed from the shell, however, it is necessary to inspect them. 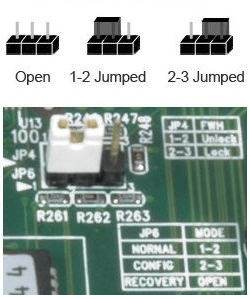
In today's fast-paced corporate world, jumpers on motherboards are set to auto, which allows the BIOS or software to set the right CPU and memory settings. Therefore, make sure the jumpers are set to auto if your motherboard supports this capability. Ensure that you are using appropriate settings if you want to modify your peripherals' settings manually. Although a system can be overlocked, we suggest that you use the system's auto or real values first to make sure that it functions properly before tinkering with its settings. Install pegs or standoffsIf you found that the pegs or standoffs are missing from the chassis after testing the jumpers, you need to insert these attachments now. In order to avoid the motherboard from shorting out, these attachments must be installed before the motherboard is installed. Before installing the pegs or standoffs, you need to make sure that you are inserting them into the correct holes. Different kind of motherboard form factors are supported by many cases, and if they are not installed properly, there are high chances the motherboard may be damaged. The holes available on the cases give a small hint of what they are used for. For case, the words ATX may be written next to a hole to indicate that it is for an ATX motherboard. 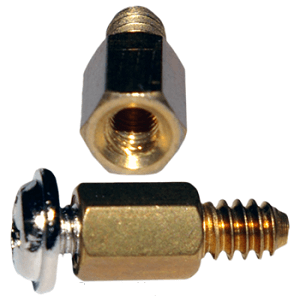
Make sure the standoffs are securely placed into the case when you are installing them. When unscrewing the screw from the peg, this helps to prevent complications like the pegs falling free. Motherboard installationNow, it is time to install the motherboard when you have successfully installed the standoffs and I/O plate. When you are doing this, make sure the rear of the motherboard is aligned with the backside of the case. Then, while the motherboards are being installed, you must line the holes in the motherboards with the pegs or standoffs; once you have done so, screw the screws that should go into the peg or standoff that you placed earlier into the motherboard. Note: Make sure you are not screwing too much tight when you are screwing in the screw because the motherboard can be broken if it is overtightened. The motherboard should, however, be held in place by the screw.Install essential componentsInstall the following components into the computer if your system has no already them.
Front panel setupThe Fpanel (short for front panel connections) must be connected when you have successfully inserted the motherboard physically into the computer. The hard drive light, power button power light, and reset button, are all controlled by this panel. Unfortunately, even with the motherboard manufacturer's instructions, the setting of this panel can be complicated at first. Steps, further information, and assistance with attaching the cables to this connector are listed below.
Connect cablesWhen you have successfully connected the front panel cables, connect the other wires in the order listed below: 1. From the power supply, you need to connect the main motherboard ATX style power wire to the motherboard. Note: Always connect the cables carefully in the correct direction and never pull on them. Your motherboard can be destroyed if it is not connected in the right direction. In modern times, the power supply connector on ATX and other motherboard form factors is keyed, which allows the cable to connect in only one way.2. Now, you are required to attach the floppy drive, CD drive, and hard drive to the motherboard by using IDE/EIDE, SATA, or SCSI cables. 3. In the computer, connect each of the computer's drives to the Molex power cables from the power source. CMOS setupWhen you have completely installed the motherboard and connected it to the computer, now, you need to attach the monitor, keyboard, and power to the computer system. If you are facing any kind of problems and need to unplug all of the cords again, do not connect all of the cables yet. Then, enter CMOS setup; when your computer has booted up successfully, set all of the values that are not automatically recognized. The following values are given below that should be checked or set.
Now, you are ready to start the computer, if you have saved the settings after everything has been recognized and set up and exit the CMOS setup. Turn on your computer system.
Next TopicHow to tell how hot my CPU is running
|
 For Videos Join Our Youtube Channel: Join Now
Feedback
- Send your Feedback to [email protected]
Help Others, Please Share


