What is Windows Minidump Mean?Every time the Windows operating system suddenly experiences a problem, such as during a "blue screen of death" (BSoD) crashes, a little file called a "Windows minidump" is created. Information on the error's nature is contained in the file, including details about how the system was functioning just before and potentially during the crash. It includes details about the processes and services that are active, together with the resources that are being utilized by each. 
A Windows minidump is a file made to assist a user in determining the causes of a crash, specifically one involving the Windows operating system. For the purpose of identifying the issue, it comprises extensive information about the System just before and during the crash. The minidump file contains details on the programs and applications executing, the resources used, and the processor state. The amount of information in a minidump may not be as extensive as that in a full crash dump file, but it usually is enough to aid in a rapid problem diagnosis. Minidumps with other types of information can also be produced by other apps. The debugger program must have access to the binaries and symbol files in order to read a minidump file. Specifically, in Windows 2000 and XP, a minidump debugger called dumpchk is preinstalled. The Windows minidump file can be located under the Windows system folder's "minidump" subdirectory, for example, at "C: Windows minidump", and it resembles something like this: Mini030915-01.dmp. The month is represented by the first two numbers ("03"), the day by the second ("09"), and the year by the third ("15"). If more than one minidump file was created on the same day, the "-01" represents the number of those files. The steps for seeing the Windows minidumpThe dumpchk utility is available with Windows 2000 and Windows XP support tools, and it can be used to read Windows minidump files. Detailed information is available in our dumpchk command reference. 
Microsoft Windows minidump settings customizationThe steps listed below can be used to modify how Windows processes and generates the minidump.
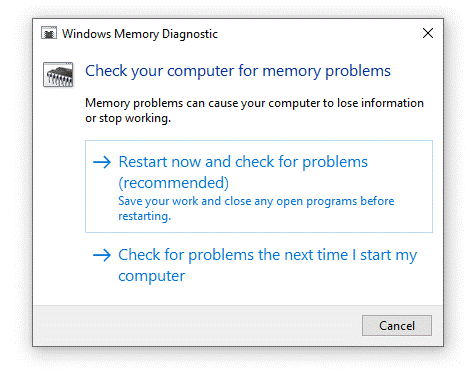
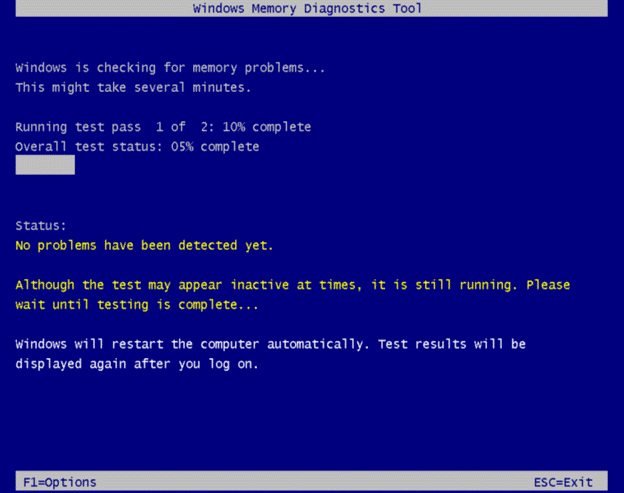
How to Interpret the Minidump and Discover the Root of Your Blue Screen of DeathOnce the minidump is set up, you'll need to get a program that can read the file and give you meaningful information. For performing this, the program BlueScreenView is suggested. Visit the official website to get BlueScreenView, choosing between the 32-bit and 64-bit versions of the program. The tool must be extracted to a location after downloading in order to be used. Double-click the "BlueScreenView" icon to launch the tool after it has been extracted to a directory. Following that, BlueScreenView will examine the current logs that have been created as well as the default minidump location.You should be aware of the dates linked with the logs if you've had a lot of problems or if you haven't deleted earlier minidump files. What if a hardware error is visible in the Minidump file?In contrast to BSODs caused by hardware failure, driver problems are typically simple to resolve. Error FAULTY HARDWARE CORRUPTED PAGE is a prime example of minidump. In this case, you would still utilize a program like BlueSceenWindow to identify the source of the issue. However, there isn't a magic fix for a hardware fault when it occurs. For the purposes of this particular problem, we'll pretend that a RAM module that was installed was to blame. We'd have to test the memory to determine if this is the real issue. There are various methods for doing this, including utilizing an application or a hardware memory checker. We'll use the application way as the majority of folks don't have access to a physical memory checker. Fortunately, Microsoft has a RAM diagnostics tool that has been available since Windows 7 that can help. Open a run prompt and type "matched" to utilize this. When your system is turned on, you can select between restarting your computer right away or checking for issues. The first choice will cause Windows to shut down, so make sure to save your work. The memory checker will load and begin examining your memory once your computer has restarted. The length of time it takes will depend on how much memory you have installed. A progress meter and a general status are both visible while the test is running. The status section's presentation will include any errors that might be made. The memory test will boot into Windows when it is done. If there are none, you can infer that your memory is not the issue.
Next TopicWhat does Momentum Cache
|
 For Videos Join Our Youtube Channel: Join Now
Feedback
- Send your Feedback to [email protected]
Help Others, Please Share


